
upload photo | donate | calendar
|
my profile |
register |
faq |
search upload photo | donate | calendar |
 07-12-2007, 02:48 PM
|
#1 |
|
User

Join Date: Jul 2007
Location: Italy
Posts: 22
Thanks: 0
Thanked 1 Time in 1 Post
|
I was asked by the forum members DaveinTN and Dwight Gruber some information about my photos. Given the fact that you guys really provided me with a lot of education on the marvelous P08, I think it's my time to share with you my tricks.
Among all these German ladies let's take a picture of a muddy Italian boyâ?¦.. To begin with this is a look of Paolo.Orange Photo Studiosâ?¦ehmm, my kitchen.  Yes, there is no black magic, nor Star Wars equipment here. So we have: - the muddy boy, Beretta 9 mm (no jam since out of the box in 1993) - some rounds - some mud from my off-road motorbike (????) - a tripod - a digital camera good for 3 or 4 mega JPG - a large sheet of paper, green, red, blue or while as you want. - Minimum knowledge of Abobe Photoshop tools (Eraser, Magic Wand, Smudge, Layer) - a couple of beers. Fist of all put all the stuff on the paper sheet. The use of a homogeneous background will be later very useful to "eliminate" that from the photo itself. This technique comes from Hollywood action movies where the scene is take on a contracting background what is then electronically removed and replaced by something else (Mission Impossible, Matrixâ?¦)  I use green paper for colorful object and gray or white for "black" items. Both work fine, it's up to you trying and seeing what you find easier to handle. Now it's time to shot. I usually take 10 shots, a little bit over exposed, with a relatively wide objective (28 mm, or 35mm). I find that this kind of focal length distorts a little bit the gun and makes the photo more attractive. At the end of the day we don't want somebody to say "huu, just another M9"! I've picked up this one that doesn't look that badâ?¦.  â?¦..ooops I forget the beer! It's doesnâ??t matter. .........
__________________
Grace under fire, business as usual. |

|

|
|
07-12-2007, 02:52 PM
|
#2 |
|
User
Join Date: Jul 2007
Location: Italy
Posts: 22
Thanks: 0
Thanked 1 Time in 1 Post
|
......
Let's go to the PC and let's cancel the bottle first. This is very easy, just use ERASER  Now with the MAGIC WAND select white background and cancel that too. The trick here is to select the proper tolerance in order to select the greatest part or the white background without removing any clear area of the gun. It's a back a forth process that you will to master quickly.  This is the right time to correct color, contrast and saturation. They really depend by the way our own eyes see the screen and it's difficult for me suggesting the right strategy. Generally speaking: - more contrast means a better definition of detail - our guns are not really colorful so color management is always simple The big problem with MAGIC WAND is that it mathematically generates a very sharp edge of the object. This makes the photo looking "fake". The best I could suggest is to use the tool SMUDGE to make the edge "soft". This is a super boring step, but it's a rewarding one! There is an enlarged area of the trigger area where you can see the effect of SMUDGE on the right.  It's time now to generate a new layer that you fill in pure white and that will be the new background.  Shot at 2007-07-12 I like to put in my photo a kind of signature. I use my avatar, and this is how it originally looks.  The following step is to generate another new layer where we can put the logo.  Now we have the subject flying in a milky space that look "flat", we definitely need something suggesting that this is a 3D environment. Let's use the logo like it was printed on a "virtual" ground.  Use the tool LAYER/SHADOW to generate logo shadow Now carefully check the "consistency" of the photo. Mud strains should look OVER the logo, the shadow beamed by the gun and the logo should be pointed toward the same direction. To make thing more realistic cancel a little bit of the mud stains so that you can see the text through them. ......
__________________
Grace under fire, business as usual. |
|
|
|
| The following member says Thank You to paolo.orange for your post: |
|
07-12-2007, 02:54 PM
|
#3 |
|
User
Join Date: Jul 2007
Location: Italy
Posts: 22
Thanks: 0
Thanked 1 Time in 1 Post
|
......
Looking now at the result, I find that it's a little bit too bright and that there is nothing making the photo "deeper". Let's try with PAINTBRUSH to add a little bit of gray in the foreground..this is the final result.  Beautiful Beretta! Just like when we were in the Army! I hope that you found something interestingâ?¦.wow the most complicated thing has been writing in English! Sorry for the typos! â?¦and now let me go to clean my trusty Beretta. Ciao Paolo
__________________
Grace under fire, business as usual. |
|
|
|
|
07-12-2007, 03:18 PM
|
#4 |
|
FIREARM HISTORIAN AND AUT

Join Date: Jun 2002
Location: Belgium
Posts: 1,535
Thanks: 106
Thanked 350 Times in 129 Posts
|
Simply beautiful!!!
Thanks for sharing your knowledge. Cheers, Mauro
__________________
Mauro Baudino - www.lugerlp08.com www.paul-mauser-archive.com Mauser Company and Firearm Historian - Mauser Parabellum Certification Service. |
|
|
|
|
07-12-2007, 03:22 PM
|
#5 |
|
Moderator
Lifetime Forum Patron 
Join Date: Jun 2002
Location: Arizona/Colorado
Posts: 7,775
Thanks: 4,995
Thanked 3,134 Times in 1,439 Posts
|
Paolo, A very interesting photographic seminar! Thank you...Jerry Burney
__________________
Jerry Burney 11491 S. Guadalupe Drive Yuma AZ 85367-6182 lugerholsterrepair@earthlink.net 928 342-7583 (CO & AZ) Year Round 719 207-3331 (cell) 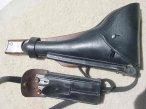 "For those who Fight For It, Life has a flavor the protected will never know." |
|
|
|
|
07-12-2007, 04:47 PM
|
#6 |
|
User
Join Date: Jun 2002
Location: Portland, Oregon
Posts: 3,908
Thanks: 0
Thanked 1,330 Times in 435 Posts
|
Paolo,
Excellent work, and a clear explanation. Your knowledge and understanding of the full Photoshop program serves you very well. Thanks very much for taking the time and going to the effort. A couple of further questions: What is the light source for your photograph? When you use a color background, what is your method for rermoving the color which inevitably becomes reflected in the object? --Dwight |
|
|
|
|
07-12-2007, 06:35 PM
|
#7 |
|
User
Join Date: Nov 2004
Location: The Edge of Texas
Posts: 514
Thanks: 0
Thanked 0 Times in 0 Posts
|
Beautiful work and thanks for the lesson. I'm eagerly awaiting the elaboration Dwight wants.
|
|
|
|
|
07-12-2007, 08:07 PM
|
#8 |
|
Super Moderator
Eternal Lifer LugerForum Patron 
Join Date: Jun 2002
Location: North of Spokane, WA
Posts: 15,980
Thanks: 2,079
Thanked 4,614 Times in 2,127 Posts
|
well done, I have made this a sticky, thanks much,
nice Beretta, I carried a 92 for about a third of my army career Ed |
|
|
|
|
07-13-2007, 09:18 AM
|
#9 |
|
User

Join Date: May 2004
Posts: 1,538
Thanks: 18
Thanked 36 Times in 21 Posts
|
Great initiative paolo.orange! Thanks for posting that. Very interesting
 I'm also into photography, but only on hobby basis. I find it just as cost draining as Luger collecting, with the endless amount of accessories available.. Since Iâ??m mostly into shooting nature scenery, so I wanted to use what I already have to make setup for this. So here is my shot at a poor mans macro lens; *Digital DSL camera (I prefer a DSL when shooting makro, not because of the quality/resolution, but for an easier access to manual adjustments, as depth, sharpness and shuttertime.. *â??wide angleâ?? lens, in my setup, I used the low cost Canon 17-55mm that came with my camera *Canon 50mm f1.4 USM lens, this could be any lens. But I would look for a f1.4 to catch as much light as possible, preferable in the 50mm area. (Perhaps look for an a used one with the proper diameter, since it does not need to have auto focus) *Macro coupler ring, there is no brand on mine. I bought it cheap from China trough Ebay. The ring is mounted outside the lens and allows you to screw on a second lens, in my case the 50mm, opposite way on the 17-55mm. Head to head. This ring came with a wide angle â??lensâ?? to screw on any lens with the proper diamenter. But the distortion was terrible, therefore I would recommend to find just the ring instead the â??wide angle kitâ??. *Tripod, the small ones are often crappy (but cheap). I super glued mine so that it can only be adjusted up-down. It made it more stabile. *2xteleconverter. Mine is not, but you can find these also cheap trough Ebay. Autofocus usually donâ??t work anyway.. This is a ring mounted between the camera and lens, witch makes a 17-55 into a 34-110mm *light source. Strong lamp, external flash (if flash, set it low!), sunlight.. whatever you have. You will probably want to adjust the light angle, so make sure your setup is adjustable that way. (*you could also add a close up filter, I donâ??t have any yet, so I donâ??t have much experience with them. Basically because I like to have the object further away from the lens, but for those of you who want to take picture of unit marks or a stamping, it would be a good alternative. I have heard that if using several at the same time, the strongest shall be placed closest to the lens. But keep in mind that itâ??s best to have as little glass as possible, no matter how good the quality may be. Hama and Hoya have some of these) The setup; 1.Install the tripod, screw on the teleconverter, then the zoom lens, macro coupler ring and then the 50mm lens 'wrong way' on. 2.Find a place with good lightning, close to a window and an adjustable light/flash on the other side can be sufficient. To to have an equal light on the object, you can send the light trough light fabric or like I did, a white plastic lid. 3.Then find the background you would like to have, gray can be nice. On the picture below, I used a paper cover because of the pattern found on it. Thought that would help the background look more diffuse. Place it in the right distance from lens, you can use books or whatever you like. 4.Look trough the viewfinder and adjust both distance, angle to object and light angle until you are happy with it. Look at the shadows, make them as good as possible. If trouble with reflection somehow, you can use a polar filter to eliminate it. (You will find it in your photobag, if not, you should find it in any shop that sells DLS's. Very neat thing to have.. ) Taking the picture; 1.Set the camera to Av (Aperture priority) 2.Use a high diaphragm, like F8 3.Zoom in on the object 4.If â??as close as possibleâ??, lock the focus to as close at it gets, then move the camera away from object until it gets clear and then starting to get unclear again. Then adjust the focus until it is perfectly clear. If not using a tripod, adjust only by moving the camera. 5.If you have a lot of light, set the ISO down towards 200. 6.Then start taking pictures with various shutter time. If you have a remote, ir or cord, thatâ??s a good thing to have. Since we now have digital cameras, you can take many pictures. Start with long or short shutter time and go step by step down or up. If you take it in a increasing/decreasing order like that, itâ??s much easier to find the best picture once you get it on your computer. 7.Then you can play a little with it in Photoshop, Pain Shop Pro or a similar program. I usually end up playing with all the effects until I realize that simple is often the best. Hue, saturation, brightness and contrast + cutting it to a proper size and resize it down reasonable size, without loosing too much quality. 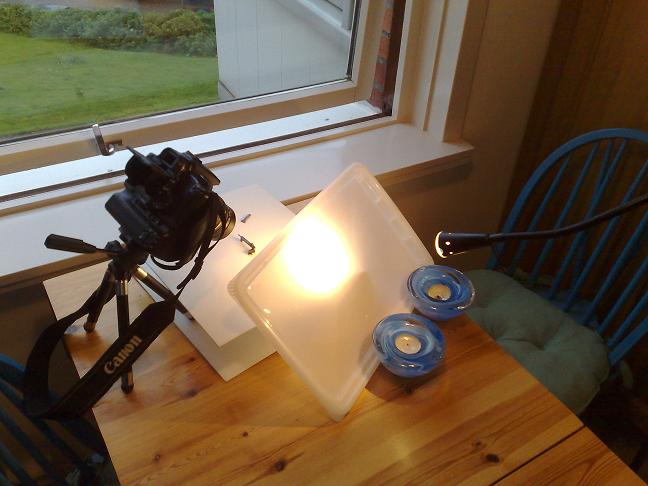
__________________
Previously known as Morgan Kane |
|
|
|
|
07-15-2007, 12:23 PM
|
#10 |
|
User
Join Date: Jul 2007
Location: Italy
Posts: 22
Thanks: 0
Thanked 1 Time in 1 Post
|
Dwight, the light I use the most is ISS (Italian Summer Sun
) sometime with the help of the flash. I do not like artificial light even if you probably have more control with that.Managing undesired reflex from the background is probably the most complicated post processing activity and not even a super powerful tool like Photoshop can easily do that.. On the other hand, I find that the surface treatment of our toys, that is intended also to avoid reflex, makes its job pretty well so itâ??s not really likely to have the problem. The only strategy I can suggest is just to avoid reflex on the frame picking up the proper light source and origin. Nevertheless sometime it happensâ?¦ Here I took a shot of a pretty radical situation, 2 chrome plated Meg-Gar magazines over a strip of distress orange paper. Iâ??m sure that itâ??s not the typical photo we takeâ?¦.  Anyway here are the 3 types of reflex that could happen to your photos. The first is the relatively large area on the second magazine. There is almost nothing to with this, itâ??s too wide and itâ??s definitely better to shot another picture with a better control of the light. The second reflex in on the edge of the front magazine and is a pretty easy one. The best Photoshop tool is CLONE STAMP. Select the proper brush size and opacity and it will be a piece of cake. For the little orange reflex on the middle rib of the magazine, we can try a technique that looks pretty brutal but works. Just copy a portion of the mag close to reflex and paste that over it. Do not worry if the edges of the copied are look evident like this,  just use again Clone Stamp to smooth them. This is the final results, but as I said nothing is better then a good â??baseâ? photo.  Hope you found sonthing useful. Paolo P.S.: Morgan, with all that magnificent equipment we want now to see a photo of your P08 â?¦on Jennifer Lopez belly!!! 
__________________
Grace under fire, business as usual. |
|
|
|
|
07-16-2007, 03:46 AM
|
#11 |
|
User
Join Date: May 2004
Posts: 1,538
Thanks: 18
Thanked 36 Times in 21 Posts
|
paolo.orange; Instead laying the Luger on the belly, I prefer to use the other side of J.L, where you will find a much nicer rack to place it in.
..that will help it 'stand up' and reduce the plastic reflection from the background  In danger of being 'old school', the circular polar filter would help remove the yellow reflection without taking it to Photoshop. But if it has been captured that way, I would consider to use 'clone brush'. Where you can right click and set a reference point, then edit as little area as possible in a non-linear way. On the magazine, they darker line would be a natural referance point, set as close as possible. Some photoshop links; http://www.wacom.com/tips/photoshop.cfm http://www.good-tutorials.com/ http://www.tutorialized.com/tutorials/Photoshop/1 http://www.graphic-design.com/Photoshop/ http://www.absolutecross.com/tutorials/photoshop/ http://photoshopcafe.com/ http://www.haraldbjellvag.com/photoshop.html (in norwegian) It is possible to Google up much the same for Pain Shop Pro. That program is a little more easy to use than Photoshop, but has become almost just as advanced.
__________________
Previously known as Morgan Kane |
|
|
|
|
07-17-2007, 02:31 PM
|
#12 |
|
User
Join Date: Jul 2007
Location: Italy
Posts: 22
Thanks: 0
Thanked 1 Time in 1 Post
|
How could I possibly forget about the old polar filter...
Good old times, when sex was safe and making good photos easy and cheap...
__________________
Grace under fire, business as usual. |
|
|
|
|
07-17-2007, 02:45 PM
|
#13 |
|
User

Join Date: Feb 2004
Location: Orygun
Posts: 4,243
Thanks: 118
Thanked 245 Times in 150 Posts
|
I remember sex, when it was easy and cheap. And photos of it, weren't so safe. :-D
__________________
I Still Need DWM side plate #49... if anyone runs across a nice one. What ~Rudyard Kipling~ said... |
|
|
|
 |
|
|


 Linear Mode

