
upload photo | donate | calendar
|
my profile |
register |
faq |
search upload photo | donate | calendar |
 07-18-2016, 09:40 PM
|
#1 |
|
User
Join Date: Apr 2015
Location: near Charlotte NC
Posts: 4,677
Thanks: 1,439
Thanked 4,347 Times in 2,038 Posts
|
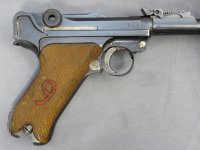
This luger breach block must have been nearly worn through at the striker guide retainer, as after a few mags of ammo fired- it would not function any more!
 Disassembly and inspection revealed the wear seen here and also shown in this thread: http://forum.lugerforum.com/showthread.php?t=35950 The first three pictures are before repair. I don't have the capability or ability to do a "good" small weld, so decided to fix the problem with a transverse pin inserted to replace the missing/worn retaining lip. I used a 1/16" pin, made from a drill bit. Being too impatient to take the piece to my machinist friend to do the work in a "real" milling machine; I decided to do a trial repair with my drill press. I used two 1/16" carbide drills because I broke one, they were not long enough to do a through and through, so I drilled from each side and then through both holes using a normal drill from one side. I was a little surprised I was able to pull this off, mill work would be much surer!  After the job, the pin required grinding and shaping to allow the striker spring guide to enter and turn as designed. This was done with a dremel and various bits. When finished the pin was locked in place using green penetrating loctite. One can see the pin ends on each side of the breech block, and the pin body where it passes through the circular opening. Bench function was ok, so then to the range, where 2x 8 rounds as trial worked just fine. I'll be firing more to determine the "durability" of the repair.
__________________
03man(Don Voigt); Luger student and collector. Looking for DWM side plate: 69 ; Dreyse 1907 pistol K.S. Gendarmerie |

|

|
| The following 12 members says Thank You to DonVoigt for your post: |
|
07-18-2016, 09:59 PM
|
#2 |
|
User
Join Date: Apr 2015
Location: near Charlotte NC
Posts: 4,677
Thanks: 1,439
Thanked 4,347 Times in 2,038 Posts
|
I forgot to mention the striker spring guide I used was broken and also had been repaired,
a story for another thread.
__________________
03man(Don Voigt); Luger student and collector. Looking for DWM side plate: 69 ; Dreyse 1907 pistol K.S. Gendarmerie |
|
|
|
|
07-18-2016, 10:01 PM
|
#3 |
|
User
Join Date: Apr 2015
Location: near Charlotte NC
Posts: 4,677
Thanks: 1,439
Thanked 4,347 Times in 2,038 Posts
|
BTW: Eugene is making new breechblocks on his wonderful CNC workstation. I had an opportunity to examine one and it was very well done.
__________________ Yes, one can buy new breech blocks for $100, or fix it for $5; and keep the original numbers and markings! 
__________________
03man(Don Voigt); Luger student and collector. Looking for DWM side plate: 69 ; Dreyse 1907 pistol K.S. Gendarmerie |
|
|
|
|
07-18-2016, 10:02 PM
|
#4 |
|
User
Join Date: Apr 2015
Location: near Charlotte NC
Posts: 4,677
Thanks: 1,439
Thanked 4,347 Times in 2,038 Posts
|
[QUOTE=sheepherder;291640]That's the second breechblock with a worn/chipped body today.
I posted this after seeing his problem, link to the other thread is in my OP. My theory of this wear is that most if not all luger striker springs are WAY stronger than they need to be for firing commercial ammo. Certainly no need for a Wolf +10 spring, JMHO. The Germans can be excused for using a very strong spring in a military application with hard primers and maybe lots of dirt floating around; but for shooting the ammo of today, I reduce the strength of the springs in my "shooters".
__________________
03man(Don Voigt); Luger student and collector. Looking for DWM side plate: 69 ; Dreyse 1907 pistol K.S. Gendarmerie |
|
|
|
|
07-19-2016, 11:22 AM
|
#5 |
|
Lifer - Twice Over
Lifetime Forum Patron 
Join Date: Jun 2002
Location: Savannah
Posts: 514
Thanks: 0
Thanked 239 Times in 111 Posts
|
Don,
I completely agree that the Luger striker spring is much stronger than necessary. However, I can't see how the stronger spring would be the determining factor in the failure of the breech block at this point. It seems to me that the wear to the striker guide retaining lug is the combined result of ammo that is too hot, causing the the striker guide to be pushed back and forth as it hits the frame, and a lack of lubrication. KFS |

|
|
|
07-19-2016, 12:04 PM
|
#6 |
|
Lifer
Lifetime Forum Patron 
Join Date: Jun 2002
Location: The Capital of the Free World
Posts: 10,150
Thanks: 3,003
Thanked 2,304 Times in 1,096 Posts
|
If a striker spring is too long it could also contribute to deterioration of the firing pin retaining lug on the breechblock by pushing rearward when totally compressed to the max during the firing cycle (Toggle wide open) ...
__________________
regards, -John S "...We hold these truths to be self-evident that ALL men are created EQUAL and are endowed by their Creator with certain UNALIENABLE rights, and among these are life, LIBERTY, and the pursuit of happiness..." |
|
|
|
|
07-19-2016, 01:25 PM
|
#7 | |
|
User
Join Date: Apr 2015
Location: near Charlotte NC
Posts: 4,677
Thanks: 1,439
Thanked 4,347 Times in 2,038 Posts
|
Quote:
the spring is what pushes the retainer to the rear, without it it would not lock in, any "extra" pressure =more wear. I never said it was the only factor, only that the spring is much stronger than needed and a big factor in this type of wear, IMO. Lubrication is always good; and yes, in "normal" operation the guide should not contact the rear of the frame. It would take a Lot of shooting and/or firing higher power loads to do this. It is not a really common failure, again JMHO.
__________________
03man(Don Voigt); Luger student and collector. Looking for DWM side plate: 69 ; Dreyse 1907 pistol K.S. Gendarmerie |
|
|
|
|
|
09-03-2018, 12:03 PM
|
#8 |
|
User
Join Date: Aug 2018
Posts: 25
Thanks: 0
Thanked 12 Times in 6 Posts
|
I had my local gunsmithing services provider perform this repair to my breechblock.
The repair pin occupies space within the breechblock that needs to be free for rearward movement of the retainer, so I reduced the retainer locking tab's thickness until the toggle would lock and striker would drop. I popped a primed case to prove trigger/striker function, and will try to get to the range for a full test, and some pics. |
|
|
|
|
09-30-2018, 04:46 PM
|
#10 |
|
Lifer
Lifetime Forum Patron 
Join Date: Jun 2008
Location: Scottsboro, Alabama
Posts: 540
Thanks: 546
Thanked 438 Times in 165 Posts
|
Well done Don. An ingenious fix that was professionally carried out.
__________________
Neil  The hurrier I go the behinder I get. Sometimes it takes me all day to get nothing done. The hurrier I go the behinder I get. Sometimes it takes me all day to get nothing done.
|
|
|
|
| The following member says Thank You to Neil Young for your post: |
|
10-05-2018, 06:46 AM
|
#11 |
|
User
Join Date: Jun 2002
Posts: 339
Thanks: 81
Thanked 359 Times in 198 Posts
|
Rickybill,
May I ask how the new pin was retainned in the breechblock? Was the drilling hard to control as to supported/unsupported surfaces to keep it true? Just curious........... Rick W. |
|
|
|
|
10-05-2018, 09:40 AM
|
#12 |
|
User
Join Date: Apr 2015
Location: near Charlotte NC
Posts: 4,677
Thanks: 1,439
Thanked 4,347 Times in 2,038 Posts
|
Retained by loctite and is an interference fit. Though it could be soldered if you wish.
One most likely will have to use a vertical mill, carbide (short) bit, I did The breech lock has sufficient flat surface on the top to hold in a good vise.
__________________
03man(Don Voigt); Luger student and collector. Looking for DWM side plate: 69 ; Dreyse 1907 pistol K.S. Gendarmerie |
|
|
|
| The following member says Thank You to DonVoigt for your post: |
|
10-05-2018, 02:15 PM
|
#13 |
|
User
Join Date: Jun 2002
Posts: 339
Thanks: 81
Thanked 359 Times in 198 Posts
|
I was curious if Rickybill's gunsmith had problems with the interrupted cut or if he came in from both sides, which of course, is more setup time and indexing. All in all, small mill bits have a bit more rigidity than twist drills, but both(especially small diameter) can be wondering jennies if you are a bit lax.
I believe I remember years ago of seeing a threaded pin, threaded only where it needs to be, to fix a breechblock that had this failed condition. I asked why he used a threaded pin rather than friction fit or a new then, loctite retainer, he told me seemed like a good idea at the time........but he was a fussy guy really; he did not know what close was. At any rate, I will study Rickybill's picture about how the pin was placed etc, to attempt my broken breechblock that I was sold 30 years ago. Just stuck it away, looks like the time to make it or break it I reckon. I appreciate the picture and comment RB. Hopefully it will not join the bone pile in the back yard. |
|
|
|
|
10-05-2018, 10:40 PM
|
#14 |
|
User
Join Date: Aug 2018
Posts: 25
Thanks: 0
Thanked 12 Times in 6 Posts
|
He did drill in from both sides.
Because the hole is not centered on a flat surface, some tool - I'm not a machinist - was used to cut down to a point where the drill could go straight in without wandering. The pin was fixed with green Loctite. My gunsmith will drill the hole and install a pin for $50, if anyone wants that part of the work done, leaving the fitting to the owner. After his experience with my breechblock, he can do it again much more easily than the first one. This is a terrible picture, and that's why I didn't use it before, but you should be able to see the pin, with the part blocking the bore of the breechblock reduced with a small, round needle file. Last edited by Rickybill; 10-05-2018 at 10:45 PM. Reason: added pic |
|
|
|
| The following member says Thank You to Rickybill for your post: |
|
10-06-2018, 09:01 AM
|
#15 |
|
User
Join Date: Jun 2002
Posts: 339
Thanks: 81
Thanked 359 Times in 198 Posts
|
Rickybill,
Thanks a lot for the detailed pictures of the pin in your repair. Lots of information there for me to ponder. Gives me the gumption to try it myself on a blown breechblock(obvious high pressure) that I have, fixed years ago by someone with brazing. Of course, failed sometime over the years before I got it. Have kept it for some odd reason, perhaps today is the day. I suspect knowing me, that I will consider use of a Henkel retainer, as it is made for cylindical, non threaded surfaces. Similar material is used to lock sleeves in engines like the corvette. Also has a higher temperature point, if that matters to anyone. The retainer stuff has been good to me over the many years of doing front banded sights on high power rifles, easier cleanup than the old silver solder(soft or hard). Even old guys still have to learn ti seems here. I am pondering the advantage of the threaded pin versus one that is affixed by other means........but just thinkin now............  appreciate your time to help me out. Rick W. |
|
|
|
|
10-06-2018, 09:59 AM
|
#16 |
|
User
Join Date: Apr 2015
Location: near Charlotte NC
Posts: 4,677
Thanks: 1,439
Thanked 4,347 Times in 2,038 Posts
|
Rick,
What is "retainer stuff"? Loctite? I think a threaded pin, i.e. a screw, would be one un-necessary step, it would be a very small screw too. The hole drilled even smaller, and then tapped. Much work for no gain. JMHO.
__________________
03man(Don Voigt); Luger student and collector. Looking for DWM side plate: 69 ; Dreyse 1907 pistol K.S. Gendarmerie |
|
|
|
|
10-06-2018, 12:05 PM
|
#17 |
|
User
Join Date: Jun 2002
Posts: 339
Thanks: 81
Thanked 359 Times in 198 Posts
|
Henkel(Loctite) has a lot of adhesive type products. One of them is what they call retainers. Specially made for the application of two close fitting psudeo or cylinderical surfaces.....(not threaded)......like the banded front sight and barrel application I mentioned; or putting a sleeve into a block.
Oddly enough, color is just an first line indicator of strength or application, one should read the technical notes from Henkel for final choice to your environment. The threaded pin would be similar in nature I think to the screw in the holding iron of an artillery stock. The pin is cylindrical for most of its length, with a small section of threading for securing(torque); slotted on the non threaded end for insertion/removal. The pinned approach is certainly not a new thing, been done for years in different ways. I guess the concept is to be able to remove if you mess up the final touches of fitment. Like the guy told me, seems like a good idea at the time, but he was a perfectionist............good enough was not in his vocabulary, just his choice I reckon. I could see a small amount of thread locker(fairly easily removeable choice selection). Threading a pin is like threading a bolt.......just smaller, single point it and it is done, to a class IV fit if you wish. Just another way of doing things perhaps, something to ponder and think about if such fits your temperament. A lot of the job is in the satisfaction that you did it the best way you thought you could. I could see the friction fit and retainer just being driven out since has two holes, top/bottom as well. One could imagine the threaded section not going thru the top, but it could...........but only might need one setup in the mill............just have to ponder such a while to see potential advantages if any are pertinent to you or not. I have come to recognize that a lot of folks here have their own opinions about how to's etc, just neat to see and learn from others point of view...........then make your own choice. Extra work to some is fun for others you know; is one more right that the other? of course not; to suggest such is kinda silly to me; everyone would do it the way they wanted anyway...... .The retainer that I use a lot of is Loctite 620, a medium strength, fairly good temperature rating, and some working time. I think it is close or equal to Hi-Force 44 in my own opinion of course. fwiw |
|
|
|
|
10-06-2018, 11:41 PM
|
#18 |
|
User
Join Date: Apr 2015
Location: near Charlotte NC
Posts: 4,677
Thanks: 1,439
Thanked 4,347 Times in 2,038 Posts
|
Thanks Rick for the loctite info.
Using a threaded pin, adds unnecessary complexity to an already delicate job; and increases the chance for failure- like breaking a very small hardened tap in a very small hole, leaving a near impossible removal issue. I used a 1/16" drill bit, cut to length for the pin, since it was already hardened and should last as well or better than the material of the original block. If you screw up a pin, as you say - drive it out and put in another; doesn't get much simpler than that. If I could weld worth shucks, I would have welded it! Sure there are lots of ways to skin a cat, I just like to get it fixed and move on. No need to over complicate things. JMHO.
__________________
03man(Don Voigt); Luger student and collector. Looking for DWM side plate: 69 ; Dreyse 1907 pistol K.S. Gendarmerie |
|
|
|
|
10-07-2018, 02:20 PM
|
#19 |
|
User
Join Date: Jun 2002
Posts: 339
Thanks: 81
Thanked 359 Times in 198 Posts
|
One of my many faults is that I like detail. The more, the better. Overthink, overdo, never happens.
I suspect that we could talk about the choice of mudflaps for the old truck until the cows come home. Guess to me, it is pretty marvelous that someone in the past did take the time to come up with the piin in the breechblock routine, fairly well mechanically supported, and is a good alternative to welding. I cannot weld either, but have cousins that can. We all know about choices in tap material, all comes into play in certain situations. I have come to disdain a little, the good stout red loctite stuff, so many messed up scope mounts put in with that stuff, painful it is to repair..........well at least time consuming. Environment is everything. Likewise, not much is really new in the gun business. So it goes. I hope that Rickybill will chime in on occasion with a report on how his breechblock is holding up. |
|
|
|
|
10-07-2018, 10:05 PM
|
#20 |
|
User
Join Date: Apr 2015
Location: near Charlotte NC
Posts: 4,677
Thanks: 1,439
Thanked 4,347 Times in 2,038 Posts
|
"One of my many faults is that I like detail. The more, the better. Overthink, overdo, never happens."
We never would have known!!! But , gee whiz, I thought the pin repair was my idea! Now you say someone else came up with it in the past!
__________________
03man(Don Voigt); Luger student and collector. Looking for DWM side plate: 69 ; Dreyse 1907 pistol K.S. Gendarmerie |
|
|
|
 |
|
|


 Linear Mode

