
upload photo | donate | calendar
|
my profile |
register |
faq |
search upload photo | donate | calendar |
 04-07-2017, 11:26 AM
|
#21 | ||
|
Lifer
Lifetime Forum Patron 
Join Date: Feb 2009
Location: ...on the 'ol Erie Canal...
Posts: 8,181
Thanks: 1,398
Thanked 4,438 Times in 2,327 Posts
|
Quote:
 Pressing the staple in seems most likely. Staking, peening, welding are possible but would they bother with a part intended to only hold a pound of weight (if it hung from the lanyard)??? Probably not. The press fit would suffice. That the area around the 'legs' is machined or finished after the pressing is curious. My 1900AE clearly shows grinding after the area was milled and then the staple pressed in. But my S/42 only shows the mill tool marks, which would seem to indicate that Mauser at least switched the finishing operations around. All good stuff. But I'm still not sure if the loop itself will withstand repeated firings with a relatively heavy object hanging off of it...Or clamped to it... ") Ed seems interested in removing his staple from that sawed-off frame. Hopefully he can add his experience to Bill's.  Quote:
__________________
I like my coffee the way I like my women... ...Cold and bitter...
|
||

|

|
| The following member says Thank You to sheepherder for your post: |
|
04-07-2017, 12:22 PM
|
#22 |
|
Lifer 2X
Lifetime Forum Patron 
Join Date: May 2005
Location: Somewhere in Montana
Posts: 2,614
Thanks: 3,140
Thanked 2,519 Times in 939 Posts
|
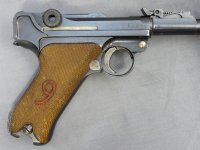
Here is an original lanyard loop. I think they were pressed in and then the protruding ends ground or machined off. I removed one years ago just as stated by GT, with a small punch. . Inserting was more difficult because of the tight fit. I used a small nylon hammer and slowly tapped both sides in. Bill
__________________
Bill Lyon |
|
|
|
| The following 4 members says Thank You to wlyon for your post: |
|
04-07-2017, 01:11 PM
|
#23 | |
|
Lifer
Lifetime Forum Patron
Join Date: Feb 2009
Location: ...on the 'ol Erie Canal...
Posts: 8,181
Thanks: 1,398
Thanked 4,438 Times in 2,327 Posts
|
Quote:
 Thanks Bill!  Armed with this knowledge, I searched TBLAP and found the blueprint measurements for it...1900, P04, and P08...All interesting...It seems to have 'evolved'... 
__________________
I like my coffee the way I like my women... ...Cold and bitter...
|
|
|
|
|
| The following 4 members says Thank You to sheepherder for your post: |
|
04-07-2017, 01:53 PM
|
#24 |
|
Lifer
Lifetime Forum Patron 
Join Date: Jun 2002
Location: The Capital of the Free World
Posts: 10,150
Thanks: 3,003
Thanked 2,304 Times in 1,096 Posts
|
What is TBLAP?
__________________
regards, -John S "...We hold these truths to be self-evident that ALL men are created EQUAL and are endowed by their Creator with certain UNALIENABLE rights, and among these are life, LIBERTY, and the pursuit of happiness..." |
|
|
|
|
04-07-2017, 02:09 PM
|
#25 | |
|
Lifer
Lifetime Forum Patron
Join Date: Feb 2009
Location: ...on the 'ol Erie Canal...
Posts: 8,181
Thanks: 1,398
Thanked 4,438 Times in 2,327 Posts
|
Quote:

__________________
I like my coffee the way I like my women... ...Cold and bitter...
|
|
|
|
|
|
04-07-2017, 02:10 PM
|
#26 | |
|
User

Join Date: Dec 2013
Location: FL and PA
Posts: 332
Thanks: 276
Thanked 243 Times in 109 Posts
|
Quote:
__________________
My avatars are the Bulgarian word for "Fire", as seen on my 1900, 1906 and 1908 Bulgarian Contract DWM Lugers. Looking for a DWM Commercial side plate #95 |
|
|
|
|
|
04-07-2017, 02:49 PM
|
#27 |
|
Lifer
Lifetime Forum Patron
Join Date: Feb 2009
Location: ...on the 'ol Erie Canal...
Posts: 8,181
Thanks: 1,398
Thanked 4,438 Times in 2,327 Posts
|
Here's an interesting observation...Although the late P08 frame notch (the cut for the lanyard loop) is the same as the early [P04, 1900] frames @ 1.8mm, the P08 has longer staple 'legs'...8mm, as opposed to 6mm...Was the frame made thicker???
And the shoulder-to-bend measurement for the loop was increased from 3.5mm to 5mm... It wasn't intended to be used, so they made the notch wider???
__________________
I like my coffee the way I like my women... ...Cold and bitter...
|
|
|
|
|
04-07-2017, 03:18 PM
|
#28 |
|
Super Moderator - Patron
LugerForum Life Patron 
Join Date: Dec 2009
Location: Eastern North Carolina, USA
Posts: 3,900
Thanks: 1,370
Thanked 3,094 Times in 1,503 Posts
|
Referring to this study, you'll see that the ends of the loop were sometimes milled away in final shaping...
http://forum.lugerforum.com/showthread.php?t=24367 The end of the loop can be seen in some of the photos. It's possible that it was peened and flattened to fix the loop into the frame, and then the milling done to smooth the entire area.
__________________
 Igitur si vis pacem, para bellum - Igitur si vis pacem, para bellum -- Therefore if you want peace, prepare for war. |
|
|
|
|
05-02-2017, 06:21 AM
|
#29 | |
|
User

Join Date: Jan 2017
Location: S.E. Iowa
Posts: 481
Thanks: 531
Thanked 226 Times in 123 Posts
|
Quote:
__________________
I Build Custom Pistol Boxes |
|
|
|
|
|
05-02-2017, 08:54 AM
|
#30 | |
|
Lifer
Lifetime Forum Patron
Join Date: Feb 2009
Location: ...on the 'ol Erie Canal...
Posts: 8,181
Thanks: 1,398
Thanked 4,438 Times in 2,327 Posts
|
Quote:
There is a 3-4 page thread on this here somewhere, I'll try to find it. Here is the short thread on the controversy surrounding the two editions (on page 3) - http://forum.lugerforum.com/showthread.php?t=29036 Ordering instructions for the DVD are in there too, in case your set (whichever it is) doesn't have the CDs/DVD...
__________________
I like my coffee the way I like my women... ...Cold and bitter...
|
|
|
|
|
|
05-02-2017, 12:45 PM
|
#31 |
|
Always A
Lifetime Forum Patron 
Join Date: Jul 2009
Location: Colorado
Posts: 2,414
Thanks: 224
Thanked 2,591 Times in 930 Posts
|
Hi Tom,
I own both sets, here is my take. You can't go wrong with either set, they are both superb, indispensable reference works for the serious collector. If you are a book kind of guy, as I am, you will like the green set better. If you want to pull out a single volume you can do so without having to lift the whole case out of the shelf, which you have to do with the poorly designed slip case of the red set. When you open a green book it stays open and lays flat, not so with a red book. The green books are printed on better paper and have larger and clearer illustrations. The red books are said to have many updates and additions, in two years I have only found one, an added photo spread. The big plus with the red set is the searchable DVD which comes with it. If you are a computer kind of guy you will love it. The photos come in loud and clear and you can zoom in. However, since the DVD is available separately for about $40.00, it's not all that big a plus. Norm |
|
|
|
| The following 5 members says Thank You to Norme for your post: |
|
05-02-2017, 12:56 PM
|
#32 |
|
User

Join Date: Feb 2010
Location: Tennessee
Posts: 1,149
Thanks: 159
Thanked 663 Times in 318 Posts
|
From what I have seen, loops like that are normally staked from the back. I know for sure that the P.38 and Nambu T14 loops are done like that, and I would say the Luger loops are staked as well. If the holes in a Luger are visible from behind, they are more than likely staked as this makes it much stronger. Knowing how anal the Germans were, I'm guessing that they staked it and then ground it flush on the inside. It could also be that they were swaged, which would leave a neater surface that would be easy to hide by grinding it a bit.
Of course: A press fit is possible, but may not be very practical on a small part made of wire. I'm not sure if I would trust that arrangement either, considering what the loop was intended for. |
|
|
|
| The following 2 members says Thank You to Olle for your post: |
|
05-02-2017, 03:54 PM
|
#33 |
|
Moderator
2010 LugerForum Patron 
Join Date: Jun 2002
Location: Santa Teresa New Mexico just outside of the West Texas town of El Paso
Posts: 6,986
Thanks: 1,065
Thanked 5,088 Times in 1,674 Posts
|
I agree with Norm. I also have both sets and prefer the green set for a printed reference. I appreciate the fact that photo credits are given...they are totally absent in the red set. The red set does have a little bit of updated material but the real plus is the CD with its high resolution photos. The details are highly educational and invaluable for sorting out fakes.
__________________
If it's made after 1918...it's a reproduction |
|
|
|
| The following 2 members says Thank You to Ron Wood for your post: |
|
05-02-2017, 04:18 PM
|
#34 | |
|
Lifer
Lifetime Forum Patron
Join Date: Feb 2009
Location: ...on the 'ol Erie Canal...
Posts: 8,181
Thanks: 1,398
Thanked 4,438 Times in 2,327 Posts
|
Quote:
Many of the images are in the 3,000 x 2,192 pixel size...And obviously show great care in lighting and backdrops... 
__________________
I like my coffee the way I like my women... ...Cold and bitter...
|
|
|
|
|
| The following member says Thank You to sheepherder for your post: |
|
05-03-2017, 07:18 AM
|
#35 |
|
User

Join Date: Apr 2016
Location: Newburgh,IN
Posts: 757
Thanks: 366
Thanked 594 Times in 313 Posts
|
As a side bar, can someone please enlighten me regarding the differences between the terms "press fit" and "staked"?
Thank you.To me "staking" is what I needed to do as a boy scout when pitching a tent. As for "press fit", that is how my stomach feels in my jeans after an evening grazing at the local $10.95 all you can eat buffet.
__________________
God created war so that Americans would learn geography. ― Mark Twain |
|
|
|
| The following member says Thank You to Eugen for your post: |
|
05-03-2017, 07:49 AM
|
#36 | |
|
User
Join Date: Feb 2010
Location: Tennessee
Posts: 1,149
Thanks: 159
Thanked 663 Times in 318 Posts
|
Quote:
Press fit (or "interference fit") is what the name implies: You press it in and the part is held in place by friction. This requires a more precise fit (IIRC the total tolerance needs to be within 1/1000") so you would normally have to ream the holes to an exact dimension instead of just drilling them. In the case of the loop you'll also need a press tool that fits snugly on the loop, or else it will be deformed when you press it in. |
|
|
|
|
| The following member says Thank You to Olle for your post: |
|
05-03-2017, 08:36 AM
|
#37 | |
|
Lifer
Lifetime Forum Patron
Join Date: Feb 2009
Location: ...on the 'ol Erie Canal...
Posts: 8,181
Thanks: 1,398
Thanked 4,438 Times in 2,327 Posts
|
Quote:
Swaging is best done with a rotating concave tool to heat up the pin end by friction while pressing down with your arbor or press. This makes a nice rounded dome that overlaps the sides of the hole. My vote for the Luger loop is peened in place. A special holding fixture for the frame, stick the loop in the frame and place it in the fixture, lower a ram to touch the ends of the loop (inside the frame) then whack the ram with a BMFH...  Simple enough for slave labor and not time or machine intensive. I use this method for re-assembling Buck 110 and 112 folding knives after I swap blades in them...
__________________
I like my coffee the way I like my women... ...Cold and bitter...
|
|
|
|
|
|
05-03-2017, 08:54 AM
|
#38 | |
|
User
Join Date: Feb 2010
Location: Tennessee
Posts: 1,149
Thanks: 159
Thanked 663 Times in 318 Posts
|
Quote:
And just to argue with you: I just looked at some of the pictures, and looking at how smooth the frame is inside I would guess they are swaged. Staking will often leave marks deep enough to remain after you grind it flush, especially if you use the specialized gun manufacturing tool you recommend. Even a highly skilled BMFH operator would have this problem, so I'm voting for swaged. I know that many wartime guns were simplified to cut production time and allow for unskilled labor (which, unfortunately, is the way most guns are made nowadays as well...), but I don't know if any changes like that were ever made to the Lugers. I can't recall ever seeing a "last ditch" variation, but they may be out there? |
|
|
|
|
|
05-03-2017, 09:32 AM
|
#39 |
|
Lifer
Lifetime Forum Patron
Join Date: Feb 2009
Location: ...on the 'ol Erie Canal...
Posts: 8,181
Thanks: 1,398
Thanked 4,438 Times in 2,327 Posts
|
Ed had said that he wanted to press/punch the loop out of his junk Luger gripframe. I would be interested in seeing the inside of the frame where the loop holes come through. Just to see if the holes were chamfered. That would eliminate the need to swage the ends. They could even be slightly loose in the hole and still not come out, if they were peened or even just hammer-pressed in place and then the ends ground or milled.
Someone (might have been Ed again) said that they had observed loose lanyard loops. That they hadn't fallen out leads to belief that the inner ends were bigger than the holes. We need pics.
__________________
I like my coffee the way I like my women... ...Cold and bitter...
|
|
|
|
|
05-03-2017, 02:56 PM
|
#40 |
|
User
Join Date: Apr 2015
Location: near Charlotte NC
Posts: 4,677
Thanks: 1,439
Thanked 4,347 Times in 2,038 Posts
|
I repeat what I said in post #15.
We have come full circle during this thread, and all said the same thing at least twice. Bottom line is no one "knows" for sure; but I saw the countersink with my own eyes, so I'm convinced on at least one luger the staple ends were peened and then ground smooth.
__________________
03man(Don Voigt); Luger student and collector. Looking for DWM side plate: 69 ; Dreyse 1907 pistol K.S. Gendarmerie |
|
|
|
 |
|
|


 Linear Mode

