
upload photo | donate | calendar
|
my profile |
register |
faq |
search upload photo | donate | calendar |
 07-13-2016, 08:54 AM
|
#1 |
|
User
Join Date: Jul 2016
Posts: 22
Thanks: 8
Thanked 24 Times in 8 Posts
|
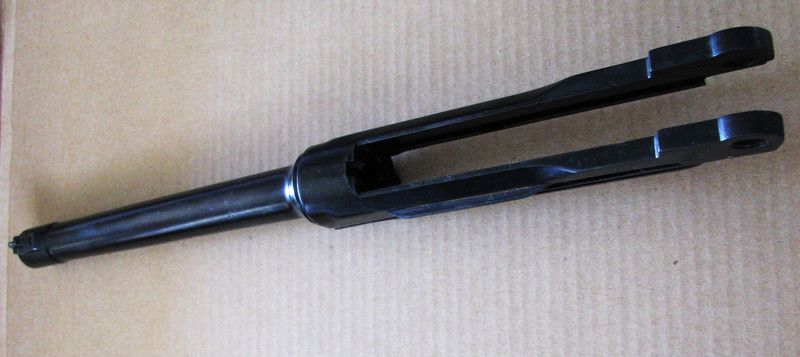
I bought a well worn but parts matching (or mostly matching,it may have been rebarreled) pre 1916 commercial Luger to refinish. I enjoy this type of thing and it will make an attractive display piece and shooter.
When I got the gun, it had no original finish left and was just grey with old patina and dirt. It had possibly been scrubbed, or was just heavily worn. Based on the condition of the original grips, I think it was just heavy wear. If it was polished down, that would have been done years ago based on the patina finish. At any rate, it was not hard to get the metal cleaned up.  I bought some Mark Lee Express (Rust) Blue #1 and also some Express Brown #2 from Brownell's. A test on a piece of scrap gun steel showed both products give a very similar finish, but the Blue #1 is a bit less labor intensive. So, about 3.5 hours later I had this...  The Mark Lee Express rust blue is VERY easy to apply and is almost foolproof if you follow the instructions. At first it seems rather complex as there are a few steps, but once you get the process down, it is just a matter of repeating it as many times as it takes to get the finish you want. In this case it was 5 or 6 applications, boils, and buffings. So far the quality seems top notch. The black is deep and rich and very glossy. |

|

|
|
07-13-2016, 09:33 AM
|
#2 |
|
Lifer
Lifetime Forum Patron 
Join Date: Feb 2009
Location: ...on the 'ol Erie Canal...
Posts: 8,182
Thanks: 1,398
Thanked 4,440 Times in 2,328 Posts
|
Looks good! How about a detailed description of exactly what you did, what tools/supplies you used, links to suppliers (like the Mark Lee stuff), pics of the process etc.
 Don't be bashful. The forum is about sharing, helping, encouraging.  You may have a potential income generator here.  Also, please attach your pics here. Photobucket pics/links disappear with regularity.
__________________
I like my coffee the way I like my women... ...Cold and bitter... 
|
|
|
|
|
07-13-2016, 10:00 AM
|
#3 |
|
User

Join Date: Apr 2016
Location: Newburgh,IN
Posts: 763
Thanks: 367
Thanked 598 Times in 317 Posts
|
dnickels, nice work bud!
In addition to what sheepherder mentioned, please provide more detailed photos and preferably on a non large white background. Cameras compensate for the white reflection and then darken the subject and reducing the details and color contrast. We would appreciate a better contrast on your subject to show the results of your hard work. Thanks.
__________________
God created war so that Americans would learn geography. ― Mark Twain |
|
|
|
|
07-13-2016, 05:17 PM
|
#4 |
|
User
Join Date: Jul 2016
Posts: 22
Thanks: 8
Thanked 24 Times in 8 Posts
|
Here are some pics with darker background. The first ones are not intended to be final photos; I took them at my desk.
  In the pics the barrel looks a little grey or cloudy but that is just light. As I mentioned above, the Mark Lee Express Blue is available from Brownell's. The product comes with a lengthy instruction sheet, but the process is fairly simple and straight forward. Items needed: distilled water degreaser - I used Super Clean, and then some Dawn dish soap carding brush/stiff wire brush/steel wool/Dremel bristle brush soft wire to suspend parts while boiling pot to boil parts in cotton and plastic gloves cotton gun patches, bits of old cotton tee shirt etc First you clean the parts and do any polishing or whatever, as necessary. Then degrease the parts. Pretty much all of the work you do is done wearing gloves to prevent oil contamination from your hands. Any tools and items like steel wool and bristle brushes should be degreased too, ahead of time. Heat the parts a bit. I use a small propane torch and just a couple quick passes does the trick. You want to still be able to hold the parts (with plastic gloves). A heat gun would work too. I use small cotton gun patches to apply the rust blue solution. You want the patch just damp and not wet. Apply the bluing acid in long strokes down the part. You don't want tuns and drips so you aren't blobbing it on very heavy. Almost instantly you get a bright light rust all over the part, especially if its humid. When dry, repeat with two more coats using heat to make sure it dries almost on contact with the warm part. Let the gun part(s) sit a few minutes, then take the parts and boil in distilled water for two minutes. I used some fine wire to support the part. Small parts will be boiled in a little metal strainer. You can plug the barrel bore with corks. The bright rust turns dark in the water. Take the parts out of the water. Because of the heat, the warm metal will dry very quickly. Using a wire brush, card or burnish off the rust, leaving a smooth, glossy, metallic finish. The first time the part will be sort of a pewter grey. Each application of the acid, along with a boiling and carding, turns the finish darker. I used 5-6 applications here. I may try a couple more. The instructions recommend 6-10 but how many you use will vary on the type of metal etc. Since you seal the part with oil when you are done, I would need to clean it well before I start the process up again. I felt that it would be best to oil the part up when I was finished on the first day just to prevent any possible future rust since I knew I was not going to be able to get back to it for a day or two. The new finish is much better than this... 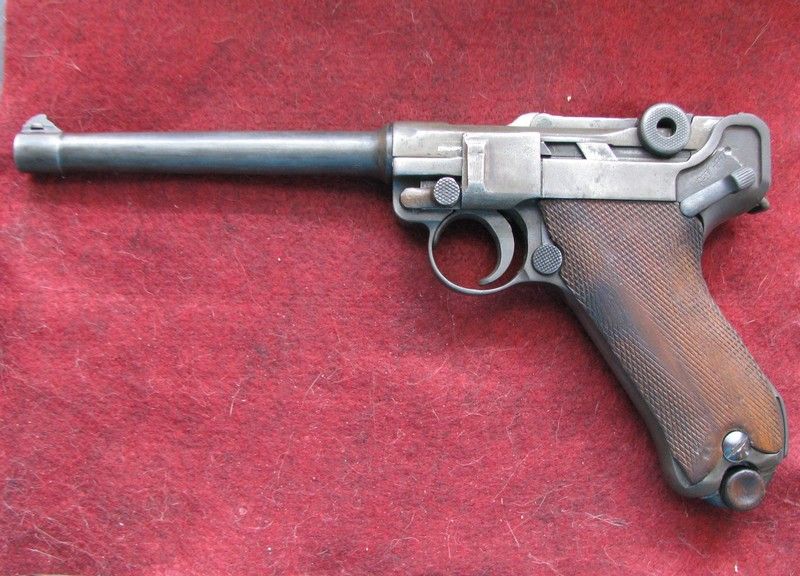
|
|
|
|
| The following 3 members says Thank You to dnickels for your post: |
|
07-14-2016, 02:34 AM
|
#5 |
|
User

Join Date: Feb 2013
Location: Somewhere in Northern Italy
Posts: 2,646
Thanks: 1,082
Thanked 1,783 Times in 1,007 Posts
|
David
From what I can see that looks like a pretty good job, but I'm not an expert, in about 36 years I've never blued any gun... (although in a couple of times I was stroooooongly tempted to) ")
__________________
"Originality can't be restored and should be at the top of any collector's priority list. |
|
|
|
|
07-14-2016, 09:31 AM
|
#6 |
|
Lifer
Lifetime Forum Patron
Join Date: Feb 2009
Location: ...on the 'ol Erie Canal...
Posts: 8,182
Thanks: 1,398
Thanked 4,440 Times in 2,328 Posts
|
Interesting. You mention using a wire brush to 'card' the parts. Steel? Stainless steel? Copper/brass brush? Where do you find soft wire brushes that won't scratch the finish or gouge scratches in the pistol metal??? Is there a 'gauge' for wire brushes (like with steel wool)???
 The pic of the barrel does look mottled, or 'cloudy'. How do you keep the barrel corks from popping out from the heat/pressure? I ask because I do Parkerizing on AR-15 barrels and that is a persistent problem... 
__________________
I like my coffee the way I like my women... ...Cold and bitter...
|
|
|
|
|
07-14-2016, 01:07 PM
|
#7 |
|
User
Join Date: Jul 2016
Posts: 22
Thanks: 8
Thanked 24 Times in 8 Posts
|
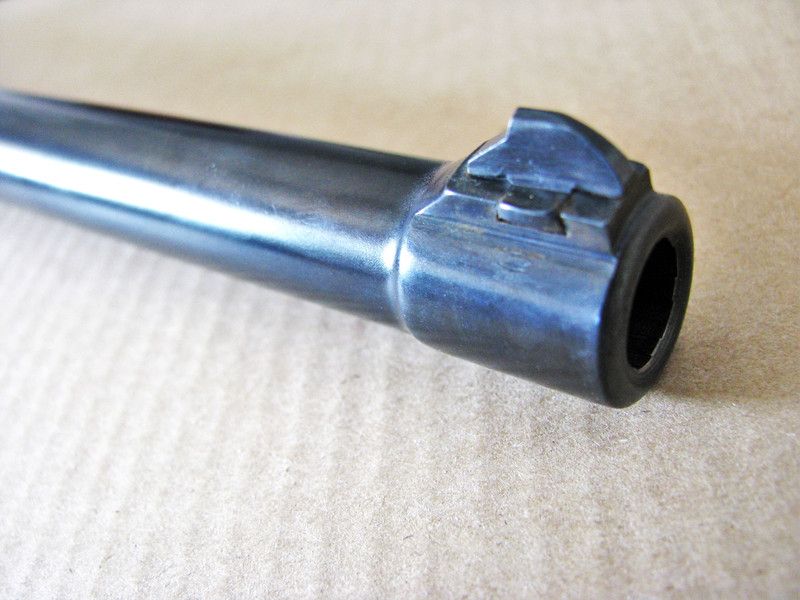
I have trouble photographing things that are highly polished and shiny. Here is a better picture
The background is black plastic. There are a couple marks up at the muzzle that are little pits and flaws in the metal. Photographs tend to amplify things like that. You could spend a lot more time polishing them down but this gun would not be worth the effort. [IMG] 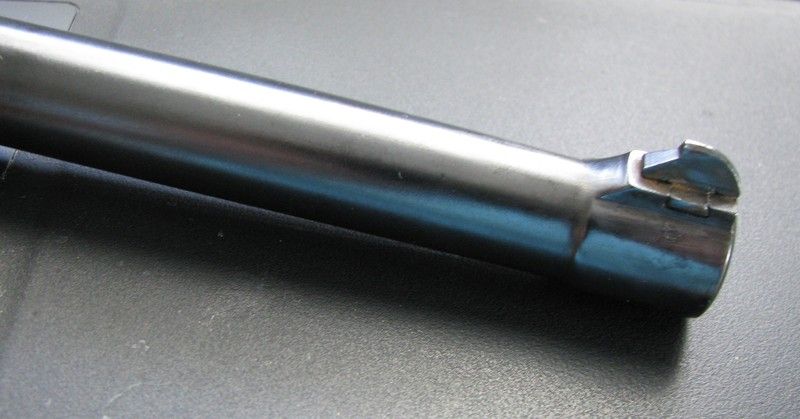 [/IMG] [/IMG]Good question about the brushes. The instructions don't go into too much detail, but between the instructions and some online videos, I think you have a lot of leeway. Mark Lee (the company) says the finish is hard and it takes some effort to card/polish the rust down, and not to worry about hurting the finish, as it is durable. I have done 90% of the polishing with either steel wool (XF stuff) or Dremel wire bristle brushes. For some scrubbing I have used a Harbor Freight brass bristles brush. None of those will damage hard steel like gun parts. I wouldn't use those industrial heavy wire brushes you can fit on a power drill for stripping paint... Here is the frame after it's second boiling. That means it had been heated, had three applications of solution applied, was boiled once, polished down, three more applications of solution applied, and was boiled again. You can see a couple damp spots still, but the hot metal dries within a minute or two of being removed from the water. [IMG]  [/IMG] [/IMG]After one more application of solution, boiling and light polishing it is quite dark. The blued magazine in the photo is in a factory black finish for comparison. [IMG] 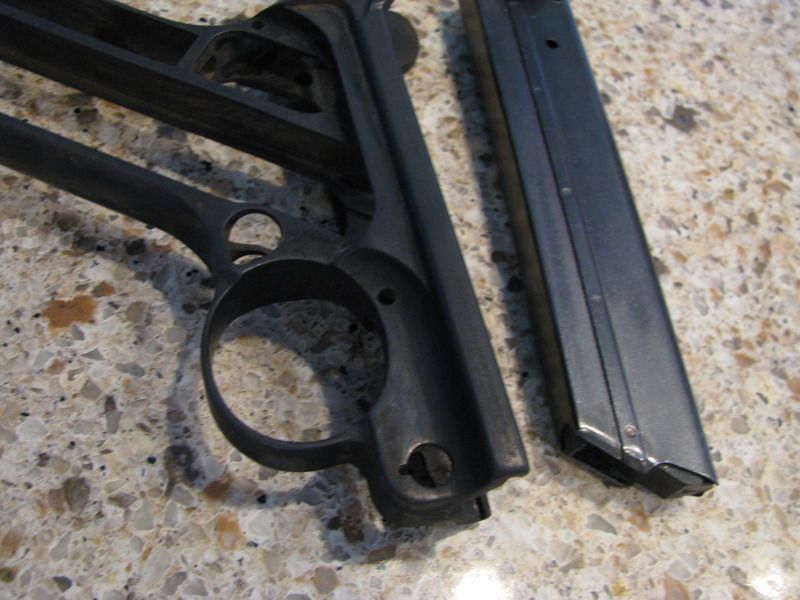 [/IMG] [/IMG]I can't afford the spendy, high end, collector type weapons so I go for fixer-upper, shooter projects. Plus I like to actually work on my guns. I have more fun with one that I put a lot of TLC into rather than just buying and looking at it. The rust bluing is at least an authentic finish for early Lugers. It's not hard although it is somewhat time consuming. |
|
|
|
| The following member says Thank You to dnickels for your post: |
|
07-14-2016, 03:14 PM
|
#8 |
|
User

Join Date: Apr 2015
Location: near Charlotte NC
Posts: 4,677
Thanks: 1,439
Thanked 4,348 Times in 2,038 Posts
|
Good work and improving pictures.
I enjoy the work on these old soldiers also, but draw the line at rust blue- sounds just to "messy"!  Though I have done hot salt bluing and parkerizing a fair amount. Though I have done hot salt bluing and parkerizing a fair amount.Try a neutral grey background for the pictures. Shiny surfaces are a problem, but open shade is your friend. The carbine in the pictures has its barrel in the white and very reflective, as was the high polish stock. The 1914 Erfurt Artillery was re-blued and polished a bit. These two were done inside with artificial light, would do much better in open shade.
__________________
03man(Don Voigt); Luger student and collector. Looking for DWM side plate: 69 ; Dreyse 1907 pistol K.S. Gendarmerie |
|
|
|
|
07-14-2016, 05:30 PM
|
#9 |
|
User
Join Date: Jul 2016
Posts: 22
Thanks: 8
Thanked 24 Times in 8 Posts
|
What a beautiful piece. The problem I have is that here in Florida the outdoor light is blinding. And, my house, is fairly dark inside with just ambient and indirect light.
The rust bluing isn't that big of a deal. All you need is a little work area to set up your stuff. I do the bluing out on my screen room and keep the water pot going on the kitchen stove. I've looked into a regular hot bluing set up but man, it is costly... At least I can do the rust bluing with an $11 bottle of solution and an $8 spaghetti pot from Good Will. |
|
|
|
|
07-14-2016, 07:42 PM
|
#10 |
|
User
Join Date: Apr 2015
Location: near Charlotte NC
Posts: 4,677
Thanks: 1,439
Thanked 4,348 Times in 2,038 Posts
|
Well,
on a screen poarch in the summer, you are a better man than I! You'd need a big spagetti/stock pot for that carbine bbl/receiver! I could not get the 16" bbl shown to function as a semi - too heavy; so I went to a 12" and it works. Just sent it to Charles Danner to have it rust blued. Thanks for the thread. Maybe next time I order from Brownells..... 
__________________
03man(Don Voigt); Luger student and collector. Looking for DWM side plate: 69 ; Dreyse 1907 pistol K.S. Gendarmerie |
|
|
|
| The following member says Thank You to DonVoigt for your post: |
|
07-14-2016, 07:48 PM
|
#11 | |
|
Lifer
Lifetime Forum Patron
Join Date: Feb 2009
Location: ...on the 'ol Erie Canal...
Posts: 8,182
Thanks: 1,398
Thanked 4,440 Times in 2,328 Posts
|
Quote:
Just FYI...
__________________
I like my coffee the way I like my women... ...Cold and bitter...
Last edited by sheepherder; 07-14-2016 at 09:10 PM. |
|
|
|
|
| The following member says Thank You to sheepherder for your post: |
|
07-14-2016, 08:12 PM
|
#12 |
|
User
Join Date: Jul 2016
Posts: 22
Thanks: 8
Thanked 24 Times in 8 Posts
|
The rust bluing process isn't hard; just time consuming. I enjoy working on such things anyway.
The screen room actually isn't bad from the morning to mid afternoon. It's on the West side so the sun doesn't shine in directly until around 3, and it has an overhead fan. I bought a cheap metal hand strainer at the dollar store to boil the small parts. I've seen people string them up on lots of wires but I don't think that is necessary. |
|
|
|
|
07-15-2016, 09:27 AM
|
#13 |
|
User

Join Date: Feb 2010
Location: Tennessee
Posts: 1,149
Thanks: 159
Thanked 663 Times in 318 Posts
|
Rust bluing is not messy at all, you may get a bit dirty when you card the parts but that's why they make nitrile gloves. The first times I did it, I just hung the parts in the shop, boiled them in the kitchen and carded them on the front porch. Even my wife was impressed with how easy it was.
Later on, I built a cabinet where I can accelerate the rusting a bit. I use a spray bottle to wet the inside of it, then I heat it up. Once it's warm, I spray some water on the walls to raise the humidity, and it's good to go. When I'm in a hurry I just put a pot of water on the hot plate, and it will get hot and steamy in no time flat. The thermostat is a type you use in terrariums, simple, cheap and functional. The pictures show it in a semi finished state, and the only major difference is that it now has a wire mesh tray above the heat bulb. I put a tin can on the shelf and pour a little bit of water in it, this will generate enough steam to maintain the humidity. It's not perfect, but it works and it only requires a minimum of baby sitting. |
|
|
|
| The following 3 members says Thank You to Olle for your post: |
|
07-15-2016, 01:10 PM
|
#14 |
|
User
Join Date: Apr 2015
Location: near Charlotte NC
Posts: 4,677
Thanks: 1,439
Thanked 4,348 Times in 2,038 Posts
|
Thanks for the info guys; I guess I should confess it is not the mess- I'm just too lazy!
__________________
03man(Don Voigt); Luger student and collector. Looking for DWM side plate: 69 ; Dreyse 1907 pistol K.S. Gendarmerie |
|
|
|
|
07-15-2016, 03:56 PM
|
#15 | |
|
User
Join Date: Sep 2007
Posts: 1,225
Thanks: 2,679
Thanked 929 Times in 509 Posts
|
Quote:

|
|
|
|
|
|
07-16-2016, 11:10 AM
|
#16 |
|
User
Join Date: Jul 2016
Posts: 22
Thanks: 8
Thanked 24 Times in 8 Posts
|
That's a cool set up. Here in FL with 98% humidity, I didn't have much of an issue.
I got the Luger finished (for now). I have to replace the side plate. It was badly worn and/or polished and does not fit tightly and you have to hold it up against the frame for the gun to fire. So, I will find a replacement and refinish it to match the gun. Also, I am not quite happy with the finish around the top of the gun, and may take the barrel off again, degrease it, and work on it some more. On the other hand, the problem is the light pitting that remains that I really can't do anything about. It gives a frosted look in patches, against the overall gloss. Still, I am really pleased with the overall look. I added some new springs, replaced the lock bin/lever, and used some nice Altamonte wood grips with new screws. Normally I am not big on flashy grips, but I thought they would be nice here and I needed new grips anyway. The badly pitted top toggle was replaced. I cleaned the original mag but here is a repro mag with the plastic end cap removed and replaced with a wood one to match the grips. [IMG] 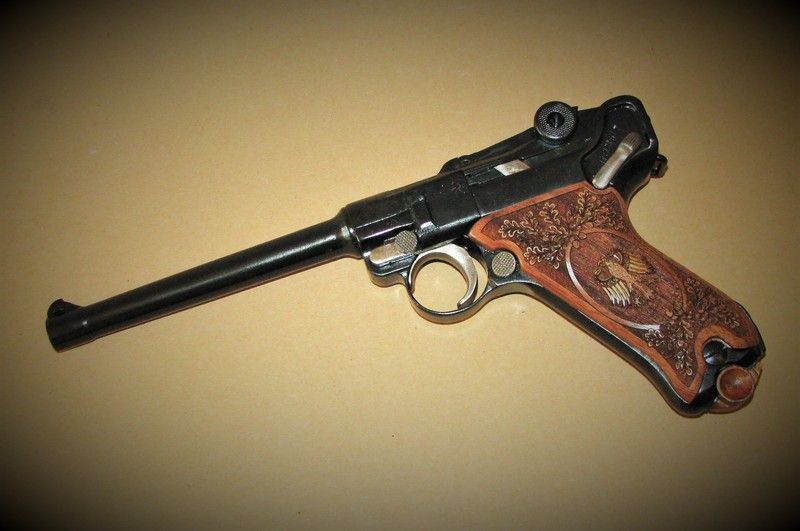 [/IMG] [/IMG]This is what she started out as.... home made/repaired take down lever, mis-matched, worn, grips, and no original finish. [IMG] [/IMG]
|
|
|
|
| The following 3 members says Thank You to dnickels for your post: |
|
07-16-2016, 12:19 PM
|
#17 |
|
Lifer
Lifetime Forum Patron
Join Date: Feb 2009
Location: ...on the 'ol Erie Canal...
Posts: 8,182
Thanks: 1,398
Thanked 4,440 Times in 2,328 Posts
|
I think it looks pretty good!
 But...I have more questions...Does the bluing solution degrade with use??? When I Parkerize, the solution degrades with repeated use until it is no longer usable. And the Manganese parkerizing solution can get expensive.  Can you store & re-use the bluing solution??? Can you store it at all???
__________________
I like my coffee the way I like my women... ...Cold and bitter...
|
|
|
|
|
07-16-2016, 02:56 PM
|
#18 |
|
Patron
LugerForum Patron 
Join Date: Mar 2011
Location: Az.
Posts: 2,270
Thanks: 2,686
Thanked 958 Times in 704 Posts
|
I think that your end results more that speak for themselves!! You have a nice looking shooter, and something you can be proud of.....Enjoy
|
|
|
|
|
07-16-2016, 09:09 PM
|
#19 |
|
User
Join Date: Jul 2016
Posts: 22
Thanks: 8
Thanked 24 Times in 8 Posts
|
Thanks for the kind words!
I'm not sure if it goes bad in the closed bottle. While using the solution, I kept pouring small amounts into a Nyquil type cup to avoid contamination of the bottle since the application generates rust. My liquid cold blues don't go bad. On the other hand, I used 3/4 the bottle or more, so it's not like I have a lot left. |
|
|
|
| The following member says Thank You to dnickels for your post: |
 |
|
|


 Linear Mode

