
upload photo | donate | calendar
|
my profile |
register |
faq |
search upload photo | donate | calendar |
 09-04-2015, 04:59 PM
|
#1 |
|
User
Join Date: Nov 2014
Posts: 544
Thanks: 194
Thanked 489 Times in 251 Posts
|
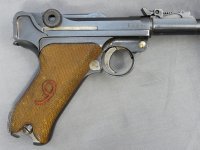
I just received this 1900 model and thought I would post some pictures, and I had a few questions I'm hoping someone can help with.
First the pistol - I purchased this from forum member Markbritt (Mark). It's a 1900 AE, all matching but refinished by Mark (not restored). By "all matching" I mean barrel (very faint but the serial #9419 is there), frame, trigger, grips, take-down, receiver, all three toggle pieces, and grip safety. The pistol has made the rounds, as it is in Dwight's database with a note that the pistol is in "extremely poor condition - offered as a parts gun". It is a very worn, refinished surface, and can't imagine how it must have looked before Mark refinished it. My guess is the pistol went through several refinishes over its life; the metal has been taken down to where the American Eagle stamping is as faint as it can be yet you can still detect it. I cleaned it up, fired about 25 rounds, cleaned it some more and gave it a coat of Renaissance Wax. Cleaning included brushing the grips with Acetone using a fine but stiff artist's paintbrush purchased for the purpose. The only function issue was a sticky hold-open. The hold-open is not original to the pistol, but is a numbered replacement. I reduced and polished the side of the hold-open where there appeared to be friction, which fixed it. Last edited by 4 Scale; 09-04-2015 at 06:08 PM. |

|

|
|
09-04-2015, 05:03 PM
|
#2 |
|
Patron
LugerForum Patron Join Date: Nov 2008
Posts: 4,047
Thanks: 578
Thanked 1,414 Times in 887 Posts
|
Don't know what you paid, but it looks like a very nice shooter. Enjoy!
dju |
|
|
|
|
09-04-2015, 05:07 PM
|
#3 |
|
User
Join Date: Nov 2014
Posts: 544
Thanks: 194
Thanked 489 Times in 251 Posts
|
Thanks dju. The price agreed to by the parties was $1,150.
I completely agree with Mark's decision to refinish the pistol over its various wear and wounds. He said it had no finish left when he got it, and in my opinion at that point the owner's best strategy is to re-blue to prevent further oxidation. I have had a lot of fun comparing the pistol to my Mausers. It's got the "flaming bomb" proof, aka "bomb flamer" by a Luger collector from Mexico, fun to see that. But, I have a couple questions I wanted to ask for help on: 1. The front sight is loose as it sits atop its ramp. It is so loose, it can be pushed off the ramp with a finger. Is there a best way to fix this? I was thinking LockTite? 2. The pistol shoots high at ten yards, about 15" high which amazed me because the group was reasonable - about 5" diameter (about what I get with my '38 Mauser 'shooter'). I would rate the bore as fair to good, good rifling with no pitting although there is some darkness and roughness in the grooves in some places. I don't see anything about the bore that could be throwing the rounds high. By that I mean, it doesn't seem bent or to have anything odd going on near the muzzle. The only thing I can imagine to fix this is a custom taller front sight, but would appreciate any comments or ideas. 3. Is there a way to release the firing pin after cycling the action? (ha, the forum software will not allow me to use the word that also means "male chicken..."). My standard method with Mausers: retract the breechblock until tension, then depress trigger while returning the breechblock to rest -but on this pistol, that doesn't work. Instead I stick a pencil down the bore and release the firing pin against the eraser to cushion it, but is there a better way? Thanks in advance for any advice on these. Last edited by 4 Scale; 11-10-2015 at 09:52 PM. |
|
|
|
| The following member says Thank You to 4 Scale for your post: |
|
09-04-2015, 06:52 PM
|
#4 |
|
Patron
LugerForum Patron Join Date: Nov 2008
Posts: 4,047
Thanks: 578
Thanked 1,414 Times in 887 Posts
|
I suspect that you have a standard P08 front sight insert, whereas the 1900's used a taller sight blade, thus yours shoots high. Let's let others weigh in on that, but yours just looks low to me.
dju |
|
|
|
|
09-04-2015, 07:28 PM
|
#5 |
|
Twice a Lifer
Lifetime Forum Patron 
Join Date: Mar 2011
Location: Atop the highest hill in Schuyler County NY
Posts: 3,282
Thanks: 7,007
Thanked 2,476 Times in 1,319 Posts
|
Greg,
The de-cocking procedure you outlined is correct, but you didn't go quite far enough. It's easy to tell when the resistance is encountered, but you have to pull a little bit more just into the resistance. Pulling and holding the trigger while returning the breech block to battery finished the job. What happens inside the gun is that this procedure allow the trigger lever in the side plate to maintain its ability to press in on the spring-loaded disconnector button on the front end of the sear bar. If you pull back too far, the barrel extension will move back, the lever will be "disconnected" from the trigger, and subsequent holding the trigger back will do nothing, allowing the gun to c0ck. Pulling back into the action's resistance relieves the tension at the sear/f.p. interface. The sear will not set when its bar is held in at the front, thus the firing pin returns all the way forward, within the block.
__________________
"... Liberty is the seed and soil, the air and light, the dew and rain of progress, love and joy."-- Robert Greene Ingersoll 1894 |
|
|
|
|
09-04-2015, 07:30 PM
|
#6 |
|
User
Join Date: Nov 2014
Posts: 544
Thanks: 194
Thanked 489 Times in 251 Posts
|
David thanks, after ready your post I inspected/measured. It seems to be the same height as a Mauser P. 08 front sight but the shape appears correct for a 1900 model, based on a check of Dave's 1900 Commercial and looking at the Simpson site.
Last edited by 4 Scale; 09-05-2015 at 10:44 PM. Reason: After studying photos of M1900 sights, the shape seems correct. |
|
|
|
|
09-04-2015, 07:33 PM
|
#7 | |
|
User
Join Date: Nov 2014
Posts: 544
Thanks: 194
Thanked 489 Times in 251 Posts
|
Quote:
Last edited by 4 Scale; 09-04-2015 at 08:26 PM. |
|
|
|
|
|
09-04-2015, 08:55 PM
|
#8 |
|
User
Join Date: Apr 2015
Location: near Charlotte NC
Posts: 4,677
Thanks: 1,439
Thanked 4,347 Times in 2,038 Posts
|
4 Scale,
I'm sorry you are having soooo much trouble with your new shooter, obviously you must send it to me as soon as possible!  PS- it looks good, nice job on cleaning the grips. |
|
|
|
|
09-04-2015, 08:56 PM
|
#9 |
|
User

Join Date: Mar 2008
Location: Marco Island, Florida
Posts: 4,867
Thanks: 1,685
Thanked 1,916 Times in 1,192 Posts
|
Pull and toggle up above the zone where you start feeling spring tension upon lowering the toggle, (about half way up on most pistols). While holding the toggle in that half up position, pull the trigger while gently lowering the toggle manually.
This will release the striker/firing pin and it will slowly ride forward as the toggle is lowered. HTHs Last edited by alanint; 09-05-2015 at 01:22 PM. |
|
|
|
| The following member says Thank You to alanint for your post: |
|
09-04-2015, 09:03 PM
|
#10 |
|
Patron
LugerForum Patron Join Date: Nov 2008
Posts: 4,047
Thanks: 578
Thanked 1,414 Times in 887 Posts
|
OK, you 1900 guys: Is the front sight on the orig. 1900's taller than the standard P08 sight blades?
dju |
|
|
|
|
09-04-2015, 10:05 PM
|
#11 | |
|
User
Join Date: Nov 2014
Posts: 544
Thanks: 194
Thanked 489 Times in 251 Posts
|
OK, I've now tried the 'modified' toggle release method suggested and have successfully de-c0cked the pistol thanks to Dave and Doug.
On the front sight, believe it or not Sarco claims to have three different 1900 model sights in stock, at 6.1mm, 6.77mm and 7.0mm height. I'm inclined to get the 7.0mm unless someone advises differently. They also have a surprisingly large inventory of other 1900 parts on hand. Quote:
 Thanks for your kind words on the grips. The acetone/stiff-fine brush treatment seems to work wonders. Since posting the pictures above, I'v had a chance to micro-clean under the microscope and they look even better if I do say so myself. I may be nuts but to me the grips are a big part of the appearance of any Luger and I enjoy trying to improve them. Personally I like the grips to be lighter to set off the darker pistol finish, and acetone is very good at removing accumulated grime to produce a lighter more natural wood color. |
|
|
|
|
|
09-05-2015, 09:44 AM
|
#12 |
|
User
Join Date: Apr 2015
Location: near Charlotte NC
Posts: 4,677
Thanks: 1,439
Thanked 4,347 Times in 2,038 Posts
|
I have not tried acetone on grips-yet; but use it for lots of other "stuff".
Sounds better than scrubbing with soap! No pesky water to swell the grain. I'm going to PM you my address so you don't have to mess with that front sight. 
|
|
|
|
|
09-05-2015, 09:58 AM
|
#13 |
|
Lifer
Lifetime Forum Patron 
Join Date: Feb 2009
Location: ...on the 'ol Erie Canal...
Posts: 8,181
Thanks: 1,398
Thanked 4,438 Times in 2,327 Posts
|
If your Luger is sitting on your Canon G11, what are you taking pics with???

__________________
I like my coffee the way I like my women... ...Cold and bitter...
|
|
|
|
|
09-05-2015, 10:08 AM
|
#14 |
|
User
Join Date: Nov 2014
Posts: 544
Thanks: 194
Thanked 489 Times in 251 Posts
|
Well Don we can always discuss, but for the moment I will keep plugging away. Even if this thing breaks or keeps shooting high, it still has value as a parts gun!
I have done a fair amount of research on grip restoration and have some woodworking background. In my opinion, acetone is the best solution to remove accumulated material on grips. It does not harm the wood it only removes non-wood material. I do not recommend a toothbrush, those are too stiff and corse. Rather a fine-bristled, medium-stiff artist brush about 1/2" wide, available in any better art store. Per the microscope, most of the dark foreign material is in the grooves, and toothbrush bristles are simply too thick reach the base of checkering grooves. And they are a little too stiff in my opinion, with a toothbrush there is a slightly increased chance of damaging the checkering. I pour acetone into a glass baking pan, about 1/4", and gently brush along the two checkering directions. Typically I change the bath several times, as it gets discolored. I am 100% sure (via microscope) that I remove grime without harming wood. I work fast - a minute or two per grip. You know you are done when brushing/rinsing stops darkening the acetone. Be sure to do it outdoor or with a respirator. I know some collectors like to treat cleaned grips with boiled linseed oil and similar. With respect, I completely disagree. The oldest wood in the world (over 7,000 years old) got that way by being kept dry, cool and out of the sun. Oil and other foreign emulsions accelerate wood deterioration, based on my research which includes looking at some Smithsonian wood preservation papers. I did some additional cleaning today, removing some stubborn junk using a #11 Xacto knife and the 'scope. I then used a very small amount of walnut penetrating resin stain to re-darken the tiny light areas caused by scraping off junk. I applied the stain with the point of a pin, again using the microscope. Here's a before and after. Last edited by 4 Scale; 12-10-2015 at 01:28 PM. |
|
|
|
|
09-05-2015, 10:27 AM
|
#15 | |
|
User
Join Date: Nov 2014
Posts: 544
Thanks: 194
Thanked 489 Times in 251 Posts
|
Quote:
|
|
|
|
|
| The following member says Thank You to 4 Scale for your post: |
|
09-06-2015, 11:31 AM
|
#16 |
|
Lifer - Twice Over
Lifetime Forum Patron 
Join Date: Jun 2002
Location: Savannah
Posts: 514
Thanks: 0
Thanked 239 Times in 111 Posts
|
FYI, My 1900 shooter required a taller front sight that I made from a '96 Swedish Mauser sight. It measures about .025 from the sight base or about 6.5 mm. I suggest getting the tallest sight from Sarco and filing it down as needed.
KFS |
|
|
|
| The following member says Thank You to Karl for your post: |
|
09-06-2015, 09:37 PM
|
#18 | |
|
User
Join Date: Nov 2014
Posts: 544
Thanks: 194
Thanked 489 Times in 251 Posts
|
Quote:
|
|
|
|
|
|
09-06-2015, 10:29 PM
|
#20 | |
|
User
Join Date: Nov 2014
Posts: 544
Thanks: 194
Thanked 489 Times in 251 Posts
|
Quote:
If anyone gets on me for faking Luger parts I will blame you.
|
|
|
|
|
 |
|
|


 Linear Mode

