
upload photo | donate | calendar
|
my profile |
register |
faq |
search upload photo | donate | calendar |
 11-01-2018, 07:10 AM
|
#21 |
|
User
Join Date: Jun 2002
Posts: 339
Thanks: 81
Thanked 359 Times in 198 Posts
|
The round over cutter I thought was pretty clever idea. Guess just gotta find the right size or have it ground.
The cutter that I had dreamed of is similar to a wheel cutter like for the extractor cut in a pre64 Winchester 70 or similar to a fluting wheel for barrels. Pretty efficient cutter but expensive for the layman with only a few to do. No prework with a straight.....pretty durable too. I am a little envious of pistol teams on the line, not seen that here locally for many years. |

|

|
|
11-01-2018, 06:42 PM
|
#22 |
|
Lifer
Lifetime Forum Patron 
Join Date: Feb 2009
Location: ...on the 'ol Erie Canal...
Posts: 8,181
Thanks: 1,398
Thanked 4,438 Times in 2,327 Posts
|
I added a machining operation for 1911 triggers in post # 5 on page 1, if anyone is interested. It took me a week, and I had pics of the finished jig, so I decided to throw it in here.

__________________
I like my coffee the way I like my women... ...Cold and bitter... 
|
|
|
|
|
11-01-2018, 07:59 PM
|
#23 | |
|
User
Join Date: Apr 2015
Location: near Charlotte NC
Posts: 4,677
Thanks: 1,439
Thanked 4,346 Times in 2,038 Posts
|
Quote:
that is a great deal of work and a fine, even amazing jig.  I'm not sure the end result(a slot in the trigger) is worth it. 
__________________
03man(Don Voigt); Luger student and collector. Looking for DWM side plate: 69 ; Dreyse 1907 pistol K.S. Gendarmerie |
|
|
|
|
|
11-01-2018, 08:25 PM
|
#24 | |
|
Lifer
Lifetime Forum Patron
Join Date: Feb 2009
Location: ...on the 'ol Erie Canal...
Posts: 8,181
Thanks: 1,398
Thanked 4,438 Times in 2,327 Posts
|
Quote:
__________________
I like my coffee the way I like my women... ...Cold and bitter...
|
|
|
|
|
|
11-02-2018, 06:56 PM
|
#25 | |
|
User

Join Date: Feb 2010
Location: Tennessee
Posts: 1,149
Thanks: 159
Thanked 663 Times in 318 Posts
|
Quote:
I'm sure you can find a cheaper tool from China, but the cool thing about Harvey's catalog (as opposed to eBay) is that they have a plethora of diameters and shapes to choose from and the tools are top quality. The 17062 cutter is very close to specs, and should last longer than the Chinese bits as well. Tiny bits like this (especially in carbide) chatter and break easily when they start going dull, and it normally happens A: Friday afternoon and B: When you have a deadline to meet. IMO it pays off to buy good quality if your'e planning to do several barrels. |
|
|
|
|
| The following member says Thank You to Olle for your post: |
|
11-02-2018, 07:31 PM
|
#26 | |
|
Lifer
Lifetime Forum Patron
Join Date: Feb 2009
Location: ...on the 'ol Erie Canal...
Posts: 8,181
Thanks: 1,398
Thanked 4,438 Times in 2,327 Posts
|
Quote:
I had written it down when Olle told me about it but when I received Harvey's latest catalog, I tossed the old one - With the note about the cutter.  FWIW, the dovetail cutter I use for Luger front sights is Harvey's # 28512, 3/16" x 40º carbide 2-flute dovetail cutter - http://www.harveytool.com/ToolTechIn...olNumber=28512
__________________
I like my coffee the way I like my women... ...Cold and bitter...
|
|
|
|
|
|
11-03-2018, 01:35 PM
|
#27 |
|
User
Join Date: Jun 2008
Location: Southern Maine
Posts: 454
Thanks: 3,881
Thanked 101 Times in 81 Posts
|
Rich, you never cease to amaze. Salute
|
|
|
|
|
11-07-2018, 10:49 PM
|
#28 |
|
Lifer
Lifetime Forum Patron
Join Date: Feb 2009
Location: ...on the 'ol Erie Canal...
Posts: 8,181
Thanks: 1,398
Thanked 4,438 Times in 2,327 Posts
|
I'll be waiting four to six weeks for the 'Swedish Luger' to come back and I can start assembling it. Until then, I have a shelf full of projects.
One was a 1911 parts kit with an FN M1911 slide in 38ACP that was so tight it wouldn't slide on the receiver. I've lapped slides in in the far past [80's] and still have the three grades of 'lapping compound' left. So, I made up a handy slide attachment and a magazine well reinforcement and lapped the FN slide in. (In those halcyon years of yore I would use my bare hands. I still have the scars). First valve grinding compound, then polishing compound, then rubbing compound. You 'saw' the tool back & forth like sawing wood. Now the slide glides as slick as grubs through a goose. (I've had to do this with a parts Luger too. Same principle). I'll function test this one when I can get some range time again.
__________________
I like my coffee the way I like my women... ...Cold and bitter...
Last edited by sheepherder; 11-08-2018 at 05:15 AM. |
|
|
|
| The following 2 members says Thank You to sheepherder for your post: |
|
11-09-2018, 02:28 PM
|
#29 |
|
User
Join Date: Jun 2005
Posts: 63
Thanks: 0
Thanked 48 Times in 23 Posts
|
A 9mm bullet at 1600 yards? Well, if we assume a 115 grain FMJ, starting at 1,200 fps, by the time it wanders down to 1,600 yards, it has a mere 288 fps left to its name. And the trip took just shy of 11 seconds. It will go through paper, but not much more.
|
|
|
|
|
11-09-2018, 08:23 PM
|
#30 |
|
User
Join Date: Apr 2015
Location: near Charlotte NC
Posts: 4,677
Thanks: 1,439
Thanked 4,346 Times in 2,038 Posts
|
That 288 fps equates to about as much energy as a .25 auto at 10 ft or a .32 S&W at 50 yards or a .22 lr at 100 yards; more than enough energy to "hurt". I sure would not want to be hit by any of them.

__________________
03man(Don Voigt); Luger student and collector. Looking for DWM side plate: 69 ; Dreyse 1907 pistol K.S. Gendarmerie |
|
|
|
|
11-09-2018, 08:53 PM
|
#31 |
|
User
Join Date: Jun 2002
Posts: 339
Thanks: 81
Thanked 359 Times in 198 Posts
|
Times and concepts change over time, time marches on it seems...

|
|
|
|
|
11-10-2018, 01:48 AM
|
#32 |
|
User

Join Date: Oct 2013
Location: Florida/Penna
Posts: 882
Thanks: 847
Thanked 507 Times in 270 Posts
|
Mary had a little watch - she swallowed it - its gone! Now every where that Mary goes, Time Marches On.
|
|
|
|
| The following member says Thank You to hayhugh for your post: |
|
11-11-2018, 10:04 AM
|
#33 | |
|
User
Join Date: Sep 2007
Posts: 1,225
Thanks: 2,679
Thanked 929 Times in 509 Posts
|
Quote:
Of course there are 1800 meter Luger. Last edited by kurusu; 11-11-2018 at 12:30 PM. |
|
|
|
|
| The following 3 members says Thank You to kurusu for your post: |
|
11-11-2018, 12:03 PM
|
#34 |
|
Lifer
Lifetime Forum Patron
Join Date: Feb 2009
Location: ...on the 'ol Erie Canal...
Posts: 8,181
Thanks: 1,398
Thanked 4,438 Times in 2,327 Posts
|
While doing another project, I remembered I needed a magazine for this fantasy barreled Luger. I visited Greg Cote's web site and ordered two more blued Muc-Gar Luger magazines. Unfortunately, they now come with plastic followers and bases. I don't like that look, so I emailed Gerry at G.T. Specialties. Gerry used to make some beautiful polished aluminum bases. He no longer makes them, which is a loss for us all, but he said he had an East German cast aluminum base, so I ordered one of those. They're undrilled blanks, as-cast, slightly oversized, and the casting seam is uneven. But they're 'good enough' for my amateur projects. Gerry once told me that he had various (and many) jigs for producing his excellent magazines and components, which produced uniform and correct pieces. I've only converted about a dozen Mec-Gar magazines so far, and I'm a firm opponent of 'production lines', so I only have the minimum of mandrels/jigs/fixtures to convert Mec-Gar magazines to all-metal items.
Here's what I do. Not as good as Gerry, but my customers (all one of me!) haven't complained. Here's a blow-by-blow account of my base/follower modifications. 1. Some of the stock, parts, and mandrels I use. 2. Drifting out the base pins. Gerry has fantastic fixtures for doing this, but for my low-volume (two), my 1-ton press and some ground down drill rod blanks work just fine. 3. The disassembled Mec-Gar P08 magazine. Removing the button is always an annoyance, as the hole on the opposite side does not line up with the button hole. Argh!!!  This seems to be typical of original Luger magazines as well. This seems to be typical of original Luger magazines as well.4. I take a piece of brass bar stock for the follower and mill it to the approximate dimensions of the Mec-Gar follower, which is not the same as a P08 follower. 5. I start with drilling the button hole as my datum point. 6. Relieving the button hole with a 5mm end mill. 7. Milling the front edge to spec. 8. Half-round milling the front edge with a special end mill. I like brass. I especially like it for magazine followers as its lead content adds to its lubricity. 9. Milling the step in the top of the follower. 10. Milling the base of the step in the follower. I'll break all sharp edges but other than that, this follower is finished. Now I need to pay some attention to the aluminum base. ") 11. The 'East German' magazine base blank is too thick, so I'm taking a skim cut off each side until it is a snug fit. 12. Drilling the base blank for the Mec-Gar pins. 13. Milling reliefs on both sides. 14. Milling spring pocket in bottom. 15. Finished parts awaiting assembly. 16. Assembled magazine with brass follower and aluminum base. Not as nice as G.T.'s work, I'm afraid. Adequate but not pretty. Oh, well. It only has to work. Pic of installed magazine. It locks in place and trips the hold-open. What more could you ask for???
__________________
I like my coffee the way I like my women... ...Cold and bitter...
Last edited by sheepherder; 11-17-2018 at 08:11 PM. |
|
|
|
| The following member says Thank You to sheepherder for your post: |
|
11-22-2018, 06:13 PM
|
#35 |
|
Lifer
Lifetime Forum Patron
Join Date: Feb 2009
Location: ...on the 'ol Erie Canal...
Posts: 8,181
Thanks: 1,398
Thanked 4,438 Times in 2,327 Posts
|
Working on some off-topic projects, but getting ready to test fire a newly acquired Luger and the 'ring base' Mec-Gar magazines really annoy me...I just don't like those rings...So I took a 5/8" ball end mill and made them scalloped...
I'd switch it over to a brass follower + aluminum base configuration but I don't have an aluminum base right now...I'll keep this around for testing.
__________________
I like my coffee the way I like my women... ...Cold and bitter...
|
|
|
|
| The following member says Thank You to sheepherder for your post: |
|
11-22-2018, 07:42 PM
|
#36 |
|
User
Join Date: Apr 2015
Location: near Charlotte NC
Posts: 4,677
Thanks: 1,439
Thanked 4,346 Times in 2,038 Posts
|
I don't like those plastic "ring" bases either; the rings have been removed from mine too!
Only difference is I use a 1/2" ball end mill, 'cause that is what I have.
__________________
03man(Don Voigt); Luger student and collector. Looking for DWM side plate: 69 ; Dreyse 1907 pistol K.S. Gendarmerie |
|
|
|
|
11-23-2018, 10:52 PM
|
#37 |
|
Lifer
Lifetime Forum Patron
Join Date: Feb 2009
Location: ...on the 'ol Erie Canal...
Posts: 8,181
Thanks: 1,398
Thanked 4,438 Times in 2,327 Posts
|
I mentioned in another thread that Numrich had an aluminum base magazine listed. I had an order in to Numrich so I had them add the Luger magazine to it -
Magazine, 9mm/7.65 Para (.30 Luger), 7 Round, Blued New (w/ Aluminum Bottom) Product #: 466090 It came in today. As you can see from the pics below, it has a metal follower, button, and base. I set it up in my mill with the 5/8" ball end mill ('cause that is what I have ) and proceeded to mill the finger depressions in the base. It was a tough cut. I had to use fairly strong pressure to get the end mill to cut. After I was done, I noticed that the pins were roll pins [split pins]. I knew they would drift out easily so I removed them and inspected the internal parts. I couldn't figure out why an "aluminum" base was so hard to mill. Even Zamak isn't that hard. ...D'Oh!... It's not aluminum! It's stainless steel! Last pic shows the base hanging from a magnet. Not as magnetic as the steel tube but enough iron & nickel to make it magnetic. And it's hard stainless; not soft. No identifying marks anywhere. Flat checkered button. Round spring. Seems to function OK. Locks in place, button trips the hold-open. I still don't like the rings, but from now on, I'll stick to ball-milling plastic and aluminum, not these stainless magazines.
__________________
I like my coffee the way I like my women... ...Cold and bitter...
|
|
|
|
|
11-27-2018, 11:19 AM
|
#38 |
|
Lifer
Lifetime Forum Patron
Join Date: Feb 2009
Location: ...on the 'ol Erie Canal...
Posts: 8,181
Thanks: 1,398
Thanked 4,438 Times in 2,327 Posts
|
I received a call from Charles Danner last night that my Swedish sight equipped P08 would be finished later this week. Mr Danner had explained to me some time back that he painstakingly draw files, sands, and rust-blues the parts he refinishes. He also re-cuts any letters/numbers/graphics that the refinishing might diminish. His work removes pits, scratches, and blemishes. He did my Lahti and Nambu projects, as well as my Luger carbine and several 1911 builds. Excellent work, and Charles is a member here as well.
I don't want to tie up my lathe/mill table as I will be using it to install the parts removed from the P08 frame - mainspring, safety & pin, recoil lever & pin. So, in the meantime, rather than start a long project, I whipped up a 1911 recoil spring guide rod. I'll continue to polish it and shape the rear while waiting for the refinished P08 parts to come in. I made a couple of these back in the 80's but I was never convinced that they did anything. Lately I have changed my mind. I had a 1911 that shot pretty well, so I dropped in a leftover JT Masen one-piece guide rod I had used as a pattern/master. With no other changes and the same ammunition, the point of impact changed dramatically. I'm still dialing that .45 in, but since I had some free time now I decided to make another. I used a Grade 8 1/2" bolt 4 1/2" long, turned down on the lathe. It will take some time to polish it with many grades of wet/dry sandpaper, and then I'll either drill & ream out a spare guide rod plug or make a new plug out of another bolt. Whichever looks better. Then I'll tackle the assembly of the 1600 Meter Luger. Pic 1. Turning down the 1/2" bolt. 2. Bolt/rod polished and flange turned down. Update: I was expecting this post to be the last for the 1911 guiderod, but as it turns out, I screwed up. I wish I could say that it's a rare occurrence, but hey, I make mistakes too. In this case, I didn't go big enough in my choice of bolt size. When I set the turned-down bolt/rod in the rotary indexing head, I found I didn't have enough diameter in the bolt head to accommodate the 'ears' that prevent the guide rod (stock or aftermarket) from rotating. There is a cut in the head of any 1911 guide rod that allows the barrel to drop down fully under full recoil. If the guide rod were to rotate, then the barrel would hit the rod and jam the action. The ears prevent rotation. So, back to the hardware store and a couple of 9/16" Grade 8 bolts. I turned down and polished the first this afternoon/evening. I'll set it up in the rotary indexing head tomorrow. Maybe. 3.Turning down the 9/16" bolt. 4. Bolt.rod polished and flange partially turned down. 5 & 6. Rod chucked in the 4-jaw chuck on the indexing head. Pic shows head of guide rod being milled to include the 'ears'. 7. Cutoff tool being used in lathe to turn down the flange center. 8. Grinding wheel being used to extend the ears on each side to clear frame rails. (I didn't mill the circumference far enough). I just drilled a hole in a block of aluminum and turn the rod with a padded visegrip. Field expedient grinding jig. I had noticed that I had an original Colt 2-piece guide rod assembly in my parts box, and after looking at it I decided if Colt could make one, so could I. So, I'll cut that first guide rod made from the 1/2" bolt and thread it to screw into a cut-off Colt guide rod plug. 9. End of rod has been threaded to 1/4" x 28tpi. 10 & 11. Guide rod plug is cut off ~3/8" from flange. 12. Guide nub is threaded 1/4" x 28tpi. Threaded rod back in lathe chuck. 13. Threaded nub fitted to rod. 14. Both 1-piece and 2-piece rods ready for final fitting to length of 5" slides. 15. Making a guide rod plug for a Colt Commander. 16. The completed guide rod plug, guide rod (shortened to Commander length), and recoil spring for a Colt Commander. I'll show pics of the finished Colt Combat Commander (with a Bo-Mar rib!) on page 3.
__________________
I like my coffee the way I like my women... ...Cold and bitter...
Last edited by sheepherder; 02-09-2019 at 02:08 PM. |
|
|
|
|
12-03-2018, 04:58 PM
|
#39 |
|
Lifer
Lifetime Forum Patron
Join Date: Feb 2009
Location: ...on the 'ol Erie Canal...
Posts: 8,181
Thanks: 1,398
Thanked 4,438 Times in 2,327 Posts
|
All right!!! The reblued and refinished Luger parts arrived today from Danner Gunsmithing! Charles & Sons did their usual excellent job of removing pits, scratches, blemishes, and oxidation!
Top pic shows parts as they were sent to Danner etc, bottom pic is as they came out of the box after refinishing. Now to reassemble this Swedish sight-equipped long barreled Luger! 1. Reviewing all the parts, I noticed that I had milled out the V-notch in the Swedish Mauser sight leaf to a squqre 'Patridge' style notch but had neglected the slider V. So, here is the slider being milled. I only milled down to the bottom of the original V. 2. The bare frame is clamped to a suitably stable table. I clamp on the inside of the magazine tunnel. First item to be installed was the recoil lever and its pin. These were pushed on and I went on to the mainspring and its guide. I 'threaded' the mainspring on to the guide to simplify installation. 3. Now the captive mainspring and guide are slid into the frame and a steel rod (red line) used to compress the spring while using a pick (or small screwdriver) to guide the hook on the mainspring guide onto the recoil lever. (Jim Solomon's mainspring tool could be used here, but I had used the knobbed-rod before and was familiar with it so that's what I used). That completes the mainspring installation.  4. Next I installed the safety bar, safety catch, and safety pin. Tapped the pin in place with a suitable drift. Continuing reassembly. 5. The hold-open assembly is installed next. I use a razor blade to hold the spring while pushing down and forward on the hold-open latch. Next, the locking bolt spring and locking bolt were inserted, and the trigger and trigger spring and the magazine catch and its spring were also slid into place. All push-on pieces; no special tools or procedure needed. 6. This completes the reassembly of the Luger lower assembly. Danner & Associates strawed the magazine catch, locking bolt, safety catch, and trigger as part of their refinishing. Looks good!!! Next up is the reassembly of the upper ('cannon') assembly. 7. Reassembling the trigger lever in the trigger plate. Line up the lever and slide in the pin. 8. Using a drift to rotate the pin into the locked podition. Moving on to the last of the reassemblies. 9. Using an undersize pin to line up the Swedish Mauser rear sight leaf, and tapping the sight pin in. 10. Torqueing the front sight base in place, using the aluminum spanner and a large Crescent wrench to line up my marks. That pretty much completes the reassembly of the Swedish rear sight 1600 meter Luger. I have a set of new grips but they need fitting, which I really suck at. I've attached a couple pics of the left/right/top for now. I'll try to get a set of pics with grips in a good light.
__________________
I like my coffee the way I like my women... ...Cold and bitter...
Last edited by sheepherder; 12-03-2018 at 08:17 PM. |
|
|
|
| The following 3 members says Thank You to sheepherder for your post: |
|
12-05-2018, 03:10 PM
|
#40 |
|
Lifer
Lifetime Forum Patron
Join Date: Feb 2009
Location: ...on the 'ol Erie Canal...
Posts: 8,181
Thanks: 1,398
Thanked 4,438 Times in 2,327 Posts
|
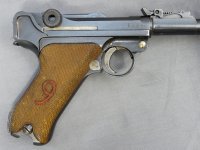
I dug through my box of odds & ends and came up with a pair of Numrich 'laser-cut' grips. They look like Walnut, they're darker than I like, but it gives a good idea what this Luger would look like.
It doesn't really look all that much different from a 'regular' artillery Luger. I have a set of light color Sarco grips, coarser checkering and kind of chunky, but definitely a different look. The Sarco coarse-checkered light color grips don't look as good as the dark Walnut.
__________________
I like my coffee the way I like my women... ...Cold and bitter...
Last edited by sheepherder; 12-05-2018 at 04:16 PM. |
|
|
|
| The following member says Thank You to sheepherder for your post: |
 |
| Tags |
| blivet |
|
|


 There ain't no such thing!!!
  Linear Mode

