
upload photo | donate | calendar
|
my profile |
register |
faq |
search upload photo | donate | calendar |
|
|
 03-06-2014, 06:43 PM
|
#1 |
|
Lifer
Lifetime Forum Patron 
Join Date: Feb 2009
Location: ...on the 'ol Erie Canal...
Posts: 8,181
Thanks: 1,398
Thanked 4,438 Times in 2,327 Posts
|
A faux 'Artillery' Nambu and Lahti !!!
 Disclaimer: I am not a gunsmith; I'm a gun hack. I'm not a collector; I'm an accumulator. I am not soliciting work; I have enough to last me the rest of my life. I only work on projects that interest me; I loathe 'production' work. My small essays are not meant to be tutorials; they are intended to spark interest in others who would like to experiment with unusual features but are hesitant to try something new. There is no one way to do something; there are many ways to skin a cat...  Note: Although this thread is specific to the Nambu, the techniques can be (and have been) used for Luger pistol barrels. Through the years, there have been threads/posts regarding the Japanese Nambu Type 14 pistol. Several For Sale Nambu's, a few questions, some owner pictures. Lately, probably because of several magazine articles, the Nambu has regenerated interest. I have been intrigued by the Type 14 since the 70's. Recently, some members here selling their Nambu's have finally goaded me to buy one. It's pretty interesting, but as always, I was curious as to how it would look/function with a longer barrel, and in a more familiar caliber. So I took a poll, first pic here. What barrel length was most appealing. Finding the results of that poll, I started another - Which of two 'artillery' lengths, and which rear 'artillery' sight? I have installed both the Luger artillery and the Mauser C96 rear sights on 'artillery' length Luger barrels. I gathered my supplies (second pic), and set off.  The third pic shows the receiver preparation. Cutting, drilling, and tapping. Also along the way, several special 'Nambu-specific' tools/jigs/fixtures had to be made; they show up in pics here & there. ") I'll be chambering this barrel in the 7.65mm Parabellum caliber ["30 Luger"]. The specs are close to the OEM 8mm Japanese cartridge, and I happen to like 30 cal bottleneck cartridges.
__________________
I like my coffee the way I like my women... ...Cold and bitter...
Last edited by sheepherder; 07-18-2014 at 03:36 PM. |

|

|
| The following 3 members says Thank You to sheepherder for your post: |
|
03-06-2014, 06:44 PM
|
#2 |
|
Lifer
Lifetime Forum Patron
Join Date: Feb 2009
Location: ...on the 'ol Erie Canal...
Posts: 8,181
Thanks: 1,398
Thanked 4,438 Times in 2,327 Posts
|
More receiver work...Tapping the barrel hole, and checking the bolt to make sure it is centered...It is!
(I don't power-tap; the tailstock simply holds the tap inline with the drilled hole).
__________________
I like my coffee the way I like my women... ...Cold and bitter...
Last edited by sheepherder; 03-06-2014 at 07:33 PM. |
|
|
|
|
03-06-2014, 06:45 PM
|
#3 |
|
Lifer
Lifetime Forum Patron
Join Date: Feb 2009
Location: ...on the 'ol Erie Canal...
Posts: 8,181
Thanks: 1,398
Thanked 4,438 Times in 2,327 Posts
|
Moving on to the barrel blank. It's from Green River, 308 cal, 4140 steel. Button rifled.
It's skim-cut for concentricity and inserted as far in the chuck/headstock as it will go...About 5 inches. I turn the end for the receiver stub, thread it, and make a nice snug fit. Then I relieve the last .030" where the stub threads into the receiver. 
__________________
I like my coffee the way I like my women... ...Cold and bitter...
Last edited by sheepherder; 03-08-2014 at 09:30 AM. |
|
|
|
|
03-06-2014, 06:47 PM
|
#4 |
|
Lifer
Lifetime Forum Patron
Join Date: Feb 2009
Location: ...on the 'ol Erie Canal...
Posts: 8,181
Thanks: 1,398
Thanked 4,438 Times in 2,327 Posts
|
Chambering has been outlined in two previous threads -
Artillery Barrel Specs http://forum.lugerforum.com/showthread.php?t=21048 and - Alternative Artillery Barrel Fabrication http://forum.lugerforum.com/showthread.php?t=25858 - So I won't repeat the steps here. Stripped bolt is used to set headspace and breech gap. Barrel is then removed and the middle is rough turned. The barrel is also milled flat on all four sides where the rear sight base will be, and then is set back in the lathe to turn off the front sight base section. (The battery in my digi-cam crapped out while the milling operations were going on; my apologies). 
__________________
I like my coffee the way I like my women... ...Cold and bitter...
Last edited by sheepherder; 03-06-2014 at 09:09 PM. |
|
|
|
| The following 5 members says Thank You to sheepherder for your post: |
|
03-06-2014, 06:47 PM
|
#5 |
|
Lifer
Lifetime Forum Patron
Join Date: Feb 2009
Location: ...on the 'ol Erie Canal...
Posts: 8,181
Thanks: 1,398
Thanked 4,438 Times in 2,327 Posts
|
Here's another thread on barrel fabrication & profiling -
6" .30 Luger barrel, 1900 style http://forum.lugerforum.com/showthread.php?t=29518 Sometimes you get ahead of yourself...Which is what I did here...I left the muzzle nice & long to chuck it, but forgot that I needed to finish the muzzle [turn to dia, round, and crown] before milling the sight bases round...So I had to cut the excess off and finish the muzzle... I used a 4-jaw chuck. Took about a half-hour to get the barrel centered.  I don't recommend this setup; I don't like the end being unsupported while it is being turned, but due to CRS it turned out this way. I took very small cuts and slow manual feed, and it turned out OK. The centering in the 4-jaw is a PITA. It has taken me an hour in the past, to get it down to +- .001". This time I clamped a 7.6mm ground pin in my tailstock Jacob's chuck and hung the barrel on that, and ran the jaws of the lathe chuck up to the barrel for a rough centering. Then it was just all trial & error with the dial indicator to get it 'just right'...
__________________
I like my coffee the way I like my women... ...Cold and bitter...
Last edited by sheepherder; 03-15-2014 at 08:46 AM. |
|
|
|
|
03-06-2014, 07:47 PM
|
#6 |
|
Lifer
Lifetime Forum Patron
Join Date: Feb 2009
Location: ...on the 'ol Erie Canal...
Posts: 8,181
Thanks: 1,398
Thanked 4,438 Times in 2,327 Posts
|
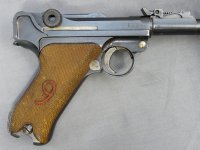
Finishing up the muzzle. Clamping the barreled action in the mill and cutting the base, cutting the dovetail, and fitting the rear sight base. Worked out pretty well, I think. I'm using a Luger artillery rear sight. Doesn't look too bad.
__________________
I like my coffee the way I like my women... ...Cold and bitter...
Last edited by sheepherder; 03-17-2014 at 01:28 PM. |
|
|
|
|
04-18-2014, 09:00 AM
|
#7 |
|
Lifer
Lifetime Forum Patron
Join Date: Feb 2009
Location: ...on the 'ol Erie Canal...
Posts: 8,181
Thanks: 1,398
Thanked 4,438 Times in 2,327 Posts
|
Although I had said the barrel was 'finished', I forgot about the extractor notch and the feed ramp...I finally got the chamfering cutter I wanted to cut feed ramps with...
Machining the front sight blade and pressing it in place and final machining is shown in next pic...
__________________
I like my coffee the way I like my women... ...Cold and bitter...
Last edited by sheepherder; 04-19-2014 at 05:31 PM. |
|
|
|
| The following member says Thank You to sheepherder for your post: |
|
04-19-2014, 05:34 PM
|
#8 |
|
Lifer
Lifetime Forum Patron
Join Date: Feb 2009
Location: ...on the 'ol Erie Canal...
Posts: 8,181
Thanks: 1,398
Thanked 4,438 Times in 2,327 Posts
|
Continuing to machine the front sight blade in place...
Blade height fixed & milled; squared off front sight blade; milling the 'ramp' on the blade. Second set of pics is the finished faux front sight blade. I set the height of the front blade equal to the height of the rear sight, as that is how my Luger artillery rear/front sights measure up. I assembled some of the special tools I had to make for this project. Finally, a shot of the barrel being torqued in place in the Nambu receiver [barrel extension], using three of the special tools.
__________________
I like my coffee the way I like my women... ...Cold and bitter...
Last edited by sheepherder; 04-22-2014 at 04:48 PM. |
|
|
|
|
04-22-2014, 04:50 PM
|
#9 |
|
Lifer
Lifetime Forum Patron
Join Date: Feb 2009
Location: ...on the 'ol Erie Canal...
Posts: 8,181
Thanks: 1,398
Thanked 4,438 Times in 2,327 Posts
|
This project is officially finished. All the machine work is complete. I am quite satisfied with the final product.
 I have determined that it would be relatively simple to convert a Luger artillery barrel to fit on a modified Nambu barrel extension ['receiver']. All it would require is to turn the Luger barrel threads down and re-thread; and cut, drill, and tap the Nambu barrel extension to accept it. The chamber might need to be deepened, and the Nambu extractor cut and feed ramp machined. My 'artillery' barrel is not a direct copy of the artillery Luger. I like the Luger 1900 barrel band/base, and the Lahti 'square' front sight blade. My Luger artillery rear sight had been modified by a previous owner to a square notch, so I made my front sight blade squared also. A "Patridge" sight combination. Similarly, it was easier to make the rear sight base simple rather than the complex concave & convex base of the Luger. If it wasn't that I wanted the barrel in 30 caliber Parabellum, I would have modified a Luger barrel. I have only seen one 30 cal artillery Luger barrel for sale on GB in the last ten years, and it went for big bucks. It would also be relatively simple to install a 'stock' Luger barrel of either caliber on a Nambu, using the method I outlined here. A 4 3/4" [120mm] Luger barrel in 30 caliber is almost a dead ringer for the OEM 8mm Nambu barrel profile. I have to admit, this 'artillery Nambu' is even uglier than the original Nambu.
__________________
I like my coffee the way I like my women... ...Cold and bitter...
|
|
|
|
|
04-23-2014, 05:15 AM
|
#10 |
|
Lifer
Lifetime Forum Patron
Join Date: Feb 2009
Location: ...on the 'ol Erie Canal...
Posts: 8,181
Thanks: 1,398
Thanked 4,438 Times in 2,327 Posts
|
- The front sight sides were cut with a radiused end mill (first pic)
- Nambu receiver/barrel extension has a 2.5mm x 8mm flat milled next to barrel shoulder for alignment purposes (second pic) - 120º chamfer cutter used to cut feed ramp - 40º Harvey dovetail cutter used for front sight blade; 60º dovetail cutter used for rear sight base - The Luger artillery rear sight sits higher than the original grip-frame Nambu rear sight, so milling the Nambu rear sight off was not necessary
__________________
I like my coffee the way I like my women... ...Cold and bitter...
|
|
|
|
|
04-28-2014, 02:54 PM
|
#11 |
|
Lifer
Lifetime Forum Patron
Join Date: Feb 2009
Location: ...on the 'ol Erie Canal...
Posts: 8,181
Thanks: 1,398
Thanked 4,438 Times in 2,327 Posts
|
I was asked if I was planning on making any more 'artillery Nambu' barrels. No, I am not. This was a 'design exercise', and I made it in 7.65mm Parabellum caliber because I like that caliber and it is similar enough to the 8mm Nambu dimensionally and ballistically to make tailoring my handloads fairly easy.
The 9mm artillery Luger barrel could easily be adapted to a modified Nambu barrel extension, with the same dimensional adaptability as the 7.65. It would be relatively easy if you had access to an engine lathe to turn down the Luger barrel thread, re-thread it, and re-chamber it; and a milling machine, to re-cut the extractor notch and feed ramp. A chambering reamer would be required too, in most cases. The Nambu barrel extension would need to have the old barrel cut off, face the cut, and drill, thread, and relieve the extension. This can all be done in a lathe. The advantage of the artillery Luger barrel is its thick shoulder. This allows for indexing the front & rear sights to the Nambu extension without cutting into the barrel taper. A 'standard' Luger barrel, in 7.65mm or 9mm, could be adapted to the Nambu extension, but more care would be needed because of the narrow [relative to the artillery) shoulder. The 4 3/4" pencil-profile Luger barrel is a dead ringer for the OEM 8mm Nambu barrel. It would look almost original. I made my 'artillery Nambu' barrel with the 1900-style barrel band and Lahti-style front sight blade because I like their looks. The Luger front sight is actually more like the OEM Nambu. I would select the 9/16" x 24 NEF thread size for the Luger-to-Nambu barrel stub and extension. The Nambu bolt is ~.702" dia and the OD of the extension is ~.862". 9/16" would give an extension wall thickness of ~.150". If the Luger thread of ~18mm x 20 were used, the wall thickness of the Nambu receiver would only be ~.077". That's kind of thin to me. I wouldn't go up to 5/8" thread because that would not leave me much of the original breechace for the bolt to bear against. Below is an additional pic showing the OEM Nambu two-section feed ramp and bolt face compared to the 'artillery Nambu' feed ramp.
__________________
I like my coffee the way I like my women... ...Cold and bitter...
Last edited by sheepherder; 04-29-2014 at 08:09 AM. |
|
|
|
|
04-29-2014, 08:22 AM
|
#12 |
|
Lifer
Lifetime Forum Patron
Join Date: Feb 2009
Location: ...on the 'ol Erie Canal...
Posts: 8,181
Thanks: 1,398
Thanked 4,438 Times in 2,327 Posts
|
I always try to use a 'spare' barrel/barrel extension for my projects. This is because if I make a mistake, it's not the end of that handgun.
A word or two on Nambu 'interchangeability of parts'...There is none...  I used eBay/GB parts for this project. Here's my take on that... It would seem from my observations that the Nambu is pretty much part-matched, and any interchange of parts will require some searching and trial-and-error matching or hand fitting. Parts that I've noticed that require particular attention are - - Barrel extension and locking block. Locking block must be able to fully retract (a straight line) or it won't even allow the barrel extension to be assembled. - Bolt and cocking knob. The knob, when fully screwed on, must line up with the firing pin extension. It would seem that the best solution is to get all the relevant parts from the same handgun.
__________________
I like my coffee the way I like my women... ...Cold and bitter...
|
|
|
|
| The following member says Thank You to sheepherder for your post: |
|
04-30-2014, 01:00 PM
|
#13 |
|
Lifer
Lifetime Forum Patron
Join Date: Feb 2009
Location: ...on the 'ol Erie Canal...
Posts: 8,181
Thanks: 1,398
Thanked 4,438 Times in 2,327 Posts
|
Diary Of A Mad Housewife...
__________________
I like my coffee the way I like my women... ...Cold and bitter...
|
|
|
|
|
05-02-2014, 03:06 PM
|
#14 |
|
Lifer
Lifetime Forum Patron
Join Date: Feb 2009
Location: ...on the 'ol Erie Canal...
Posts: 8,181
Thanks: 1,398
Thanked 4,438 Times in 2,327 Posts
|
I was asked WTF that scribbling above is...
 It's part of my simple math to decide which size tap to use for the Nambu barrel thread...The left half compares 1/2", 9/16", and 5/8" thread diameters with the Nambu receiver to decide on the best compromise tap to use...(I'll thread the barrel to match the tapped receiver)... The right side compares different ways to determine Luger barrel thread crush factor...Some say 'extractor notch width', some say 1/16 (or 1/8) revolution of the barrel, and "the book" says .003" (which can be measured with a feeler gauge)...I compared them all, given that the Luger uses 20tpi and 1/8 revolution is un-lapped, while 1/16 rev is 'lapped in' by being tightened & loosened at least three (preferably more) times... The yellow post-it shows common NEF (National Extra Fine) thread pitches and the corresponding dimension between threads... I frequently do my calculations on the backs of envelopes and when I can see ahead a step or two I abandon the envelope and go directly to the lathe/mill...Leaving the written account unfinished... Below is my final comparison of the three tap sizes. Because the Luger barrel thread is ~.708" dia and the Nambu bolt is ~.704" dia, I decided not to use the OEM Luger barrel thread...It would not have left any boltface in the receiver. In a perfect world, I would want equal wall thickness for the barrel stub and receiver front. Or in this case, barrel stub and bolt recess diameter. That would give me 35/64" wall thickness for each. There's no corresponding commonly available tap for that, so I chose the closest tap giving any extra material to the boltface. I want to keep as much of the OEM boltface as possible. It simplifies things considerably (headspace, breech clearance, locking block engagement, etc). That tap is 9/16" NEF [24tpi]. Some of this math crap gets tossed out, some gets saved...Some gets left around for months and when I come across it, I ask myself...WTF is this???
__________________
I like my coffee the way I like my women... ...Cold and bitter...
|
|
|
|
| The following member says Thank You to sheepherder for your post: |
|
07-18-2014, 03:22 PM
|
#15 |
|
Lifer
Lifetime Forum Patron
Join Date: Feb 2009
Location: ...on the 'ol Erie Canal...
Posts: 8,181
Thanks: 1,398
Thanked 4,438 Times in 2,327 Posts
|
In the first half of this thread, I pictured some of the steps in making my 'Artillery Nambu'. It turned out so well that I thought I'd see if I couldn't come up with a couple more 'fantasy artillery' handguns...preferably from the first half of the 20th century.
My second attempt is based on the Swedish M40 'Lahti'. Again I chose the Luger artillery rear sight paired with a modified M40 Lahti front sight. The Lahti uses the same pitch and diameter barrel thread as the Luger, but with a longer breech stub. This barrel is chambered in 9mm Parabellum. (Please note - Not every step/operation is pictured. Oily hands, need to operate machinery, and not being able to mill/turn and shoot pics at same time preclude all operations being pictured). Here is the first step in making of the 'artillery Lahti' barrel... (1) I start with the 9mm barrel blank, about 9" - 10" long, 1 3/8" dia. This blank is from Green Mountain. (2) Here I've turned both ends concentric to the bore and turned the breech stub down to .705" OD x ~.906" long. Entire blank was skim cut to make OD concentric with bore. 3-jaw lathe chuck, live center in tailstock. (3) Threading the stub to 20tpi and turning the end for clearance in the Lahti receiver. (4) Receiver is a nice snug fit on the thread. Receiver is a surplus Husqvarna M40 receiver I obtained from Numrich or Sarco some 20+ years ago. No serial, never used, as far as I could tell. At this point it was necessary to mill the barrel top level with the receiver so that it could be removed for machining without losing the timing. I greased the threads, loosened & torqued it down 6 or 7 times, then milled a flat level with the receiver top. To do the torquing, I had to make up a special receiver wrench. The next series of pics shows - (5) Thinning the excess metal where the taper will be. (6) Rough cutting the 9mm Parabellum chamber - Finished, showing 9mm case in chamber. Brass piece shown in some pics is just a thread protector, internally threaded and trued to bore. Reamer is from Clymer, solid pilot finishing chambering reamer. High-sulphur content cutting oil from Ridgid, running lathe at lowest speed, feeding in 1/32" at a time; pulling out, blowing chips away, and re-oiling each time. I use a Clymer floating reamer holder in my lathe tailstock to feed reamer in. (7) The special receiver wrench, made of 1" aluminum. Also shown are two special inserts for my lathe tool holder. (8) Rough milling the rear sight base and barrel shoulder, using a rotary indexing head with attached 3-jaw chuck and tailstock. The next set of pics shows more roughing out the sight bases - (9) Ball milling the rear sight base; making it similar to the Luger rear sight base, using a 3/8" 4-flute ball end mill. In the past, I've cut partly-round sight bases in 4º increments; this time, I used 2º increments. Looks much nicer! (10) Milling the barrel shoulder, still using the 3/8" 4-flute ball end mill. (11) Milling out the dovetail section; 5/8" 4-flute end mill. (12) Milling the dovetail for the Luger rear sight, 60º 4-flute dovetail cutter. Next set of pics - (13) Luger artillery sight fitted. (14) Rough milling the front sight base & band. (15) Turning down the rear sight base [front incline]. (16) Turning the taper. Following the lathe work, I doubled the spindle speed and progressively wet-sanded the tapered section with 220/320/400 grit wet or dry sandpaper. Not really polished, but smooths out the join where the two taper cuts meet. The next step is milling the front sight base and barrel band. (17) Milling the front sight band, using a 1/2" radius corner end mill, 2º at a time, 180º clockwise, 180º counter-clockwise. (18) Finishing the band milling. (19) Cutting the 1/8" slot that will become the front sight blade dovetail. I've decided I prefer the barrel band and front sight base as shown at http://www.gotavapen.se/gota/m40/pist40_4.htm and below - I like the square band/blade as opposed to the stepped ramp. (20) Cutting the 40º dovetail, using a Harvey 2-flute cutter. That pretty much finishes the front sight blade dovetail. Next, I need to trim back the muzzle and face & crown it. (21) Turning down the muzzle to same dia as end of taper. (22) Excess barrel has been cut off and the muzzle faced & crowned. I'm using an internally tapered split barrel vise insert to hold the barrel in the lathe chuck. (23) Barrel is 98% finished, minus a front sight blade. (24) Installing the barrel in the receiver. Spirit levels used to index parts; squib rod in bore to eliminate any crushing from barrel vise; aluminum receiver wrench used to protect receiver finish. Next will be fabrication of a front sight blade. (25) Finished barrel and Luger rear sight mounted on my M40 Lahti, minus a front sight. (26) Rought milling the new front sight blade, out of a piece of bar stock. (27) Cutting the 40º dovetail, using a harvey 2-flute 3/16" dovetail cutter. (28) Top of pic is the finished dovetail pressed into the barrel; bottom is the excess bar stock hacksawed off. Next is milling the new front sight blade square. (29) Blade has been milled square with base. I went with a simple 'Luger 1900' style base and band. (30) Three shots of the blade being thinned. (31) Milling the slope to the finished blade. (32) The finished 'artillery' Lahti barrel mounted on my Husqvarna M40. Some oblique views (33) Just showing finished 'artillery' Lahti from different angles. There are a couple of milling operations yet to be completed to the barrel; accelerator cut, extractor cut, and feed ramp cut. I need to remove the barrel for these operations, but since the main milling/turning is completed, and anything else will be hidden, I thought it was time for a photo shoot! ...And that concludes this exciting chapter of "Days Of My Lives"...
__________________
I like my coffee the way I like my women... ...Cold and bitter...
Last edited by sheepherder; 10-03-2015 at 09:16 AM. |
|
|
|
| The following 4 members says Thank You to sheepherder for your post: |
|
10-04-2015, 10:03 PM
|
#16 |
|
Lifer
Lifetime Forum Patron Join Date: Jun 2002
Location: Phoenix, AZ
Posts: 435
Thanks: 3
Thanked 152 Times in 72 Posts
|
Nice presentation. Nice work and thx for sharing your expertise. Most of us on this Forum just dream of having the tools and the skill to carry something like this to completion.
Lyn |
|
|
|
|
04-11-2016, 10:35 PM
|
#17 |
|
Lifer
Lifetime Forum Patron
Join Date: Feb 2009
Location: ...on the 'ol Erie Canal...
Posts: 8,181
Thanks: 1,398
Thanked 4,438 Times in 2,327 Posts
|
I read Don Voigt's two threads on his refinishing of a couple of Erma .22 sub-caliber adapter wooden storage boxes. Since these two 'artillery' pistols are languishing in cardboard boxes, I thought I'd see what I could mill out of a piece of 1" x 6" Pine board.
I have no woodworking tools, or skills, or even a general idea of what I'm doing, so there's bound to be lots of mistakes. The two top pics are the box bottom being milled with ball end mills and center cutting end mills; the two bottom pics are the box top being milled. I had thought to make a 'mask' with the profiles cut out of a stencil and penciled on the boards, but that idea was impractical, so everything was measured & laid out with a carpenters folding rule. I was much surprised when everything fit correctly and the two boards matched up flush without any gaps.  Next is to find a long thin hinge and a clasp for the front. I'm going for the wartime crudely made wooden box look. Easier to explain all the chips and dents. 
__________________
I like my coffee the way I like my women... ...Cold and bitter...
|
|
|
|
| The following 3 members says Thank You to sheepherder for your post: |
|
04-12-2016, 07:44 AM
|
#18 |
|
Super Moderator - Patron
LugerForum Life Patron 
Join Date: Dec 2009
Location: Eastern North Carolina, USA
Posts: 3,900
Thanks: 1,370
Thanked 3,094 Times in 1,503 Posts
|
Rich, I have enough of a machinist in my blood (my Grandfather was a Swedish machinist) that I would really enjoy group therapy with you someday!
Very nice work! Marc
__________________
 Igitur si vis pacem, para bellum - Igitur si vis pacem, para bellum -- Therefore if you want peace, prepare for war. |
|
|
|
|
04-12-2016, 09:10 AM
|
#19 |
|
User
Join Date: Apr 2015
Location: near Charlotte NC
Posts: 4,677
Thanks: 1,439
Thanked 4,347 Times in 2,038 Posts
|
Rich,
Nice work, that is exactly what you have to do! One suggestion for the future, fit the hinge and catch to the blank boxes and then layout and rout the openings. Looks like you may not have enough room for some hinges and clasps, or they may come "ugly" close to your cut outs. You can see what I mean in the picture below.
__________________
03man(Don Voigt); Luger student and collector. Looking for DWM side plate: 69 ; Dreyse 1907 pistol K.S. Gendarmerie |
|
|
|
|
04-12-2016, 09:55 AM
|
#20 | ||
|
Lifer
Lifetime Forum Patron
Join Date: Feb 2009
Location: ...on the 'ol Erie Canal...
Posts: 8,181
Thanks: 1,398
Thanked 4,438 Times in 2,327 Posts
|
Quote:
Hindsight is 20/20. But the closest store with hinges is an Ace and their hinge is too wide for where I placed the cutout. Quote:
 There's a Rocklers up the road a piece, I got my router bit for my carbine buttplate there. Later this week I'll check for a hinge & a clasp. I'd like to get the 'scythe' type clasp, that swings into a loop to hold the box closed. My wooden X-Acto knife box had such a clasp, until my last wife took it with her (she made accessories for 'miniatures'...What I would call doll houses). I could fasten the hinge to the back edges of the 'box'. It wouldn't look WW II-ish, but it would work. I think to mount the hinge inside the 'box' I would have to mill reliefs for the hinge into the edges of the 'box'. I still have the Lahti to do, maybe I'll get that 1" x 8" board. Another problem: The board I selected had been stored in an open shed probably all Winter. I selected one that was straight and not warped, but after being in my warm dry house, it curled sidewise. I milled my cutouts so that the two boards 'spooned' when put together, but that's not right either. ARGH!!!!  Edit: That 1937 Erma military box looks like it could be hardwood. That would be a lot more stable than Pine, and the cuts would be better looking. I'll have to find an online hardwood dealer. Although I do have a couple of 'knick-knack' shelves without any 'knick-knacks', I could sacrifice those...
__________________
I like my coffee the way I like my women... ...Cold and bitter...
|
||
|
|
|
 |
| Tags |
| blivet |
|
|


 Hybrid Mode
