
upload photo | donate | calendar
|
my profile |
register |
faq |
search upload photo | donate | calendar |
 06-05-2019, 12:21 AM
|
#1 |
|
User
Join Date: Feb 2019
Location: Coffeen, IL
Posts: 58
Thanks: 0
Thanked 24 Times in 15 Posts
|
What type of wire do you use when hanging parts during the rust bluing process? Also, how do you handle the pins and screws? I'm guessing you blue the pins as well during the project.
|

|

|
|
06-05-2019, 10:31 AM
|
#2 |
|
Moderator
Lifetime Forum Patron 
Join Date: Jun 2002
Location: Arizona/Colorado
Posts: 7,760
Thanks: 4,848
Thanked 3,099 Times in 1,426 Posts
|
Most small parts are fire blued.
__________________
Jerry Burney 11491 S. Guadalupe Drive Yuma AZ 85367-6182 lugerholsterrepair@earthlink.net 928 342-7583 (CO & AZ) Year Round 719 207-3331 (cell) 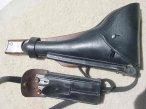 "For those who Fight For It, Life has a flavor the protected will never know." |
|
|
|
|
06-05-2019, 12:44 PM
|
#3 |
|
User
Join Date: Feb 2019
Location: Coffeen, IL
Posts: 58
Thanks: 0
Thanked 24 Times in 15 Posts
|
So that is heating them with a propane torch and stopping the process be butting them in oil? If so, do I need a special type of oil? If the original finish is okay, there would be no need to reblue correct? My project is a non matching shooter that looks okay but I want to try to fix up.
|
|
|
|
|
06-05-2019, 12:45 PM
|
#4 |
|
User
Join Date: Feb 2019
Location: Coffeen, IL
Posts: 58
Thanks: 0
Thanked 24 Times in 15 Posts
|
Putting not butting.
|
|
|
|
|
06-05-2019, 01:14 PM
|
#5 |
|
Moderator
Lifetime Forum Patron
Join Date: Jun 2002
Location: Arizona/Colorado
Posts: 7,760
Thanks: 4,848
Thanked 3,099 Times in 1,426 Posts
|
Yes, Pretty simple but practice on small metal parts. Carefully observe color changes and stop applying heat BEFORE the desired effect as it will continue to heat anyway..
Any old oil will work. It's to cool the piece.
__________________
Jerry Burney 11491 S. Guadalupe Drive Yuma AZ 85367-6182 lugerholsterrepair@earthlink.net 928 342-7583 (CO & AZ) Year Round 719 207-3331 (cell) "For those who Fight For It, Life has a flavor the protected will never know." |
|
|
|
|
06-05-2019, 10:48 PM
|
#6 |
|
Twice a Lifer
Lifetime Forum Patron 
Join Date: Mar 2011
Location: Atop the highest hill in Schuyler County NY
Posts: 3,282
Thanks: 7,007
Thanked 2,476 Times in 1,319 Posts
|
One way of getting uniform colors from heat onto parts is to immerse them in a container of sand that's been tempered to the correct temperature. This entirely eliminates any worry about over-heating. A toaster oven works fine for strawing small parts, but you'l need something with more kick to fire blue, which happens at almost 600 degrees F.
If you know a knife-maker, they'd likely have a small tempering oven. A toomaker's tempering oven, potter's kiln, or a glass artist's annealing oven would also work, as long as they're adjustable. Quenching in oil is not necessary when heat-coloring parts.
__________________
"... Liberty is the seed and soil, the air and light, the dew and rain of progress, love and joy."-- Robert Greene Ingersoll 1894 |
|
|
|
| The following 2 members says Thank You to ithacaartist for your post: |
|
06-06-2019, 09:07 AM
|
#7 |
|
User
Join Date: Feb 2019
Location: Coffeen, IL
Posts: 58
Thanks: 0
Thanked 24 Times in 15 Posts
|
I strawed my first nails two nights ago in our kitchen oven by this method. (Wife wanted to know why I was baking a sand pie). It went well in my opinion. I know of a local knife maker and I'll try to see if he has a tempering oven. Thanks.
|
|
|
|
| The following member says Thank You to hughscpa for your post: |
|
06-06-2019, 01:00 PM
|
#8 |
|
User
Join Date: Apr 2015
Location: near Charlotte NC
Posts: 4,677
Thanks: 1,439
Thanked 4,347 Times in 2,038 Posts
|
If you are patient and careful, you can get the higher temperatures by using a propane torch.
Just practice some more. These pins were treated with a propane torch. The second picture shows the difference between the wide flange navy type toggle pin/axle and the "normal" one.
__________________
03man(Don Voigt); Luger student and collector. Looking for DWM side plate: 69 ; Dreyse 1907 pistol K.S. Gendarmerie |
|
|
|
|
06-07-2019, 09:36 AM
|
#9 |
|
User
Join Date: Feb 2019
Location: Coffeen, IL
Posts: 58
Thanks: 0
Thanked 24 Times in 15 Posts
|
Should they be the purple/blue color? Can all the pins be done this way as long as I get the technique down right? I know you don't see anything but the ends of the pins anyway, right?
|
|
|
|
|
06-07-2019, 12:01 PM
|
#10 |
|
User
Join Date: Feb 2019
Location: Coffeen, IL
Posts: 58
Thanks: 0
Thanked 24 Times in 15 Posts
|
Also, I am going to needing a few parts like the locking bolt and possibly others. I have seen used ones available and newly made ones. Which would you recommend? The numbers don't match as it is, so I am not worrying about trying to find a certain number. I also realize that just because the numbers match does not mean it is not a mix from other guns. This is another shooter.
|
|
|
|
|
06-07-2019, 03:53 PM
|
#11 |
|
User
Join Date: Feb 2019
Location: Coffeen, IL
Posts: 58
Thanks: 0
Thanked 24 Times in 15 Posts
|
Yet another question, do I need to strip and polish the pins or just strip them and use acetone to clean them? Sorry for all the questions but better to ask a knowledgeable person than make a very preventable mistake.
|
|
|
|
|
06-09-2019, 12:06 AM
|
#12 |
|
User
Join Date: Nov 2014
Posts: 544
Thanks: 194
Thanked 489 Times in 251 Posts
|
When I am re-coloring parts I sand off the old finish and then clean with acetone before heat treatment. As far as new parts vs. original, I've used both but always prefer original. I found that using new parts makes the project less satisfying for me. It's an entirely subjective decision.
I''ve watched eBay and Gunbroker and the forums for years in search of original part(s) that hit the right combination of price and condition, but for me that's part of the fun. Last edited by 4 Scale; 06-09-2019 at 10:27 PM. |
|
|
|
|
06-09-2019, 09:51 AM
|
#13 | |
|
User
Join Date: Apr 2015
Location: near Charlotte NC
Posts: 4,677
Thanks: 1,439
Thanked 4,347 Times in 2,038 Posts
|
Quote:
Clean parts are good. Color can be what ever you want it to be, look at pictures of original lugers of the type you have and go with something similar. You can't really screw up, if it turns out the wrong color just re-polish and do it over.  You just need to get on with it, you will learn more in 1/2 hour of doing than by asking a zillion questions! JMHO 
__________________
03man(Don Voigt); Luger student and collector. Looking for DWM side plate: 69 ; Dreyse 1907 pistol K.S. Gendarmerie |
|
|
|
|
|
06-09-2019, 09:59 AM
|
#14 | |
|
User
Join Date: Apr 2015
Location: near Charlotte NC
Posts: 4,677
Thanks: 1,439
Thanked 4,347 Times in 2,038 Posts
|
Quote:
Not every part, original or not, can be made to fit and function in every luger. The TD lever will likely require fitting to the existing side plate, actually the side plate will be fit to the new lever. It may or may not be "fittable". I built a luger from parts this weekend, fortunately I had 6 or 8 side plates, and half a dozen trigger levers. I tried all of each and still could not get the pistol to fire.  I finally had to change the trigger, then I was able to get a combination that would work. The moral of this story is that you may need to buy more than one part, or even more than one of the same part to get one to fit. Probably 80-90 % of the time one can make a substitute part work, but sometimes they just will not co-operate. Side plate, trigger, triggle lever, and sear bar interaction are the tough ones to get correct function. But then no one promised working on lugers would be a "walk in a rose garden". There is a reason that the small parts were numbered when the pistol was initially built. 
__________________
03man(Don Voigt); Luger student and collector. Looking for DWM side plate: 69 ; Dreyse 1907 pistol K.S. Gendarmerie |
|
|
|
|
|
06-13-2019, 03:49 PM
|
#15 |
|
User
Join Date: Feb 2019
Location: Coffeen, IL
Posts: 58
Thanks: 0
Thanked 24 Times in 15 Posts
|
Her are some pictures of the trigger and the ejector. I strawed the trigger and it just doesn't look quite right. Do I need a higher temperature? Also, can I sand out the imperfections in the trigger? Also, is the ejector too pitted or can I get it cleaned up all the way?
|
|
|
|
|
06-13-2019, 04:03 PM
|
#16 |
|
User
Join Date: Apr 2015
Location: near Charlotte NC
Posts: 4,677
Thanks: 1,439
Thanked 4,347 Times in 2,038 Posts
|
You can "clean up" the trigger, but the ejector would likely wind up too thin- it is a spring.
You didn't heat the trigger hot enough and/or long enough to get good yellow straw. You get a do-over!
__________________
03man(Don Voigt); Luger student and collector. Looking for DWM side plate: 69 ; Dreyse 1907 pistol K.S. Gendarmerie |
|
|
|
|
06-13-2019, 04:10 PM
|
#17 |
|
Moderator
Lifetime Forum Patron
Join Date: Jun 2002
Location: Arizona/Colorado
Posts: 7,760
Thanks: 4,848
Thanked 3,099 Times in 1,426 Posts
|
Also, can I sand out the imperfections in the trigger? Yes, within reason. Be sure to clean well with alcohol or acetone just before heating to remove imperfections. Large items like a trigger need to be evenly heated slowly.
__________________
Jerry Burney 11491 S. Guadalupe Drive Yuma AZ 85367-6182 lugerholsterrepair@earthlink.net 928 342-7583 (CO & AZ) Year Round 719 207-3331 (cell) "For those who Fight For It, Life has a flavor the protected will never know." |
|
|
|
|
06-15-2019, 01:29 PM
|
#18 |
|
User
Join Date: Feb 2019
Location: Coffeen, IL
Posts: 58
Thanks: 0
Thanked 24 Times in 15 Posts
|
I will have to be away from the project for a while in a couple of days. Should I spray it down with oil or some other protectant? I am only in the polishing phase right now. I really do appreciate all of the help I am getting with this thing.
|
|
|
|
|
06-15-2019, 01:32 PM
|
#19 |
|
Moderator
Lifetime Forum Patron
Join Date: Jun 2002
Location: Arizona/Colorado
Posts: 7,760
Thanks: 4,848
Thanked 3,099 Times in 1,426 Posts
|
Should I spray it down with oil or some other protectant? Not unless there is high humidity? Remember you want the part clean and OIL FREE until after strawing.
__________________
Jerry Burney 11491 S. Guadalupe Drive Yuma AZ 85367-6182 lugerholsterrepair@earthlink.net 928 342-7583 (CO & AZ) Year Round 719 207-3331 (cell) "For those who Fight For It, Life has a flavor the protected will never know." |
|
|
|
|
06-16-2019, 02:26 PM
|
#20 |
|
User
Join Date: Feb 2019
Location: Coffeen, IL
Posts: 58
Thanks: 0
Thanked 24 Times in 15 Posts
|
Okay, they will be in my home with ac. So everything will be left where it is. I'll take some pictures of the next strawing attempt and where I am so far. As always, any tips or critiques are appreciated.
|
|
|
|
 |
|
|


 Linear Mode

