
upload photo | donate | calendar
|
my profile |
register |
faq |
search upload photo | donate | calendar |
 05-12-2019, 07:22 PM
|
#1 |
|
User

Join Date: Feb 2010
Location: Tennessee
Posts: 1,149
Thanks: 159
Thanked 663 Times in 318 Posts
|
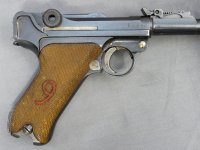
Found a cheap shooter at the TMCA show, nicely buffed into a jelly bean and blued over the remaining rust pits. It was not really worthy of a full restoration, so I put a better upper on it, straightened out the worst boo-boos on the frame, rust blued, installed new springs and called it a day. It could have used some spot welding and other detail work, but I didn't want to put too much work into a mismatched shooter. Found a brand new set of grips that I believe is for the Interarms Lugers, the 16 lpi checkering looks a bit off but it gives you a really good grip when you shoot.
It turned out to be a great shooter, the trigger is smooth, the action is solid and it shoots really straight. Like I needed another shooter, but anyway...  By he way, the finish is my "cheater rust blue": I prep the parts as usual, but I don't bother with small nicks and pits. Then I blast the parts lightly with 100 grit, smooth them on the carding wheel and then I blue with Mark D's special concoction. This gives me a slightly duller finish than a "normal" rust blue, which helps hide small imperfections. Works well on quick shooter jobs like this. |

|

|
| The following 9 members says Thank You to Olle for your post: |
|
05-12-2019, 07:55 PM
|
#2 |
|
User

Join Date: Jul 2009
Location: TN
Posts: 421
Thanks: 430
Thanked 214 Times in 95 Posts
|
Nice looking shooter
|
|
|
|
|
05-12-2019, 09:24 PM
|
#3 |
|
User
Join Date: Apr 2015
Location: near Charlotte NC
Posts: 4,677
Thanks: 1,439
Thanked 4,347 Times in 2,038 Posts
|
Good work Ollie.
__________________
03man(Don Voigt); Luger student and collector. Looking for DWM side plate: 69 ; Dreyse 1907 pistol K.S. Gendarmerie |
|
|
|
|
05-12-2019, 11:05 PM
|
#4 |
|
User
Join Date: Feb 2019
Location: Coffeen, IL
Posts: 58
Thanks: 0
Thanked 24 Times in 15 Posts
|
Wow, that looks great. I'm wanting to try the rust bluing but am afraid to start on it and really screw things up.
|
|
|
|
|
05-12-2019, 11:15 PM
|
#5 | |
|
User
Join Date: Apr 2015
Location: near Charlotte NC
Posts: 4,677
Thanks: 1,439
Thanked 4,347 Times in 2,038 Posts
|
Quote:
on a luger!
__________________
03man(Don Voigt); Luger student and collector. Looking for DWM side plate: 69 ; Dreyse 1907 pistol K.S. Gendarmerie |
|
|
|
|
|
05-15-2019, 09:53 AM
|
#6 |
|
User
Join Date: Feb 2019
Location: Coffeen, IL
Posts: 58
Thanks: 0
Thanked 24 Times in 15 Posts
|
Would I be okay to try it on an old receiver of some sort or will the different types of steel give me different results?
|
|
|
|
|
05-15-2019, 10:23 AM
|
#7 |
|
User
Join Date: Feb 2019
Location: Coffeen, IL
Posts: 58
Thanks: 0
Thanked 24 Times in 15 Posts
|
When you are refinishing a gun that is not numbers matching and is not being restored, do you reblue the internal parts also? Did you use the file in the picture is preparing the frame? Did you also have to use emery cloth? How fine do you go? I know this is a lot of questions but I have not done anything like this before. Thanks for your patience.
|
|
|
|
|
05-16-2019, 11:42 AM
|
#8 | |
|
User
Join Date: Feb 2010
Location: Tennessee
Posts: 1,149
Thanks: 159
Thanked 663 Times in 318 Posts
|
Quote:
The sides on the frame were rounded off from the previous reblue, so I used a large draw file to flatten them. The rest was done with misc files and wet or dry sandpaper. 400 grit is usually fine enough for the final polish, it leaves the surface rough enough for the rust to get a good bite. I sand blasted this one, but it's not really the standard procedure. |
|
|
|
|
|
05-17-2019, 09:21 AM
|
#9 |
|
User
Join Date: Feb 2019
Location: Coffeen, IL
Posts: 58
Thanks: 0
Thanked 24 Times in 15 Posts
|
What do you mean by "in the white"?
|
|
|
|
|
05-17-2019, 09:24 AM
|
#10 |
|
User
Join Date: Feb 2019
Location: Coffeen, IL
Posts: 58
Thanks: 0
Thanked 24 Times in 15 Posts
|
Do you normally strip it before doing the sanding/polishing? I could see where the old bluing could help you see imperfections still in the metal.
|
|
|
|
|
05-17-2019, 03:49 PM
|
#11 | |
|
Patron
LugerForum Patron 
Join Date: Mar 2011
Location: Az.
Posts: 2,270
Thanks: 2,686
Thanked 958 Times in 704 Posts
|
Quote:
__________________
Need DWM breechblock #21 |
|
|
|
|
|
05-17-2019, 05:51 PM
|
#12 |
|
User
Join Date: Feb 2019
Location: Coffeen, IL
Posts: 58
Thanks: 0
Thanked 24 Times in 15 Posts
|
Okay, that makes sense.
|
|
|
|
|
05-19-2019, 12:59 PM
|
#13 | |
|
User
Join Date: Feb 2010
Location: Tennessee
Posts: 1,149
Thanks: 159
Thanked 663 Times in 318 Posts
|
Quote:
Of course, in this case I didn't have to strip it, since I blasted it instead. Some people don't strip at all, they just prep and blue over any remaining bluing. Haven't tried it, but supposedly the rust blue will work even if there's spots of old finish left. |
|
|
|
|
| The following member says Thank You to Olle for your post: |
 |
|
|


 Linear Mode

