
upload photo | donate | calendar
|
my profile |
register |
faq |
search upload photo | donate | calendar |
 04-21-2011, 11:45 AM
|
#1 |
|
User
Join Date: Mar 2008
Posts: 27
Thanks: 5
Thanked 0 Times in 0 Posts
|
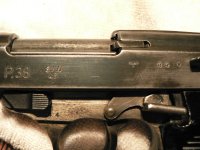
Does anyone know where to get paint for the "Gesichert" on a PO*?
|

|

|
|
04-21-2011, 12:27 PM
|
#2 |
|
Moderator
Lifetime Forum Patron 
Join Date: Jun 2002
Location: Arizona/Colorado
Posts: 7,760
Thanks: 4,850
Thanked 3,100 Times in 1,426 Posts
|
Bryan, This paint, originally applied at the factory, was an enamel. It is not a white but a cream color..beige one might call it.
I suspect that if you had a few colors of "Testors" modeling enamel paint you could make up the right color with a little mixing.
__________________
Jerry Burney 11491 S. Guadalupe Drive Yuma AZ 85367-6182 lugerholsterrepair@earthlink.net 928 342-7583 (CO & AZ) Year Round 719 207-3331 (cell)  "For those who Fight For It, Life has a flavor the protected will never know." |
|
|
|
|
04-21-2011, 01:07 PM
|
#3 |
|
User
Join Date: Mar 2008
Posts: 27
Thanks: 5
Thanked 0 Times in 0 Posts
|
Thanks for the reply, I will wait and see if someone else knows of a supplier before I try my hand at mixing paint, not sure if I could pull that off

|
|
|
|
|
04-21-2011, 01:34 PM
|
#4 | |
|
User

Join Date: Feb 2010
Location: Tennessee
Posts: 1,149
Thanks: 159
Thanked 663 Times in 318 Posts
|
Quote:
|
|
|
|
|
|
04-21-2011, 01:47 PM
|
#5 |
|
User
Join Date: Nov 2005
Location: Texas
Posts: 13
Thanks: 21
Thanked 1 Time in 1 Post
|
Here you go. This should do and comes in many colors.
http://www.brownells.com/.aspx/pid=7...QUER_STIK_reg_ Cheers, Bill |
|
|
|
|
04-21-2011, 02:05 PM
|
#6 |
|
RIP
Join Date: Jun 2002
Location: Ca.
Posts: 2,141
Thanks: 8
Thanked 89 Times in 54 Posts
|
white stick from Brownell's.
|
|
|
|
|
04-21-2011, 02:27 PM
|
#7 |
|
Moderator
Lifetime Forum Patron
Join Date: Jun 2002
Location: Arizona/Colorado
Posts: 7,760
Thanks: 4,850
Thanked 3,100 Times in 1,426 Posts
|
Howard, From a technical point of view... a grease pencil approach to replacing the missing enamel paint on the Gesichert safety marking area is abhorrent.
In the restoration work I do I strive to be as accurate and original as I can possibly be. Any other approach is alien to me. The Gesichert safety marking was originally painted with enamel and that's what should be used.
__________________
Jerry Burney 11491 S. Guadalupe Drive Yuma AZ 85367-6182 lugerholsterrepair@earthlink.net 928 342-7583 (CO & AZ) Year Round 719 207-3331 (cell) "For those who Fight For It, Life has a flavor the protected will never know." |
|
|
|
|
04-21-2011, 02:59 PM
|
#8 |
|
RIP
Join Date: Jun 2002
Location: Ca.
Posts: 2,141
Thanks: 8
Thanked 89 Times in 54 Posts
|
I have been put in my place, and shall remain.......
|
|
|
|
|
04-21-2011, 03:07 PM
|
#9 |
|
Moderator
Lifetime Forum Patron
Join Date: Jun 2002
Location: Arizona/Colorado
Posts: 7,760
Thanks: 4,850
Thanked 3,100 Times in 1,426 Posts
|
Howard, I am not here to put you or anyone else in their place..It's just that many people don't know what was in there to begin with. If I were trying to accurately restore a pistol to original specs I would use enamel paint.
yes, white stick from Brownell's would certainly work and make it show up but to what end? I am the type of collector who wouldn't do that but it may be OK for others. It's not permanent so no real damage. We don't know what type of collector Bryan is so your idea may be as good as mine for him.
__________________
Jerry Burney 11491 S. Guadalupe Drive Yuma AZ 85367-6182 lugerholsterrepair@earthlink.net 928 342-7583 (CO & AZ) Year Round 719 207-3331 (cell) "For those who Fight For It, Life has a flavor the protected will never know." |
|
|
|
|
04-21-2011, 03:14 PM
|
#10 |
|
Moderator
2010 LugerForum Patron 
Join Date: Jun 2002
Location: Santa Teresa New Mexico just outside of the West Texas town of El Paso
Posts: 6,987
Thanks: 1,065
Thanked 5,090 Times in 1,675 Posts
|
No "places to be put" here...just an exchange of ideas. Thanks to both of you.
__________________
If it's made after 1918...it's a reproduction |
|
|
|
|
04-21-2011, 05:13 PM
|
#11 | |
|
Lifer
Lifetime Forum Patron 
Join Date: Feb 2009
Location: ...on the 'ol Erie Canal...
Posts: 8,182
Thanks: 1,398
Thanked 4,440 Times in 2,328 Posts
|
Quote:

__________________
I like my coffee the way I like my women... ...Cold and bitter... 
|
|
|
|
|
|
04-21-2011, 05:22 PM
|
#12 |
|
Moderator
Lifetime Forum Patron
Join Date: Jun 2002
Location: Arizona/Colorado
Posts: 7,760
Thanks: 4,850
Thanked 3,100 Times in 1,426 Posts
|
Rich, I would guess a squeegee approach would be best. I had an extensive conversation with a Luger restorer who does this and that's how he did it. I wouldn't get too agressive with residual paint left behind but let it stiffen up and peel or scrape it (gently with wood or plastic)when it's dry. Just be sure to squeegee off the letters leaving them full of enamel. A rubber spatula perhaps?
If I were doing it I would remove the safety lever for a clear flat area to work. The fellow I know did a spectacular job, matched the color exactly too. He did this after bluing.. One other approach I might consider if I were doing it is a hypodermic needle. Use a very fine needle and gently ease the paint into each letter. Might work better than the squeegee method..
__________________
Jerry Burney 11491 S. Guadalupe Drive Yuma AZ 85367-6182 lugerholsterrepair@earthlink.net 928 342-7583 (CO & AZ) Year Round 719 207-3331 (cell) "For those who Fight For It, Life has a flavor the protected will never know." |
|
|
|
|
04-21-2011, 06:44 PM
|
#13 |
|
User
Join Date: Mar 2009
Location: Texas
Posts: 552
Thanks: 13
Thanked 69 Times in 57 Posts
|
A fine tipped camel hair artists brush works well for applying enamel. Application is very precise and the brush cleans up well for reuse later.
Charlie |
|
|
|
|
04-21-2011, 06:48 PM
|
#14 |
|
Always A
Lifetime Forum Patron 
Join Date: Jul 2009
Location: Colorado
Posts: 2,414
Thanks: 224
Thanked 2,591 Times in 930 Posts
|
I've noticed that the paint on older guns is noticeably yellower than that on newer guns. It's my belief that they were all originally white. Anyone have any thoughts on this? Regards, Norm
|
|
|
|
|
04-21-2011, 08:07 PM
|
#15 |
|
Lifer
Lifetime Forum Patron Join Date: Jun 2002
Location: Chandler Arizona
Posts: 3,486
Thanks: 1,283
Thanked 3,583 Times in 989 Posts
|
Hello to all, as with everything that concerns Lugers.. replacing the enamal in the safety area, is not an operation that can be done correctly without a little learning curve and patiences / practice ...
 ... The enamal (testors plastic model paints) can be mixed correctly to obtain the exact shade of off white needed.. you just have to test a few combinations, and let them both dry & age a'bit.. To apply, you can just fill in the recess, and then wait a'bit, (hours, days???) then mop up the residue, using thinner or acetone dampened cloth... ... not too much wiping, as it'll all disappear... now... you really have to wait a'bit, (might accelerate with heat) for the enamal to cure... I'm talking months!!!! ... The enamal (testors plastic model paints) can be mixed correctly to obtain the exact shade of off white needed.. you just have to test a few combinations, and let them both dry & age a'bit.. To apply, you can just fill in the recess, and then wait a'bit, (hours, days???) then mop up the residue, using thinner or acetone dampened cloth... ... not too much wiping, as it'll all disappear... now... you really have to wait a'bit, (might accelerate with heat) for the enamal to cure... I'm talking months!!!! .. Then try to wipe it out of the recess with anything... almost bulletproof!! .... .. Then try to wipe it out of the recess with anything... almost bulletproof!! .... .....I believe the originals were filled with white and red lead, art based filler for these types of applications... But I certainly could be wrong, as I can't really back it up with any printed resources.. best to all, til...lat'r....GT .....I believe the originals were filled with white and red lead, art based filler for these types of applications... But I certainly could be wrong, as I can't really back it up with any printed resources.. best to all, til...lat'r....GT
|
|
|
|
|
04-21-2011, 08:11 PM
|
#16 |
|
User
Join Date: Mar 2008
Posts: 27
Thanks: 5
Thanked 0 Times in 0 Posts
|
Wow, thank you to everyone for there replies. I would like to restore the gun to original specs. So with that said does any one know where to purchase the enamel paint and in what color?
Bryan |
|
|
|
|
04-21-2011, 08:37 PM
|
#17 |
|
Lifer
Lifetime Forum Patron Join Date: Jun 2002
Location: Chandler Arizona
Posts: 3,486
Thanks: 1,283
Thanked 3,583 Times in 989 Posts
|
Hi Bryan, any toy store hobby shop... it's just testors enamal model paint... The ivory suggestion has merit also, and as inexpensive as the paints are... you might want to try it also.. I used white and yellow... and just used drops for trial and error... (example: 20 drops white, 1 drop yellow, mix, mix, mix!!) etc... I think originally they just used white.. the off white you're trying to replicate is just a century of aging!....let us know how it works out... remember, time and patience...
...best to you, til...lat'r...GTOops! almost forgot! You really have to pre-clean the area to be filled.. acetone works well... |
|
|
|
|
04-21-2011, 09:43 PM
|
#18 |
|
Moderator
Lifetime Forum Patron
Join Date: Jun 2002
Location: Arizona/Colorado
Posts: 7,760
Thanks: 4,850
Thanked 3,100 Times in 1,426 Posts
|
GT..Good advice! I have painted metal parts here in the shop and it essentially dries enough to handle it in 24 hours but it's still not dry! A thin coat here in the dry desert might be a week or more before it's very dry and longer than that for any kind of use. If you were to make it thick enough to fill the letters..you are probably right..could take one heck of a long time!
__________________
Jerry Burney 11491 S. Guadalupe Drive Yuma AZ 85367-6182 lugerholsterrepair@earthlink.net 928 342-7583 (CO & AZ) Year Round 719 207-3331 (cell) "For those who Fight For It, Life has a flavor the protected will never know." |
|
|
|
|
04-21-2011, 11:46 PM
|
#19 |
|
User
Join Date: Oct 2007
Location: Maryland
Posts: 340
Thanks: 43
Thanked 107 Times in 51 Posts
|
I've gone the testors route on various firearms before. It is tedious and requires trial and error as well as lots of patience . The trick is to do it over and over again until you build up the paint in the recessed area. You put paint on and then wipe off the extra which pulls up some of what you don't want pulled up. Let it dry and repeat until you get the height that you want. The good part is that it's just paint on metal and you can't really screw anything up. If you get too sloppy, a squirt of carb cleaner and a rag makes it like it never happened.
__________________
I promise to be nice and play well with others |
|
|
|
| The following 2 members says Thank You to Wilhelm for your post: |
|
04-22-2011, 07:02 AM
|
#20 | |
|
Lifer
Lifetime Forum Patron
Join Date: Feb 2009
Location: ...on the 'ol Erie Canal...
Posts: 8,182
Thanks: 1,398
Thanked 4,440 Times in 2,328 Posts
|
Quote:
__________________
I like my coffee the way I like my women... ...Cold and bitter...
|
|
|
|
|
 |
|
|


 Linear Mode

