
upload photo | donate | calendar
|
my profile |
register |
faq |
search upload photo | donate | calendar |
 01-08-2012, 12:24 PM
|
#1 |
|
Lifer
Lifetime Forum Patron 
Join Date: Feb 2009
Location: ...on the 'ol Erie Canal...
Posts: 8,181
Thanks: 1,397
Thanked 4,438 Times in 2,327 Posts
|
Quick & dirty 7.65 Luger barrel for Colt Gov't Model
(Should be 'Gorilla Gunsmithing', as I take the brute force approach...No fancy frills here...and I am not a gunsmith; just a garage gun hack...)  This seems to be one of the few calibers/barrels not available for the Colt Gov't Model...and since I had the first weekend off in 4 months and nothing planned, and a member wondered what all had to be done, I thought I'd give it a go... I decided to go with what I was familiar with; making a screw-in stub barrel for the Colt breechblock. I had a new 38 Super barrel with the 'straight' configuration that would not work with my beloved Series 70 collet bushings, so I used that as the donor breechblock. First off is to bore out the chamber. I wanted it to be on center [duh!] so I ran a 7/16" end mill through the chamber. Then I sawed off the barrel and faced off the resulting breechblock face. I drilled out the breechblock in 1/32" increments to 15/32", the hole size for a 1/2" x 28tpi tap [NEF]. Tapping the breechblock. Incidentally, runout on the breechblock in my 3-jaw chuck was .001"... Resulting threaded breechblock with cutoff barrel. I selected a new barrel blank in 30 cal, and rough turned the OD on the lathe... Barrel blank threaded 1/2" x 28tpi for breechblock insert... Nice tight fit into breechblock...Requires some exertion to screw it all the way on... Turning down the 'relief' in the barrel... Turning the taper that the collet bushing rides on... Clymer 30 Luger finishing chambering solid pilot reamer and 'floating' reamer holder... Start of chamber reaming...Keep an eye on the newspaper & the lathe chuck... Clymer used to have an instruction page on their web site, but since the family sold the business, it's gone...but it recommended high-sulphur content cutting oil [Ridgid makes some] and cutting at low speed and in 1/32" increments, blowing chips out & re-oiling every 1/32"... More cutting...this is a slow process, with all the blowing & re-oiling... Here's a shot of what 1/32" of chips looks like...The masking tape is just a crude measurement of when I need to pay attention... This is where I start cutting in thousandths...This is the final cut; should give me .003" - .004" headspace when installed... Here I'm cutting the 'liner' away from the barrel hood... Semi-finished re-barrel in 7.65 Luger compared to my Colt Series 70 38 Super barrel & bushing... Muzzle & breech ends of the two barrels...7.65 Luger still needs a lot of hand-fitting; feed ramp, strange cut on side, fitting of link & pin (on order)... Comparison of headspace... Another headspace comparison (installed)... That's about as far as the machining operations go. My installed headspace turned out to be .005". I'm waiting on a barrel link, link pin, and magazine from Numrich for final fitment. This is a quick & dirty barrel swap; not pretty, function over form...Call it a 'feasibility study'... I don't think that this is a barrel swap that can be done without a lot of fitting of the mating parts. I was especially appalled at the excessive headspace of the Colt 38 Super barrel...I try for .003" to .004" headspace on my 'range shooters' (as opposed to .010" - .012" on my 'MilSpec' barrel swaps); this .038" is really mind boggling...but it shoots OK; and has not failed to fire with Winchester +P 130gr FMJ ammunition...but I will be looking for another 38 Super barrel... BTW: This donor barrel was made of excellent steel...I use 4140 steel for most of my projects and am familiar with how it machines...This barrel/breechblock is way tougher than 4140...6000 series at least; maybe 8000 series...
__________________
I like my coffee the way I like my women... ...Cold and bitter...
|

|

|
| The following 7 members says Thank You to sheepherder for your post: |
|
01-08-2012, 02:16 PM
|
#2 |
|
Lifer
Lifetime Forum Patron 
Join Date: Jun 2008
Location: Scottsboro, Alabama
Posts: 540
Thanks: 546
Thanked 438 Times in 165 Posts
|
Fascinating. If you're a Gorilla Gunsmith, then I am a Spider Monkey Machinist--strictly amature. You sure had a mess to clean up after the chambering episode, didn't you? I really enjoyed you're photo essay and learned a lot.
What kind of lathe do you have? Is it a combo lathe/milling maching? Neil
__________________
Neil  The hurrier I go the behinder I get. Sometimes it takes me all day to get nothing done. The hurrier I go the behinder I get. Sometimes it takes me all day to get nothing done.
|
|
|
|
|
01-08-2012, 02:26 PM
|
#3 | ||
|
Lifer
Lifetime Forum Patron
Join Date: Feb 2009
Location: ...on the 'ol Erie Canal...
Posts: 8,181
Thanks: 1,397
Thanked 4,438 Times in 2,327 Posts
|
Quote:
Quote:

__________________
I like my coffee the way I like my women... ...Cold and bitter...
|
||
|
|
|
|
01-08-2012, 02:45 PM
|
#4 |
|
Lifer
Lifetime Forum Patron
Join Date: Feb 2009
Location: ...on the 'ol Erie Canal...
Posts: 8,181
Thanks: 1,397
Thanked 4,438 Times in 2,327 Posts
|
I dug out some of my handguns and measured their headspace, using new cases I checked to make sure they were 'in spec'...Here's the results...(The 2nd 38 Super barrel was a gun show buy that some other gorilla had 'ramped' a bit too much...)

__________________
I like my coffee the way I like my women... ...Cold and bitter...
|
|
|
|
|
01-11-2012, 05:30 PM
|
#5 |
|
Lifer
Lifetime Forum Patron
Join Date: Feb 2009
Location: ...on the 'ol Erie Canal...
Posts: 8,181
Thanks: 1,397
Thanked 4,438 Times in 2,327 Posts
|
In keeping with my "Gonzo Gunsmithing", I'm trying a stepped 7.65 Luger liner in a well-used & abused P-38 barrel...Started last night on the barrel; reaming the barrel itself and milling the breechblock...
So far, so good...This particular barrel is just a 'proof of concept' conversion; the actual barrel I'll use in my shooter is [hopefully!] on the way...
__________________
I like my coffee the way I like my women... ...Cold and bitter...
|
|
|
|
| The following member says Thank You to sheepherder for your post: |
|
01-11-2012, 06:27 PM
|
#6 |
|
Lifer
Lifetime Forum Patron
Join Date: Jun 2008
Location: Scottsboro, Alabama
Posts: 540
Thanks: 546
Thanked 438 Times in 165 Posts
|
Postino:
Please tell me how you lined up the barrel to be perfectly true with the reamer and the end mill--in the horizontal and vertical direction as well as eliminating any angular misalignment. I know that you can move your compound from side to side, but how do you measure. Also, I don't see any vertical adjustment on your vise. I've wanted to do a similar operation in the past, but the setup was "beyond the scope of my text". I once had an engineering professor that when stumped by a question would always say--"That's beyond the scope of this text.". Hopefully you can tell me how to do it. Thanks. Neil
__________________
Neil The hurrier I go the behinder I get. Sometimes it takes me all day to get nothing done.
|
|
|
|
|
01-11-2012, 08:03 PM
|
#7 |
|
Lifer
Lifetime Forum Patron
Join Date: Feb 2009
Location: ...on the 'ol Erie Canal...
Posts: 8,181
Thanks: 1,397
Thanked 4,438 Times in 2,327 Posts
|
Got the liner roughed out tonight...Gotta break now...
__________________
I like my coffee the way I like my women... ...Cold and bitter...
|
|
|
|
|
01-11-2012, 09:52 PM
|
#8 | |
|
Lifer
Lifetime Forum Patron
Join Date: Feb 2009
Location: ...on the 'ol Erie Canal...
Posts: 8,181
Thanks: 1,397
Thanked 4,438 Times in 2,327 Posts
|
Quote:
First, the fixture I used is for vertical boring & threading of the P-38 breechblock (for installing long barrels); I'll make another one for this horizontal reaming, but for this 'feasibility study', it'll do... I use a set [2] of drill blanks from Travers.com in 8.75mm/8.8mm/"S" [8.85mm]/8.90mm sizes...I put the size that is a snug fit in the barrel in the lathe chuck and another in the tailstock chuck. Run the lathe and make sure drill blank has no runout. Mate the two drill blanks end-to-end in their respective chucks. Center the tailstock if necessary. I clamp the breechblock in the fixture and hang the assembly {breech first] on the drill blank in the lathe chuck. Position the table under the breechblock with the vise just loose on the table. Push the vise fixed jaw up against the fixture. Tighten the vise jaws & clamp the fixture. Run the tailstock drill blank into the barrel - it should go right in without hitting an edge. If it does hit, untighten the vise jaws and reposition the vise. If it goes right in, clamp the vise to the table. Lock the table crossfeed. Now run the tailstock out of the way and run the table out, then back in. The lathe drill blank should go in smoothly without hitting an edge (the drill blanks have square edges). Take drill blank out of chuck, put reamer in (or end mill). That's it. I do not use the power feed; I use the longitudinal micrometer feed on the end of the lathe bed. I ream only 1/32" to 1/16" at a time, back off & blow chips out, cutting oil on reamer each time. Lowest speed lathe has (400rpm). Came out pretty good for such a barnjob, huh??? 
__________________
I like my coffee the way I like my women... ...Cold and bitter...
|
|
|
|
|
| The following 3 members says Thank You to sheepherder for your post: |
|
01-12-2012, 11:31 AM
|
#9 |
|
Super Moderator - Patron
LugerForum Life Patron 
Join Date: Dec 2009
Location: Eastern North Carolina, USA
Posts: 3,900
Thanks: 1,370
Thanked 3,094 Times in 1,503 Posts
|
Rich,
I'm enjoying your article; thanks for posting it. My grandfather was a machinist in the 1900-1930 time period. Seeing your work is stoking my long suppressed interest in learning more about this kind of work. One of our North Carolina community colleges (Montgomery Community College in Troy, NC) offers a pretty well regarded gunsmithing degree. Hopefully I'll be able to attend someday! Marc
__________________
 Igitur si vis pacem, para bellum - Igitur si vis pacem, para bellum -- Therefore if you want peace, prepare for war. |
|
|
|
|
01-12-2012, 09:10 PM
|
#10 |
|
Lifer
Lifetime Forum Patron
Join Date: Feb 2009
Location: ...on the 'ol Erie Canal...
Posts: 8,181
Thanks: 1,397
Thanked 4,438 Times in 2,327 Posts
|
The following is posted at the P-38 Forum, but I'll include it here for continuity...
I pressed the liner in place, cut off the excess and faced each end, chambered it for 7.65 Luger, and chamfered the chamber edge similar to the 9mm breechface... I still need to cut the extractor notch, but this operation looks do-able... (9mm barrel shown for comparison) I'm waiting for the P1 barrel to come in; I imagine it will be slightly different in construction since it is already lined and pinned...
__________________
I like my coffee the way I like my women... ...Cold and bitter...
|
|
|
|
| The following member says Thank You to sheepherder for your post: |
|
02-23-2012, 06:02 PM
|
#11 |
|
Patron
LugerForum Patron Join Date: Feb 2012
Location: Ussr
Posts: 425
Thanks: 198
Thanked 75 Times in 58 Posts
|
Niel Young is on this forum! thats awesome, guys we got a famous musician rubbin elbows with us

|
|
|
|
|
02-24-2012, 01:44 PM
|
#12 |
|
RIP

Join Date: Jun 2002
Location: Southeast Texas Swamp
Posts: 2,460
Thanks: 2
Thanked 165 Times in 64 Posts
|
I went the easy route! Found this 30 Luger bbl on GB several years ago, and put together this combo Commander rig: 45 Auto, 9mm Luger & 30 Luger, the 9mm & 30L use the same slide & magazine: 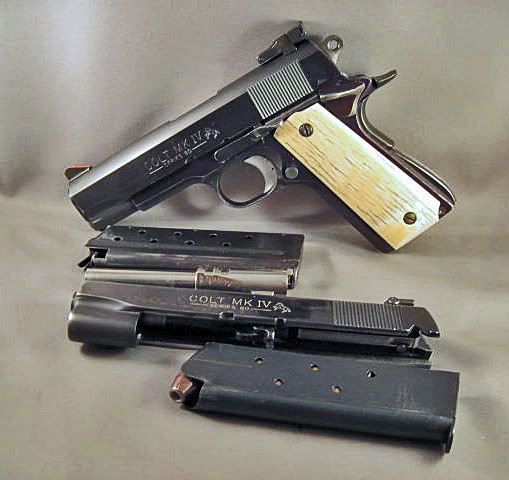 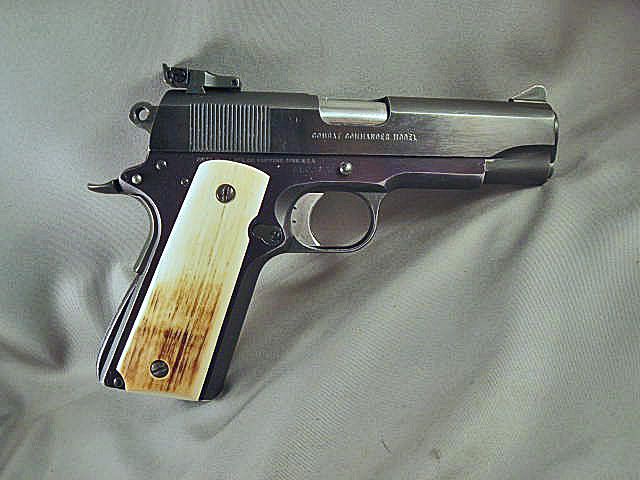 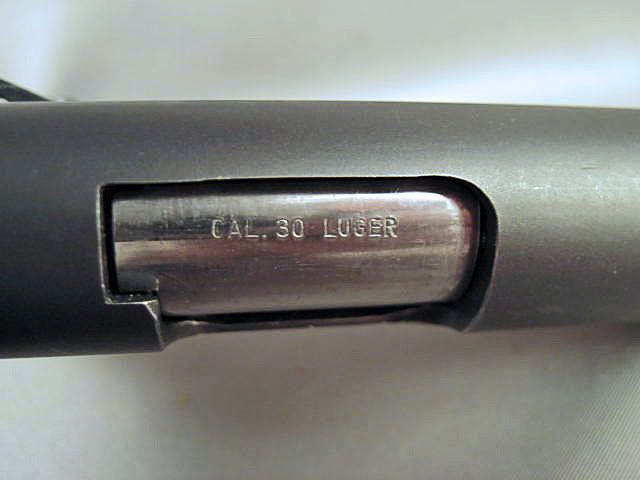
__________________
TRUMP FOR PREZ IN '20! |
|
|
|
| The following member says Thank You to Hugh for your post: |
|
04-29-2012, 01:15 PM
|
#13 | |
|
Lifer
Lifetime Forum Patron
Join Date: Feb 2009
Location: ...on the 'ol Erie Canal...
Posts: 8,181
Thanks: 1,397
Thanked 4,438 Times in 2,327 Posts
|
Quote:
") I got the 7.65 Luger barrel throated today; Rube Goldberg way to do it, but it seems to have worked...Without any tooling or workpieces becoming airborne...
__________________
I like my coffee the way I like my women... ...Cold and bitter...
|
|
|
|
|
| The following member says Thank You to sheepherder for your post: |
|
04-29-2012, 01:45 PM
|
#14 |
|
User
Join Date: Nov 2011
Posts: 224
Thanks: 0
Thanked 81 Times in 41 Posts
|
Very Nice Work! I too went to local community college for machine shop schooling. Great experience even though I actually never use it.
|
|
|
|
|
04-29-2012, 01:46 PM
|
#15 |
|
User
Join Date: Aug 2009
Location: Franklin Tennessee
Posts: 119
Thanks: 22
Thanked 10 Times in 7 Posts
|
Postino,
I use to be in a Plant Maintenance section(electronics and test equipment was my field)and I was always amazed at the work that the machinests turned out. Those guys were really talented, and they got to use the best equipment the government could afford. I always enjoy reading about your projects. Peter |
|
|
|
|
04-29-2012, 02:29 PM
|
#16 | |
|
Lifer
Lifetime Forum Patron
Join Date: Feb 2009
Location: ...on the 'ol Erie Canal...
Posts: 8,181
Thanks: 1,397
Thanked 4,438 Times in 2,327 Posts
|
Quote:
...Really annoyed me when manufacturing left my region and I had to go into service industry... 
__________________
I like my coffee the way I like my women... ...Cold and bitter...
|
|
|
|
|
|
04-29-2012, 03:53 PM
|
#17 |
|
Lifer
Lifetime Forum Patron
Join Date: Jun 2008
Location: Scottsboro, Alabama
Posts: 540
Thanks: 546
Thanked 438 Times in 165 Posts
|
Postino:
I may have mentioned this before, but I don't think so--I worked for International Paper for 36 years. So, you were a competitor. Working at a paper mill was really demanding work, but it was fascinating due to the multitude of skills that it takes to design, build, operate and maintain them. I'm sure you agree that they are truly labor and capital intensive enterprises. It usually requires over a billion dollars to build a greenfield mill. Similar work history--that's neat. Neil
__________________
Neil The hurrier I go the behinder I get. Sometimes it takes me all day to get nothing done.
|
|
|
|
|
05-06-2012, 01:57 PM
|
#18 | ||
|
Lifer
Lifetime Forum Patron
Join Date: Feb 2009
Location: ...on the 'ol Erie Canal...
Posts: 8,181
Thanks: 1,397
Thanked 4,438 Times in 2,327 Posts
|
Quote:
Quote:
I needed to cut throats on Luger, Mauser, P-38, M1911, and Star barrels that I'd relined, but my pneumatic die grinder w/Carbide burr cut way too fast and way too much...One little twitch, and I'd trash a lot of work...  So I need to cut it in a secure fixture...Like my rotary indexing head...But in one of those inexplicable instances, the centerline of my lathe spindle was .797" above the bed...Some obscure measurement (not Metric or Yankee) that of course nothing is available to use as a shim... So I had to make one...3" x 6" x 1" 6061 T6 aluminum plate milled down to .797"... Here's a shot of the indexing head bolted to the bed, with a 8.8mm ground steel rod in the chuck, bumped up close to another 8.8mm steel rod in the lathe chuck...and for all intents and purposes...Centered...  (You can just make out the line where the two rods butt up) To cut the throats, I have to turn it 35º (or 55º, however you look at it) and since it is right-handed, I have to use a mirror to watch the cut...Otherwise, I can't turn the rotary head...
__________________
I like my coffee the way I like my women... ...Cold and bitter...
|
||
|
|
|
| The following member says Thank You to sheepherder for your post: |
|
05-06-2012, 03:18 PM
|
#19 |
|
Lifer
Lifetime Forum Patron
Join Date: Jun 2008
Location: Scottsboro, Alabama
Posts: 540
Thanks: 546
Thanked 438 Times in 165 Posts
|
Pretty neat and ingenius solution Postino. I appreciate solutions like this.
Neil
__________________
Neil The hurrier I go the behinder I get. Sometimes it takes me all day to get nothing done.
|
|
|
|
 |
| Tags |
| blivet |
|
|


 Linear Mode

