
upload photo | donate | calendar
|
my profile |
register |
faq |
search upload photo | donate | calendar |
|
|
 05-17-2014, 06:36 PM
|
#1 |
|
Lifer
Lifetime Forum Patron 
Join Date: Feb 2009
Location: ...on the 'ol Erie Canal...
Posts: 8,182
Thanks: 1,398
Thanked 4,440 Times in 2,328 Posts
|
Disclaimer: I am not a craftsman or an artisan; I'm not a gunsmith or master machinist. I'm just a blue-collar gun hack. My work is crude and minimalist; no frills, no polish, nothing to be especially proud of. I don't have the years or thousands of dollars to wait for a master craftsman to make me what I want. So, I do it myself. It's not beautiful, but as the bard says, "Beauty is in the eye of the beholder". I can look at 50 feet of railroad track and think it's beautiful. Like National Lampoon has proclaimed: "Creosote is King!"
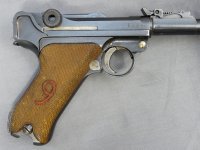
 ************************************************************************ This is the latest in my series of Gonzo long barreled military handguns. The previous two being based on the profile, dimensions, and rear sight of the LP-08 'Artillery' Luger pistol. This one is actually based on the P08 Luger, but the barrel will be longer than the 'artillery' model, and the rear sight selection is still undecided. This particular project was inspired by a 'prototype' 7.63 C96 Mauser-chambered conversion done by Herbert Werle some time back and sold on Hermann-Historica. It uses a shortened 7.65 caliber Mauser rifle barrel with OEM front and rear rifle sights, adapted to the Luger frame, and re-chambered. I kind of liked the idea, but the sights are a bit too big for me, and I'm not fond of stepped barrels. Here's two pics of Werle's excellent conversion - I'm going to emulate his idea, but slightly different. First pic is of some of the available parts I have on hand. Two barrels are Remington 700 30-06 cal barrels; one is a Winchester 30-06 Mod 70. The resulting long barrel Luger will be chambered in 7.65 Parabellum [30 Luger]. The top [Winchester] barrel has already been fitted with several rear sight assemblies. The top pic has an 1891 Argentine Mauser carbine rear sight fitted. The front sight and band is from the 1891 Mauser carbine as well. Shown below that barrel is an FN M24/30 Mauser carbine rear sight, a Luger artillery rear sight with two different dovetail mounts, and a Martini Cadet rear sight. The [Winchester] barrel shown with the 1891 Carbine sights mounted has already been chambered for 7.65 Parabellum and threaded to fit the Luger P-08 receiver pictured. Next pic is of the above mentioned barrel with the 1891 carbine rear sight mounted [top] and the FN rear sight [below] Both will fit (22mm barrel) as will the dovetail mount in the pic above this one. At this point, I am leaning toward the 1891 Carbine sight but the FN Carbine sight is more attractive and quite similar to the Luger Artillery rear sight in construction. I'm considering shortening both the sight leaf and the mount and utilizing that sight. The four pics consolidated below show the first stages of the barrel machining. (1) Barrel segment is approximately 13" long, and has been turned to 19.5mm [.768"] dia for the rear sight band and the breech stub is being turned/threaded to ~.709" dia/20tpi thread. (2) Breech being faced off and clearance cut for receiver, length of .740". (3) Beginning cutting the 7.65 Parabellum chamber. Clymer reamer, 1/32" cuts, lots of high-Sulphur content cutting oil, back out & blow chips off every 1/32" cut. (4) Chamber rough finish cut. Chamber will be hand cut for headspace after torquing to the receiver. Edit: Numrich has a listing for the base for my Martini 310 Cadet rear sight [shown below on a base]. I ordered one, and if it works, I'm thinking of using that rather than the Mauser/Luger tangent sights. It's both elevation and drift adjustable.
__________________
I like my coffee the way I like my women... ...Cold and bitter... 
Last edited by sheepherder; 09-13-2016 at 04:25 PM. Reason: added 's' to title |

|

|
| The following 3 members says Thank You to sheepherder for your post: |
|
12-07-2014, 12:20 PM
|
#2 |
|
Lifer
Lifetime Forum Patron
Join Date: Feb 2009
Location: ...on the 'ol Erie Canal...
Posts: 8,182
Thanks: 1,398
Thanked 4,440 Times in 2,328 Posts
|
I could not find a Martini rear sight, so I decided to go with the shortened FN carbine sight.
(5) Rough chambering for 7.65 Parabellum pretty much finished. (6) Cutting back the shoulder for sight base 'sleeve' mounting. (7) Sectioning the FN carbine rear sight base/sleeve. (8) Shortened FN carbine rear sight base/sleeve, shortened barrel shoulder. (9) Barrel re-tapered, rough cut. (10) Taper section polished, muzzle tip turned down for threading. (11) Front sight base blank being faced off.
__________________
I like my coffee the way I like my women... ...Cold and bitter...
Last edited by sheepherder; 02-25-2016 at 10:04 AM. |
|
|
|
| The following 3 members says Thank You to sheepherder for your post: |
|
04-06-2016, 12:38 AM
|
#3 |
|
Lifer
Lifetime Forum Patron Join Date: Sep 2006
Location: Wichita, KS USA
Posts: 453
Thanks: 573
Thanked 96 Times in 53 Posts
|
really creative work of art - in metal and wood - nicely sculpted !!!
|
|
|
|
|
04-06-2016, 02:23 PM
|
#4 |
|
Lifer
Lifetime Forum Patron
Join Date: Feb 2009
Location: ...on the 'ol Erie Canal...
Posts: 8,182
Thanks: 1,398
Thanked 4,440 Times in 2,328 Posts
|
I've gone over the text on page 1 and corrected some mistakes and added a few additional remarks. My apologies if some of the composite pics seem to be out of order, especially the forearm machining, but it's kind of a compilation of several of the five forearms showing the milling operations.
 I'm quite pleased with the final forearm. Making them all, using metalworking tooling and machinery exclusively, was very satisfying. The final forearm is not an accurate copy of an actual Luger forearm, but it kind of looks like one, if you squint your eyes and stand back a few feet... Before I stick them away forever, I thought I'd take a group photo of the five forearms that I made for this project. Two I made mistakes on, one was a 'feasibility study', one was just for practicing machine operations, and one turned out OK. - Far left is the one made from an Ithaca M37 stock [feasilibility study]. Barrel channel was too wide, due to Ithaca attaching bolt. - Next is a white pine - oddly, this one is by far the best. Everything just came together on it. ") - Middle is made from an 1891 Argentine Mauser stock, but I made the curled tip too small. Otherwise, a good one. - Light colored striped one is made from the 1895 Steyr straight-pull stock. I mis-measured the trigger guard distance and this one cracked when I screwed it to the lug. - Last one is another 1891 Argentine Mauser stock piece. This one wasn't quite as good as #2 and #4 but it's good enough! 
__________________
I like my coffee the way I like my women... ...Cold and bitter...
Last edited by sheepherder; 04-07-2016 at 09:44 AM. |
|
|
|
|
07-11-2016, 11:52 PM
|
#5 |
|
User
Join Date: Apr 2015
Location: near Charlotte NC
Posts: 4,677
Thanks: 1,439
Thanked 4,348 Times in 2,038 Posts
|
Rich,
thanks for taking the time to do the 'how to' pictures and posting them. Great info and i know it took a LOT of time and effort. The end result looks super.
__________________
03man(Don Voigt); Luger student and collector. Looking for DWM side plate: 69 ; Dreyse 1907 pistol K.S. Gendarmerie |
|
|
|
|
09-13-2016, 04:13 PM
|
#6 |
|
User

Join Date: Sep 2006
Location: Canada
Posts: 256
Thanks: 74
Thanked 67 Times in 32 Posts
|
Work of true craftsman, right there. Thanks for sharing.
|
|
|
|
|
05-27-2017, 02:32 PM
|
#7 |
|
Lifer
Lifetime Forum Patron Join Date: Dec 2003
Location: PORT ST LUCIE, FLORIDA
Posts: 12,216
Thanks: 6,209
Thanked 4,133 Times in 2,173 Posts
|
God gave you a unique Gift!!! Its wonderful for you to share it with all of us!!!! Eric
|
|
|
|
|
05-27-2017, 09:42 PM
|
#8 |
|
User
Join Date: Apr 2015
Location: near Charlotte NC
Posts: 4,677
Thanks: 1,439
Thanked 4,348 Times in 2,038 Posts
|
Nice work Rich.
Really nice wood work. Do you really need those ears at the rear of the fore arm that recoil into the trigger area? I guess they are essentially cosmetic, as there can be no rotating force to the fore arm.
__________________
03man(Don Voigt); Luger student and collector. Looking for DWM side plate: 69 ; Dreyse 1907 pistol K.S. Gendarmerie |
|
|
|
|
05-27-2017, 10:34 PM
|
#9 |
|
User

Join Date: Sep 2014
Location: Mt. Vernon VA
Posts: 244
Thanks: 1,420
Thanked 117 Times in 75 Posts
|
Beautiful work! But does the action jam with the greater weight forward and the design where the fore stock is not mounted to the frame? I guess you can't hold the fore stock or it will impede the recoil action and jam. I'm working on my own carbine with a 16.5 inch barrel and looking for a fore stock and angle piece to mount to the frame.
|
|
|
|
|
05-28-2017, 06:06 PM
|
#10 | ||
|
Lifer
Lifetime Forum Patron
Join Date: Feb 2009
Location: ...on the 'ol Erie Canal...
Posts: 8,182
Thanks: 1,398
Thanked 4,440 Times in 2,328 Posts
|
Quote:
Quote:
I'm big on theory.
__________________
I like my coffee the way I like my women... ...Cold and bitter...
|
||
|
|
|
| The following member says Thank You to sheepherder for your post: |
|
05-28-2017, 08:25 PM
|
#11 |
|
User
Join Date: Apr 2015
Location: near Charlotte NC
Posts: 4,677
Thanks: 1,439
Thanked 4,348 Times in 2,038 Posts
|
I could never get a 16" .30 barrel to work in SA fire.
I think it would require an auxillary spring to close the toggle; and for sure if you were holding the handguard on the one above, it would make a big difference - not a theory- I've done it when struggling to try to get my 16" bbl to work.
__________________
03man(Don Voigt); Luger student and collector. Looking for DWM side plate: 69 ; Dreyse 1907 pistol K.S. Gendarmerie |
|
|
|
| The following member says Thank You to DonVoigt for your post: |
|
05-28-2017, 10:36 PM
|
#12 |
|
Lifer
Lifetime Forum Patron
Join Date: Feb 2009
Location: ...on the 'ol Erie Canal...
Posts: 8,182
Thanks: 1,398
Thanked 4,440 Times in 2,328 Posts
|
When I first started that particular build, I had it in mind to make it a 'pump action' repeater. A sliding forearm with a rod going up to the toggle. The toggle would stay closed until the slide action opened it. But I got hung up on how to lock the action closed when firing. I had thought of a button/bar that would engage the frame until pressed then it would unlock the slide. Pretty much like a pump shotgun.
But I got too engrossed in the rest of the build...It took on a life of its own...  It wouldn't have looked like a Luger carbine either, even from the side. Think of one of those old .22 Winchester pump action rifles. With a long bar going from the slide up to the toggle.
__________________
I like my coffee the way I like my women... ...Cold and bitter...
|
|
|
|
|
06-03-2017, 07:59 AM
|
#13 |
|
User

Join Date: Jan 2017
Location: S.E. Iowa
Posts: 481
Thanks: 531
Thanked 226 Times in 123 Posts
|
Outstanding!! I really enjoyed seeing your work in progress. Your photos are also excellent. Thank you!!
__________________
I Build Custom Pistol Boxes |
|
|
|
|
10-30-2017, 03:19 PM
|
#14 |
|
Lifer
Lifetime Forum Patron
Join Date: Feb 2009
Location: ...on the 'ol Erie Canal...
Posts: 8,182
Thanks: 1,398
Thanked 4,440 Times in 2,328 Posts
|
(This section is continued from) -
http://forum.lugerforum.com/showpost...8&postcount=19 Well, it's been over a year since I 'finished' my 13" barreled Gonzo Luger carbine. I've shown it to a few people and gotten some comments. About the only unfavorable comment that I received was that it was not a faithful reproduction/recreation of an original carbine. Particularly the lack of checkering. I like the way the wood grain showed up under the BLO. It was even noted that my buttstock has a bit of 'fiddleback' in the comb. (I don't think it shows up in the pics - you have to turn it in the light to see it).  But checkering is a staple of Luger carbines, so I finally turned to Jim Solomon to checker the Gonzo Carbine. As a side note, I would prefer to do all the work required on my projects myself. But I'm turning 68 in a couple weeks and I don't have the patience to learn new trades at this point in my life, much less perfect them. So I've turned to Charles Danner for my blueing and strawing needs; to Gerry Tomek for my magazine bottoms; to Remington for my 30 cal barrel blanks/pulls; to Macon Gunstocks for my buttstock blank; and Jim Solomon for the checkering. These artists have all perfected their techniques, leaving me with only the simplest of work to finish the projects up. Here, then, is a commentary of Jim's conversion of my slickside carbine buttstock and forearm into a checkered set reminiscent of the Luger carbines of the 20's. After contacting Jim and emailing him several pictures of Simpson, Salter, and Bruning carbine furniture, Jim sent me back sketches of his proposed work. Jim included pics of my wood with the outlines of the checkered borders done in white pencil. Jim sent pics of the semi-complete checkering. It looked good! The wood was returned to me for final finishing. Jim does finishing of the wood as well as checkering, but I wanted to save some money and also have the satisfaction of doing some of the work myself so I had Jim leave the final finishing (BLO in my case) for me. I had already applied several coats of BLO to the slickside furniture and liked the way it looked and intended to do the same after checkering. If anyone is considering having Jim do any woodworking, I suggest you let Jim do the final finishing himself. It'll save a lot of grief. So...After three coats of BLO, hand rubbed between coats, here is the finished buttstock and forearm, checkered and buffed to a semi-gloss finish. Some closeups of the checkering - The rubbing/buffing was done with soft, clean old rags {white T-shirts) which left some fabric/lint in the checkering. I only noticed it in the blown-up pics. A brush removed most of it. Eventually. Shameless plug for Jim's services -
__________________
I like my coffee the way I like my women... ...Cold and bitter...
Last edited by sheepherder; 11-18-2017 at 12:19 PM. Reason: spel chekr |
|
|
|
|
10-30-2017, 03:20 PM
|
#15 |
|
Lifer
Lifetime Forum Patron
Join Date: Feb 2009
Location: ...on the 'ol Erie Canal...
Posts: 8,182
Thanks: 1,398
Thanked 4,440 Times in 2,328 Posts
|
And pics of the final assembled Gonzo Luger carbine -
I have some 7.65 Parabellum cartridges loaded up and hope to shoot off a few rounds in a week or so. BTW, I would be remiss if I did not credit Charles Danner with the refinishing of all parts of this handgun. Charles draw files, sands, and re-cuts any lettering/numbers as well as any logos that may be diminished by the metal removal. He then rust blues and straws the parts. Great job!
__________________
I like my coffee the way I like my women... ...Cold and bitter...
Last edited by sheepherder; 11-29-2018 at 08:53 PM. |
|
|
|
| The following 3 members says Thank You to sheepherder for your post: |
|
10-30-2017, 06:31 PM
|
#16 |
|
Lifer
Lifetime Forum Patron Join Date: Nov 2012
Location: Georgia
Posts: 193
Thanks: 695
Thanked 173 Times in 66 Posts
|
Sheepherder,
You had done a truly outstanding service for the members of this Forum by the amazing documentary of the process of building a carbine. Your are a craftsman and have built a very impressive carbine. Looking forward to your next lovely presentation of one of your creations. Jim |
|
|
|
|
10-30-2017, 06:57 PM
|
#17 |
|
User

Join Date: Sep 2017
Location: Bellevue, Nebraska
Posts: 36
Thanks: 57
Thanked 31 Times in 11 Posts
|
Wow!!!! I am very impressed. I had an idea that this was difficult for a full-up ammunition factory, but no real idea how difficult if could be for an individual. My hat's off to you.
__________________
- Glenn |
|
|
|
|
11-29-2017, 04:00 PM
|
#18 |
|
Lifer
Lifetime Forum Patron
Join Date: Feb 2009
Location: ...on the 'ol Erie Canal...
Posts: 8,182
Thanks: 1,398
Thanked 4,440 Times in 2,328 Posts
|
After seeing how well the checkering for the 13" barreled Gonzo Luger Carbine turned out, I asked Jim Solomon to checker the forearm for the 16" barrel as well, and he kindly consented.
Here's the finished 16" barreled action mounted on the Gonzo Carbine, with checkered 16" forearm installed. It's had two coats of BLO and rubbed out after each dried coat. After consulting with me, my nephew (heir & executor) has decided that this Gonzo Carbine will be part of our family heritage, and be passed down rather than sold off. I guess my next project will be to construct/modify a case for it. The case will have to hold the grip assembly, the buttstock, both barreled actions, two magazines, and whatever other accessories I can dig up. 
__________________
I like my coffee the way I like my women... ...Cold and bitter...
|
|
|
|
| The following 4 members says Thank You to sheepherder for your post: |
|
12-07-2014, 12:35 PM
|
#19 |
|
Lifer
Lifetime Forum Patron
Join Date: Feb 2009
Location: ...on the 'ol Erie Canal...
Posts: 8,182
Thanks: 1,398
Thanked 4,440 Times in 2,328 Posts
|
Pretty boring stuff now, but I include it for continuity...
(12) Drilling out sight base blank. (13) Tapping sight base blank to 1/2" x 28tpi. (14) Threading muzzle tip to 1/2" x 28tpi. Bevel linking barrel taper to rear sight base is also cut (10º). (15) Completed thread. Next up is torquing the barrel down, machining a locating flat on the barrel, and machining the front sight base & band. (16) Front sight base blank fitted to muzzle thread. (17) Barrel has been torqued into receiver; flat milled on top of rear sight hood. (18) Spirit method of indexing the barrel to the receiver using the milled flat. (19) Flat is now milled on top of leveled front sight blank. This is how I'll level the front sight with the receiver. (20) Front sight blank has been trimmed on the bandsaw and mounted on an old M16 barrel stub. Beginning to mill it round. (21) A look at the somewhat clumsy setup. What a PITA! Cranking the indexing head ~270º every .040". And I got the crank in an awkward position... (22) Close-up of the first couple of revolutions, milling the muzzle relief. (23) Completed the circular cutting; now to mill the sight base. (24) Switched from a short 1/4" 4-flute end mill to a long one. Base/band came out pretty nice. (25) Close-up of last cut. (26) Close-up of base/band installed [loosely]. Side view of how it might look...If I don't screw it up...
__________________
I like my coffee the way I like my women... ...Cold and bitter...
Last edited by sheepherder; 02-25-2016 at 10:06 AM. |
|
|
|
|
12-10-2014, 07:39 PM
|
#20 |
|
Lifer
Lifetime Forum Patron
Join Date: Feb 2009
Location: ...on the 'ol Erie Canal...
Posts: 8,182
Thanks: 1,398
Thanked 4,440 Times in 2,328 Posts
|
I now find that I need to make a keyhole spanner to torque my front sight base on & off with...Using 5/8" aluminum plate, hole bored to ~.640" and a ~.290" slot...
(27) Hole was drilled to 1/2", slot milled, and hole bored out to ~5/8"+. (28) Closeup of front sight base in keyhole spanner. (29) Torquing the front sight base to the barrel with the keyhole spanner. Spirit levels used to align the two. (30) Spanner removed; checking level again with level on top flat of front sight base. Next up is facing off the muzzle and crowning. (31) Muzzle face has been turned in lathe, slight chamfer cut on edge of muzzle, crown being cut. (32) Barrel has been torqued on receiver/barrel extension; rear sight located, holes drilled for #4-40 screws, front sight base torqued on, hole drilled for #4-40 setscrew and being tapped in this pic. (33) Angle plate has been mounted on mill table at 58º; barrel has been removed from receiver/barrel extension and leveled in barrel vise clamp; bolted perpendicular to table in preparation of milling extractor notch. (34) Making first extractor cut with .093" Woodruff keyseat cutter. (35) Second extractor cut with .200" Woodruff keyseat cutter. (36) Cutting feed ramp with 10mm end mill. Barrel held in barrel vise clamps which are in turn held in angle vise set at 50º. My thanks to Gerry Tomek for his sleuth work in determining the correct angle! (37) Just a closeup of the finished ramp cut. (38) Torquing the receiver on the barrel again, to check extractor clearance in receiver/barrel extension. I've received a donor frame, I'll be prepping that for a forearm lug soon. Couple other things need doing on the barrel, plus the rear sight leaf needs shortening. Always something. Interlude Off-topic, but worth relating...I was milling an aluminum block square earlier in the week, idly watching the end mill spin around in the spindle and the feed table move slowly along, keeping an occasional eye on the TV on the shelf above me, when the air compressor in the corner suddenly kicked in...It took about half a second for me to lunge forward and disengage the feed before the circuit breaker cut power to the 3in1 mill...The 3in1 has two 8.8A motors, one for the mill spindle and the other for the lathe/table feed...The compressor motor is 15A...All plugged into a 12/2 w/gnd wired circuit with a 20A breaker... So today I ran 10/2 w/gnd to the 3in1 with a 30A breaker and moved the compressor to a 20A breaker. I usually know enough to run the compressor and build up a reserve and switch it off before running the 3in1, but this time I forgot. If the power cuts off while I'm cutting with the feed on, it can be disastrous to the workpiece and expensive to replace the broken cutter. Better to be safe now than sorry later. Here's the finished breech - Extractor notch cut; feed ramp milled; barrel torqued in place.
__________________
I like my coffee the way I like my women... ...Cold and bitter...
Last edited by sheepherder; 02-25-2016 at 10:07 AM. |
|
|
|
 |
| Tags |
| blivet |
|
|


 Hybrid Mode
