
upload photo | donate | calendar
|
my profile |
register |
faq |
search upload photo | donate | calendar |
 09-18-2015, 08:45 AM
|
#1 |
|
User

Join Date: Feb 2010
Location: Tennessee
Posts: 1,149
Thanks: 159
Thanked 664 Times in 318 Posts
|
I just started working on one of my Broomhandles, the plan is to reline it and make it a looker/shooter. Some parts are obviously fire blued, but I don't know if all variations were done the same way. This one doesn't have the new safety, which I believe makes it a pre-WWI model. The parts I'm planning to fire blue are:
Rear sight assembly Safety lever Bolt stop Extractor The parts I'm unsure about are the hammer and the trigger, and there could possibly be some other small parts that should be fire blued as well (like the floor plate release button). Also seems like all C96 firing pins are strawed, but it would be good to confirm that. |

|

|
|
09-18-2015, 10:02 AM
|
#2 |
|
User

Join Date: Feb 2013
Location: Somewhere in Northern Italy
Posts: 2,646
Thanks: 1,087
Thanked 1,783 Times in 1,007 Posts
|
Olle,
FWIK I can't recall having seen a C96 firing pin strawed, I think all C96 had their firing pin blued. I could be wrong. Regards Sergio
__________________
"Originality can't be restored and should be at the top of any collector's priority list. |
|
|
|
|
09-18-2015, 10:38 AM
|
#3 | |
|
User
Join Date: Feb 2010
Location: Tennessee
Posts: 1,149
Thanks: 159
Thanked 664 Times in 318 Posts
|
Quote:
I know there's several knowledgeable collectors here, so I'm hoping that this will be easy to figure out. If not, I'll just wing it. It will be a refinished shooter anyway, so the main objective is to make it look good. |
|
|
|
|
|
09-18-2015, 11:21 AM
|
#4 | |
|
User
Join Date: Feb 2010
Location: Tennessee
Posts: 1,149
Thanks: 159
Thanked 664 Times in 318 Posts
|
Quote:
 I'm actually planning to take the coward's way out and let somebody else do the liner. I was thinking about doing it myself, but I won't be doing many .30 cal barrels (this might be the only one) so buying materials and the tools to do it would be cost prohibitive. The rest of the restoration will be enough work anyway. The grip frame is the worst part, it's pretty darn rough. I'm having it welded up right now and there will be many hours of filing, sanding and cussing just to do that part of the restoration. 
|
|
|
|
|
|
09-18-2015, 12:19 PM
|
#5 |
|
Lifer
Lifetime Forum Patron Join Date: Nov 2012
Location: Georgia
Posts: 199
Thanks: 700
Thanked 176 Times in 69 Posts
|
I had Randall Redman to reline my C96 two years ago......he did a good job.
Jim |
|
|
|
| The following member says Thank You to Jim Solomon for your post: |
|
09-18-2015, 01:48 PM
|
#6 |
|
User

Join Date: Jun 2002
Location: Rio Rancho, New Mexico
Posts: 4,583
Thanks: 958
Thanked 971 Times in 277 Posts
|
All fire blued as well as the trigger. A couple of my restorations to illustrate. Be care removing the rear sight blade you can shear off the two side nubs if you dont know how to remove it.
__________________
Thor's Luger Clinic http://members.rennlist.com/lugerman/ Ted Green (Thor Yaller Boots) 725 Western Hills Dr SE, Rio Rancho, NM 87124 915-526-8925 Email thor340@aol.com ----------------------------------- John3:3 Jesus answered and said to him, "Most assuredly, I say to you, unless one is born again, he cannot see the kingdom of God." |
|
|
|
| The following member says Thank You to Thor for your post: |
|
09-18-2015, 02:02 PM
|
#7 |
|
User
Join Date: Feb 2010
Location: Tennessee
Posts: 1,149
Thanks: 159
Thanked 664 Times in 318 Posts
|
Thanks, that helps a lot!
It actually appears like the hammer is in the white, would that be correct for my pistol?
|
|
|
|
|
09-18-2015, 02:24 PM
|
#8 | |
|
User
Join Date: Feb 2013
Location: Somewhere in Northern Italy
Posts: 2,646
Thanks: 1,087
Thanked 1,783 Times in 1,007 Posts
|
Quote:
Olle, Yes all hammers that I've seen are in the white (well at least all my C96 have got hammers in the white) I enclose some pictures of them. Best Sergio
__________________
"Originality can't be restored and should be at the top of any collector's priority list. |
|
|
|
|
|
09-18-2015, 03:02 PM
|
#9 |
|
User
Join Date: Jul 2007
Location: US
Posts: 3,843
Thanks: 132
Thanked 729 Times in 438 Posts
|
You can use this one as reference.
http://www.gunauction.com/buy/13529540 I just sent it out yesterday. Not in my hand anymore. Mauser finish could be confusing. But this one can be used as a reference. Hammer is supposed to be grey. Trigger finish depends on s/n. Rough rule of thumb -- if it has 4 rifling lines, strawed trigger. 6 rifling lines, fire blued trigger. |
|
|
|
|
09-18-2015, 03:15 PM
|
#10 |
|
User
Join Date: Feb 2010
Location: Tennessee
Posts: 1,149
Thanks: 159
Thanked 664 Times in 318 Posts
|
Great pictures, thanks! I don't know if it's just a trick of the light, but is the whole bolt in the white, even the rear part?
|
|
|
|
|
09-18-2015, 03:21 PM
|
#11 |
|
User
Join Date: Jul 2007
Location: US
Posts: 3,843
Thanks: 132
Thanked 729 Times in 438 Posts
|
Yes. The bolt is silver white, including the rear end.
|
|
|
|
|
09-18-2015, 03:35 PM
|
#12 | |
|
User
Join Date: Feb 2013
Location: Somewhere in Northern Italy
Posts: 2,646
Thanks: 1,087
Thanked 1,783 Times in 1,007 Posts
|
Quote:
Sergio
__________________
"Originality can't be restored and should be at the top of any collector's priority list. |
|
|
|
|
|
09-18-2015, 07:11 PM
|
#13 |
|
User
Join Date: Jun 2002
Location: Rio Rancho, New Mexico
Posts: 4,583
Thanks: 958
Thanked 971 Times in 277 Posts
|
yep
__________________
Thor's Luger Clinic http://members.rennlist.com/lugerman/ Ted Green (Thor Yaller Boots) 725 Western Hills Dr SE, Rio Rancho, NM 87124 915-526-8925 Email thor340@aol.com ----------------------------------- John3:3 Jesus answered and said to him, "Most assuredly, I say to you, unless one is born again, he cannot see the kingdom of God." |
|
|
|
|
09-18-2015, 09:04 PM
|
#14 |
|
User
Join Date: Feb 2010
Location: Tennessee
Posts: 1,149
Thanks: 159
Thanked 664 Times in 318 Posts
|
Outstanding! Thanks to everybody who have posted, time for me to go back to the dungeon and roll up my sleeves!
|
|
|
|
|
12-19-2015, 01:58 AM
|
#15 |
|
User
Join Date: Feb 2010
Location: Tennessee
Posts: 1,149
Thanks: 159
Thanked 664 Times in 318 Posts
|
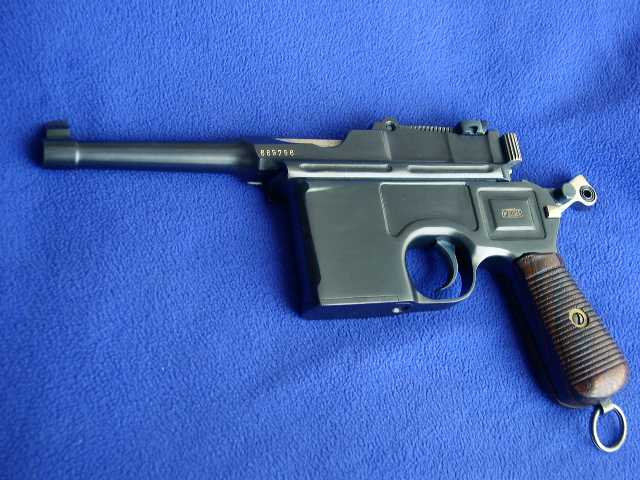
Update: Got it done this evening, just in time for the gun show tomorrow. I'll be selling guns together with a friend of mine, so I hope it will make people stop and look at our stuff.
This gun was pretty rough to begin with, and needed quite a bit of welding, filing, shaping etc. The grip frame was severely rusted, so the only thing I could do was to weld up the edges and call it a day. There's still pitting under the grips, but it should hopefully be in a more stable form now after being boiled and soaked in oil. The grips are repros from somewhere overseas, they needed a lot of massaging to fit and they are still not perfect, but at least they look decent. I would like to thank Paladinpainter for his role in the project, he was gracious enough to send me his special bluing formula, and he also did some of the nitre bluing. The barrel was relined by Redman's, and all that's left now is to install a new recoil spring and it will be ready to test fire. I should have ordered that spring before I even started working on it, but.... Anyway, here she is: |
|
|
|
|
12-19-2015, 08:19 AM
|
#16 |
|
User
Join Date: Nov 2009
Location: Vermont
Posts: 64
Thanks: 14
Thanked 45 Times in 15 Posts
|
Nice work, Olle. I suspect there is a lot of elbow grease on this one.
John |
|
|
|
|
12-19-2015, 08:47 AM
|
#17 |
|
User
Join Date: Jul 2007
Location: US
Posts: 3,843
Thanks: 132
Thanked 729 Times in 438 Posts
|
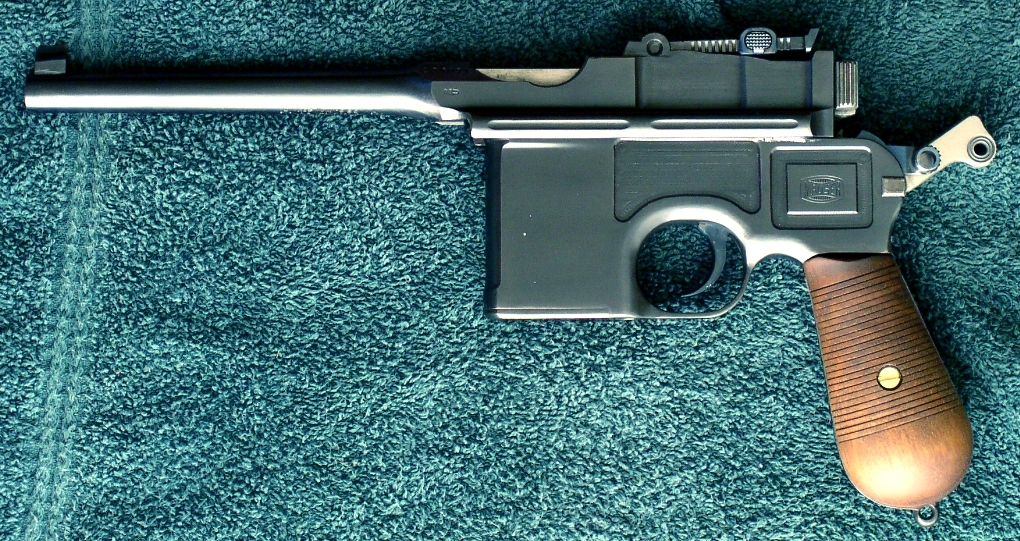
Looks good.
Standard C96 with shorter chamber (like this one) usually has slightly brighter finish. Those with long chamber has dull military style finish -- because WWI was approaching, many long chambers were sold to that direction. So, strictly speaking, the finish is not 100% correct, but it's good enough. |
|
|
|
|
12-19-2015, 09:23 AM
|
#18 |
|
User
Join Date: Feb 2013
Location: Somewhere in Northern Italy
Posts: 2,646
Thanks: 1,087
Thanked 1,783 Times in 1,007 Posts
|
Olle
Let me congratulate with you from the picture it looks like a nice work indeed!
__________________
"Originality can't be restored and should be at the top of any collector's priority list. |
|
|
|
|
12-19-2015, 10:30 AM
|
#19 |
|
User

Join Date: Apr 2015
Location: near Charlotte NC
Posts: 4,681
Thanks: 1,443
Thanked 4,356 Times in 2,041 Posts
|
Very nice job.
__________________
03man(Don Voigt); Luger student and collector. Looking for DWM side plate: 69 ; Dreyse 1907 pistol K.S. Gendarmerie |
|
|
|
|
12-19-2015, 01:58 PM
|
#20 |
|
Twice a Lifer
Lifetime Forum Patron 
Join Date: Mar 2011
Location: Atop the highest hill in Schuyler County NY
Posts: 3,403
Thanks: 7,569
Thanked 2,651 Times in 1,395 Posts
|
Olle, nice work! A silk purse created from the proverbial sow's ear!
__________________
"... Liberty is the seed and soil, the air and light, the dew and rain of progress, love and joy."-- Robert Greene Ingersoll 1894 |

|
|
 |
|
|


 Linear Mode

