
upload photo | donate | calendar
|
my profile |
register |
faq |
search upload photo | donate | calendar |
|
|
 01-02-2014, 11:49 PM
|
#1 |
|
User

Join Date: Feb 2013
Location: Merritt Island, Fl
Posts: 952
Thanks: 777
Thanked 528 Times in 290 Posts
|
When I ordered the new springs for my Nambu, I also ordered a new recoil spring for the Luger. I put it in tonite, using a hybrid approach of Thor's instructions, a YouTube video I found, and my own improvisation. My addition to the technique was to temporarily insert a spacer at the bottom of the spring to hold the hook up so I could hook it onto the do-dah that it hooks to - as I didn't have gravity assisting me as in Thor's technique. No underbench to work with.
In any event, it was pretty much a piece of cake compared to the thrash I went through replacing the takedown lever spring! I had wanted to replace the recoil spring before a planned range trip this Sunday - and as I had broken a thumbnail at work today (Horrors! The humanity!  ), I figured tonite was the nite to get this project out of the way! ), I figured tonite was the nite to get this project out of the way!
|

|

|
| The following member says Thank You to Zorba for your post: |
|
01-03-2014, 12:30 AM
|
#2 |
|
Moderator
Lifetime Forum Patron 
Join Date: Jun 2002
Location: Arizona/Colorado
Posts: 7,775
Thanks: 4,995
Thanked 3,134 Times in 1,439 Posts
|
Zorba, Congratulations! One of the tougher things to do on a Luger.
__________________
Jerry Burney 11491 S. Guadalupe Drive Yuma AZ 85367-6182 lugerholsterrepair@earthlink.net 928 342-7583 (CO & AZ) Year Round 719 207-3331 (cell) 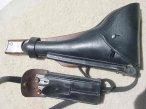 "For those who Fight For It, Life has a flavor the protected will never know." |
|
|
|
|
01-03-2014, 12:02 PM
|
#3 |
|
User
Join Date: Feb 2013
Location: Merritt Island, Fl
Posts: 952
Thanks: 777
Thanked 528 Times in 290 Posts
|
I'd rather do a recoil spring than that darn takedown lever spring. Ugh!
|
|
|
|
|
01-03-2014, 12:13 PM
|
#4 |
|
Super Moderator
Eternal Lifer LugerForum Patron 
Join Date: Jun 2002
Location: North of Spokane, WA
Posts: 15,977
Thanks: 2,076
Thanked 4,612 Times in 2,125 Posts
|
both the take lever spring and the recoil spring, well, most of the time they are little devils!
the take down spring, if I can get an edge into the groove, it will just slide in, but yes, I have spent 30 minutes and having it slide out under pressure from my pliers... the recoil spring is a lot easier with a tool i bought from a forum member, it still can be tricky, but you use a screw driver with a bent and sharpened point and it is easier... |
|
|
|
|
01-03-2014, 12:26 PM
|
#5 | |
|
Lifer
Lifetime Forum Patron 
Join Date: Feb 2009
Location: ...on the 'ol Erie Canal...
Posts: 8,208
Thanks: 1,425
Thanked 4,474 Times in 2,343 Posts
|
Quote:
 If not, is it made from a Phillips or flat screwdriver??? How exactly is it used???
__________________
I like my coffee the way I like my women... ...Cold and bitter...
|
|
|
|
|
|
01-03-2014, 12:45 PM
|
#6 |
|
Lifer
Lifetime Forum Patron 
Join Date: Jun 2002
Location: The Capital of the Free World
Posts: 10,156
Thanks: 3,003
Thanked 2,309 Times in 1,098 Posts
|
__________________
regards, -John S "...We hold these truths to be self-evident that ALL men are created EQUAL and are endowed by their Creator with certain UNALIENABLE rights, and among these are life, LIBERTY, and the pursuit of happiness..." |
|
|
|
| The following 4 members says Thank You to John Sabato for your post: |
|
01-03-2014, 05:57 PM
|
#7 | |
|
Lifer
Lifetime Forum Patron
Join Date: Feb 2009
Location: ...on the 'ol Erie Canal...
Posts: 8,208
Thanks: 1,425
Thanked 4,474 Times in 2,343 Posts
|
Quote:
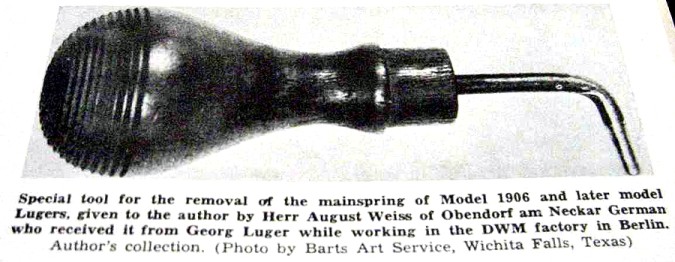
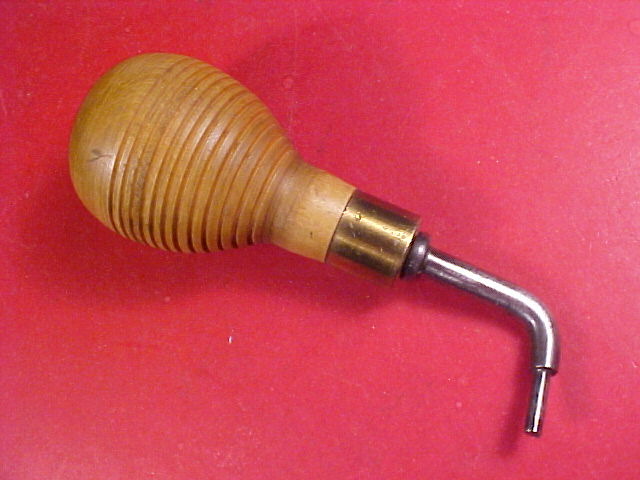
 I've only had to detail strip 2 or 3 Lugers, and frankly I don't recall how I got that mainspring in/out...But I do recall having it facing the wrong way when I was ready to finally 'set the hook'...  Now, I'm looking at the tool with the pink background color, and I think the very tip of the tool is split...At least that is my impression...Is it???  Edit: I took my grip off to look, and now I remember that I used an old needle-scaler needle (they're 3mm x 7" long and exactly fit in the hole) to use both hands to get the spring compressed, with the frame in a vise. BTW: I use this tool to pull cuttings off my lathe work, but it should work on Luger mainsprings as well as its primary purpose - Cotter Pin Puller. Should be available at any auto parts/tools store. Handy thing to throw in your toolbox.
__________________
I like my coffee the way I like my women... ...Cold and bitter...
|
|
|
|
|
|
01-03-2014, 06:36 PM
|
#8 |
|
User
Join Date: Feb 2013
Location: Merritt Island, Fl
Posts: 952
Thanks: 777
Thanked 528 Times in 290 Posts
|
I just used a small screwdriver inserted through the hole. One hand to do that, and one hand to place a temporary spacer on the bottom side - hook up the hook, remove spacer. Done.
|
|
|
|
|
01-03-2014, 08:33 PM
|
#9 |
|
Lifer X5
Lifetime Forum Patron Join Date: Sep 2008
Location: texas
Posts: 708
Thanks: 87
Thanked 523 Times in 202 Posts
|
BUT, did you put it in right-side-up ??
if you didn't, you will have to do it over.............. |
|
|
|
|
01-03-2014, 09:27 PM
|
#10 | |
|
Lifer
Lifetime Forum Patron
Join Date: Feb 2009
Location: ...on the 'ol Erie Canal...
Posts: 8,208
Thanks: 1,425
Thanked 4,474 Times in 2,343 Posts
|
Quote:
 ... ...Do you have a picture of the right side up???
__________________
I like my coffee the way I like my women... ...Cold and bitter...
|
|
|
|
|
|
01-03-2014, 11:36 PM
|
#11 | |
|
User
Join Date: Feb 2013
Location: Merritt Island, Fl
Posts: 952
Thanks: 777
Thanked 528 Times in 290 Posts
|
Quote:
|
|
|
|
|
|
01-05-2014, 02:49 AM
|
#12 | |
|
User

Join Date: Jul 2003
Location: New York, NY
Posts: 1,579
Thanks: 2,154
Thanked 402 Times in 251 Posts
|
Quote:
Would you please explain further, as I am having difficulty visualizing what you are doing? thanks! Sieger |
|
|
|
|
|
01-05-2014, 03:16 PM
|
#13 |
|
User
Join Date: Feb 2013
Location: Merritt Island, Fl
Posts: 952
Thanks: 777
Thanked 528 Times in 290 Posts
|
I'll try to describe:
Gun frame upside down on table. The already inserted, but not hooked up, spring assy has a small screwdriver inserted through the hole of the spring guide rod. I hooked two fingers of my right (strong) hand on each side of the screwdriver and bore downward. Takes quite a bit of force, and the frame wants to scoot away if you don't balance the force correctly. Once the spring is compressed, I inserted a spacer - in my case it was a bit from another screwdriver - between the end of the guide rod (with the hole that the little screwdriver is through) and the bottom end of the gun frame - which in this case is on top because its upside down. That holds the hook of the guide rod in far enough to hook the recoil lever onto it, then you can remove the spacer, allowing the spring assy back to its rest position. Clear as mud? This step took the place of Thor's under the bench maneuver as that wasn't an option for me at the time. Thor's method is probably better as the recoil lever has gravity working with it, instead of against it as in my method. All the usual safety caveats apply! |
|
|
|
|
01-03-2014, 05:18 PM
|
#14 |
|
Twice a Lifer
Lifetime Forum Patron 
Join Date: Mar 2011
Location: Atop the highest hill in Schuyler County NY
Posts: 3,403
Thanks: 7,569
Thanked 2,651 Times in 1,395 Posts
|
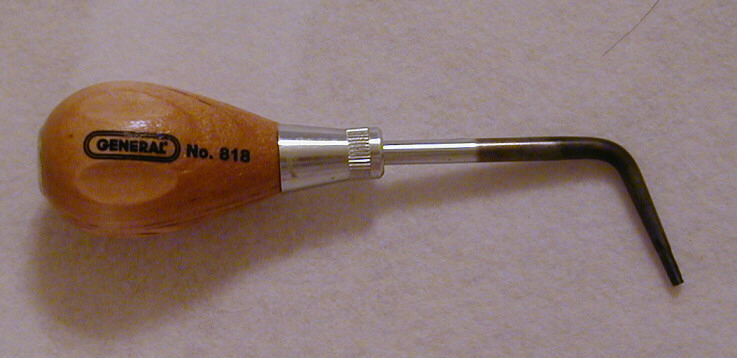
Here's the one I made from a spare Torx driver. I offset the tip in order to center the forces more, and clear the frame better. Pretty snazzy, eh?
__________________
"... Liberty is the seed and soil, the air and light, the dew and rain of progress, love and joy."-- Robert Greene Ingersoll 1894 |
|
|
|
| The following member says Thank You to ithacaartist for your post: |
|
01-05-2014, 12:46 AM
|
#15 |
|
User
Join Date: Feb 2013
Location: Merritt Island, Fl
Posts: 952
Thanks: 777
Thanked 528 Times in 290 Posts
|
This could be employed on a Nambu, but not on a Luger - yes?
|
|
|
|
|
01-06-2014, 03:44 PM
|
#16 |
|
Patron
LugerForum Patron 
Join Date: Mar 2011
Location: Az.
Posts: 2,315
Thanks: 2,750
Thanked 999 Times in 734 Posts
|
Also on a P-38 handgun with it's 2 recoil springs.
|
|
|
|
|
01-06-2014, 05:09 PM
|
#17 | |
|
Lifer
Lifetime Forum Patron
Join Date: Feb 2009
Location: ...on the 'ol Erie Canal...
Posts: 8,208
Thanks: 1,425
Thanked 4,474 Times in 2,343 Posts
|
Quote:

__________________
I like my coffee the way I like my women... ...Cold and bitter...
|
|
|
|
|
|
01-06-2014, 05:35 PM
|
#18 |
|
User
Join Date: Feb 2013
Location: Merritt Island, Fl
Posts: 952
Thanks: 777
Thanked 528 Times in 290 Posts
|
I have "A" P.38 recoil spring, NOS. Anyone can have it for the postage!
|
|
|
|
|
01-06-2014, 09:56 PM
|
#19 |
|
User

Join Date: Jul 2013
Posts: 169
Thanks: 0
Thanked 21 Times in 14 Posts
|
I guess I got lucky. I was ready for such a struggle when changing my Luger spring. Ready to make tools and stuff. I used a punch and it hooked on first try. I will probably not be able to do that again. It was just too easy.
Gun is hundreds of rounds since now and cycling great. |
|
|
|
|
01-07-2014, 04:42 PM
|
#20 |
|
User
Join Date: Feb 2013
Location: Merritt Island, Fl
Posts: 952
Thanks: 777
Thanked 528 Times in 290 Posts
|
Yea, it really wasn't that bad - and I was prepared for a real thrash! Maybe even a broken nail or two...
|
|
|
|
 |
|
|


 Hybrid Mode
