
upload photo | donate | calendar
|
my profile |
register |
faq |
search upload photo | donate | calendar |
|
|
 04-29-2008, 10:10 PM
|
#1 |
|
User
Join Date: Apr 2008
Posts: 6
Thanks: 0
Thanked 0 Times in 0 Posts
|
Luger Forum noob here, 1st post.
After multiple google searches I discovered there are waay more "re-strawing is so easy" posts than actual "how-to re-straw" posts. Got a handle on the theory and gave it a try. Absolutely shocked how nicely small parts color up using a heat gun. (..toaster oven directions got me nowhere, almost gave up). Not molesting a collectable Luger.. picked up one of the Russian battlefield pick-ups back in the early '90s. Protruding frame rails had been very crudely filed when refurbed.. minor pitting throughout, not so minor pitting in a few areas, orig grips replaced by the cheesiest plastic grips I've ever seen. Numbers matching though (except mag) and the bore looks serviceable. Always intended to make it a nice looking shooter. Just getting around to it. Thanks to Luger Forum this pistol is making progress. 
|

|

|
|
04-30-2008, 01:08 AM
|
#2 |
|
Super Moderator
Eternal Lifer LugerForum Patron 
Join Date: Jun 2002
Location: North of Spokane, WA
Posts: 15,979
Thanks: 2,077
Thanked 4,612 Times in 2,125 Posts
|
excellent, job well done!
 welcome to the forum! welcome to the forum!
__________________
Edward Tinker ************ Co-Author of Police Lugers - Co-Author of Simson Lugers Author of Veteran Bring Backs Vol I, Vol II, Vol III and Vol IV |
|
|
|
|
04-30-2008, 10:44 AM
|
#3 |
|
Lifer
Lifetime Forum Patron 
Join Date: Jun 2002
Location: The Capital of the Free World
Posts: 10,156
Thanks: 3,003
Thanked 2,309 Times in 1,098 Posts
|
Photos please... let's see your handiwork! Welcome to the Lugerforum.
__________________
regards, -John S "...We hold these truths to be self-evident that ALL men are created EQUAL and are endowed by their Creator with certain UNALIENABLE rights, and among these are life, LIBERTY, and the pursuit of happiness..." |
|
|
|
|
05-01-2008, 03:03 PM
|
#4 |
|
User
Join Date: Apr 2008
Posts: 6
Thanks: 0
Thanked 0 Times in 0 Posts
|
Hmmmm, procedure for photos is a little different here. Just snapped this Q&D during lunch, let's see if I can make it come up.
Colors not looking too defined on my monitor. More "colored" looking in hand. 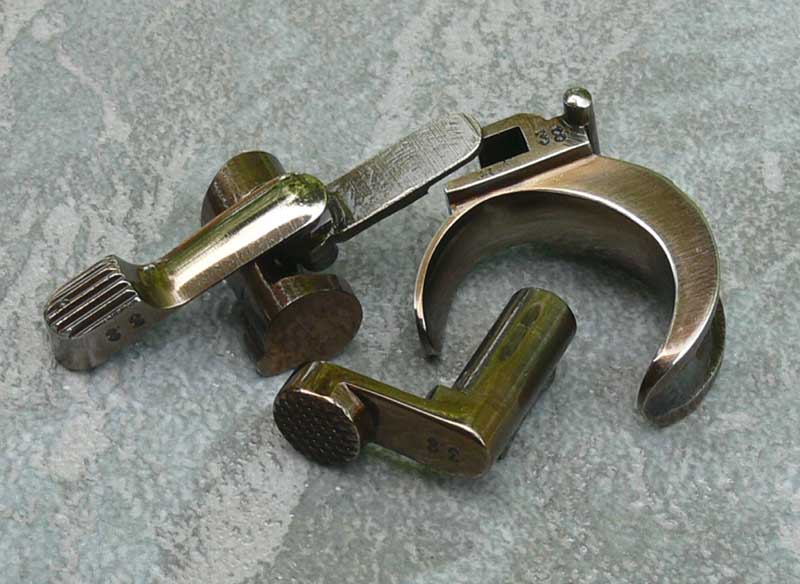
|
|
|
|
|
05-01-2008, 07:28 PM
|
#5 |
|
User

Join Date: Nov 2006
Location: Tennessee
Posts: 186
Thanks: 3
Thanked 15 Times in 11 Posts
|
Danny,
Hot damn! (no pun intended....) I like your results.... I too have been looking for a way to straw parts on my shooter and it seems you've got the job done! I can't wait to give your method a try. Just curious: What type of surface did you put the parts on before you applied the heat gun? Did you "quench" them once the desired color had been reached? Finally, did you apply heat to all the parts at the same time or did you heat them up one at a time? Many thanks, Dave in TN. |
|
|
|
|
05-01-2008, 08:26 PM
|
#6 |
|
User
Join Date: Apr 2008
Posts: 6
Thanks: 0
Thanked 0 Times in 0 Posts
|
My small bits were blued, so I pulled on my nitrile gloves and covered each part (one at a time) w/ Naval Jelly rust remover gel. Blue melts off immediately, used a stiff bristle brush then 0000 steel wool while Naval Jelly was still covering the part. Each part took only a minute or two.
Used sequentially finer sand paper (400 to 800 grit) to smooth out pitted areas, taking care to leave sand marks all running parallel to original sanding or filing direction. Did a final polish w/ semichrome and 0000 steel wool on areas I wanted to "shine up" a bit. (All work by hand to remove absolutely as little metal as possible) Once each part looked good to me I cleaned w/ spray brake cleaner & dried completely. (clean nitrile gloves on again) I held larger parts w/ needle nose pliers, smaller parts w/ tweezers, and warmed each one up (taking care to heat the entire part as evenly as possible) w/ a cheap paint stripper type heat gun. Only took 2-3 minutes for each part to go from cold to hot enough to begin coloring up. I've read that 3-in-one oil works well to quench parts. I had an opened container of brake fluid on the shelf though.. been open too long to use in the car, so.. Sure enough, it did fine. Just filled a glass tumbler half full (don't tell the wife) and dunked each part in once it was a nice honey color. The absolute beauty here is that this colored surface is so very thin that it's easily polished off if you end up going darker than you intended. A polish w/ semichrome brings you right back to bare metal to start over again if you need. Obviously wear proper eye protection, work only in a well ventilated area, don't stick the heat gun in an eye, carry an umbrella at all times, blah.. blah.. blah.. Honestly, life sized in the hand these parts look nicer than they do enlarged on screen. Anyone with enough sense to know which end of the tube the round comes out of can to this. If I can do it... 
|
|
|
|
 |
|
|


 Hybrid Mode
