
upload photo | donate | calendar
 |
my profile |
register |
faq |
search upload photo | donate | calendar |
|
|
#1 |
|
User
Join Date: Feb 2010
Posts: 20
Thanks: 1
Thanked 18 Times in 3 Posts
|
Hi There. *** edited 5/5/2010 -- add a section on cropping and resizing***
I'm new to collecting and have been using this board as a great resource on evaluating items that I've added to my collection. In a recent thread, several members asked for tips on how I take pictures of items I post up here. For example: 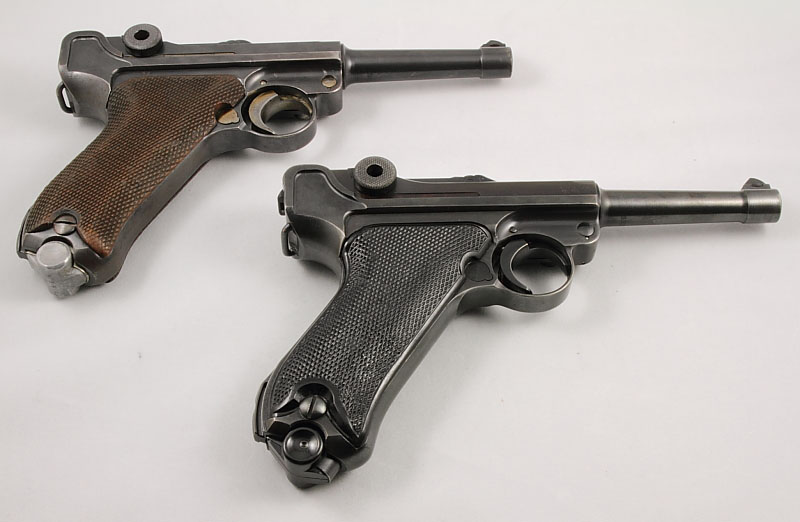 and 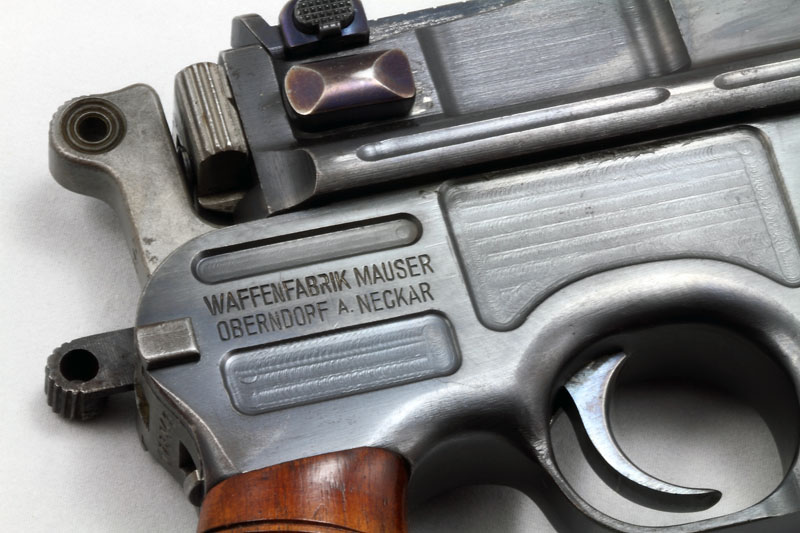 Since the members here have been so helpful in providing information on my firearms, I happy to share with you my technique on taking pictures. The best part is, you can achieve similar results using items around the house! Please note that I am NOT a professional, just someone who likes to dabble with equipment (like cameras and guns  ) I'm sure there are many on this board who can take waaaay better pictures than what I am presenting here. ) I'm sure there are many on this board who can take waaaay better pictures than what I am presenting here.With that being said, here's how I do it. General Overview For me, there are three key elements to getting good close-up photos (sometimes called Macro photography). The three key elements are 1) Indirect Lighting, 2) Use of a tripod, 3) White Balance adjustment. To understand why these elements are key, let's use a typical shot taken with a digital camera. This is typically what you see posted: 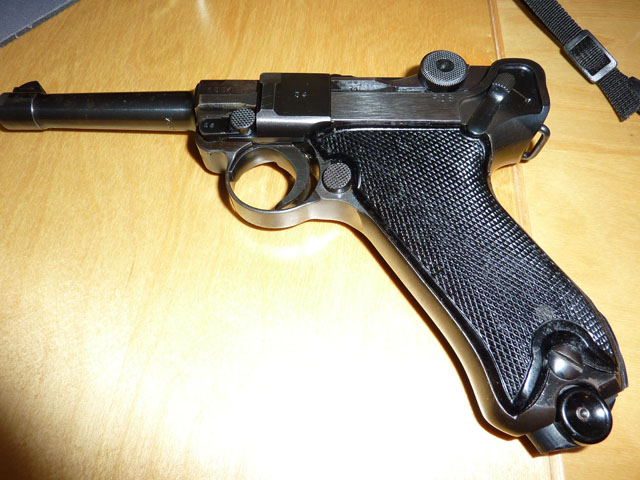 What's wrong with this picture? Well the first problem is that the use of the flash gives it a very "harsh" look. In addition, all of the detail gets blown out, we cannot see any of the serial #s or judge the condition of the finish accurately. Now some people realize they can't get good shots using the flash so they turn it off, resulting in a picture that looks like this: With the flash off, we can at least see some of the details such as the serial number. However, the picture itself is blurry and has a yellow cast to it from the overhead incandescent light. So combining the problems of these two pictures, we need to solve for three elements 1) have enough lighting to properly expose the picture, but not so much that it blows out the detail (like using a flash), 2) keep the camera steady enough to get a sharp picture, 3) make sure that the color is accuartely represented. These three issues can be solved by the elements I discussed above, namely indirect lightning, use of a tripod, and setting the white balance. Use the right equipment Here's my setup: To get good pictures, you need the right equipment......NOT!!! Here's how you can accomplish the same thing using stuff around the house and a regular digital camera. All of the pictures from here on will be taken using my wife's consumer "point and shoot" camera, not my digital SLR. Step 1 -- Make a Light Box The goal of this step is to provide enough light on the item you are photographing, but indirectly. Photographers call this a light box or light tent. The idea is simple, diffuse the light going to the object, accomplishing the task of lighting it up while avoiding harsh shadows. Start with a cardboard box, a moving box is a good size. Cut the box on the left and right sides, and on the top. Now cover the holes using that is white and will diffuse light. A t-shirt, bedsheet, or white kitchen trash bag all work. I used trash bags. At first I did a bag per side, but it was not letting enough light in. I ended up cutting up the trash bag so that only it was only a single layer of plastic for each side. Also put something to use as a background inside of the box. A white pillow cover would work well. Just about any type of fabric inside will work (as long as it does not reflect). Now you have your "light box". Simply light it up using any kind of lamps you might have around the house. I used cheapie "desk lamps" that I bought from Walmart for $9 each. Now place the item you are photographing inside the light box. I have found that a roll of tape to be an excellent item to prop things up. Because it's somewhat sticky on the edges and doesn't damage anything. Luger propped up using a roll of electrical tape: Step 2 -- Setting the white balance Ok here's where we have to get a little technical. Have you ever seen pictures where there seemed to be a yellow cast to the entire picture? this is because the camera could not set the white balance properly. Most consumer cameras have somethign called "auto white balance" as the default. Unfortunately auto white balance doesn't always work. White balance is the key to getting accurate colors in your picture. Below is a series of pictures I took using the different white balance options (auto, daylight, cloudy, indoor light, etc) as you can see none of them are quite right. Fortunately most digital cameras have somethign called "custom white balance" (although not many people know how to use this feature). The idea is, you point the camera at something you define as "white", and then you tell the camera that to adjust it's internal color parameters to make the item you are pointing at white. So for our picture here, I simply pointed the camera at our backdrop, chose the "set custom white balance", and voila, the backdrop turned perfectly white and the color looked accurate. Step 3 -- Position the camera To get really sharp pictures, you will need to make use of a tripod. Since we are not using flash and only indirect lighting, the camera needs to keep the shutter open longer to expose the picture. However, if the camera moves (even just a tiny bit), the result will be a blurry picture. We are not capable as human beings to hold the camera steady enough to get a super sharp picture using this type of setup and with the available light. Camera tripods are really cheap. On ebay I see a new 50" tripod for $12.95 and free shipping. This will work perfectly for our purposes. Place the camera on the tripod and adjust the tripod to get a good angle of the item you are taking a picture of. I like to adjust the angle so that the item I used to prop the gun up is hidden. Step 4 -- Take the picture! I like to use the timer function to actually take the picture. As I mentioned above, any little shake will blur the picture. This way I can press down on the button, start the timer, and then back away from the camera. The camera will count down a few seconds, and then take the pic without me physically touching (shaking) the camera. The final touches -- cropping and resizing Now most of your cameras will take pictures waaaay too big for forum use. You'll need to resize the picture into a smaller size for it to fit nicely in a forum post. I mostly resize my pictures to have a horizontal width of about 800 pixels. To resize the picture you have a variety of options. One option is to resize the picture in a photo editing program (like Photoshop, or Photodeluxe, or whatever software your camera came with). Or, for a quick and dirty resize I really like the program "Image Resizer", which allows you to right click on a photo and resize it right from inside of windows (no separate app needed). You can get Image Resizer (a free program) from here: http://imageresizer.codeplex.com/  The art of the crop One option to consider instead of resizing the entire picture is to crop it first. Cropping means to cut out the part of the picture you want to save. Typically you'll crop the picture, but even the cropped portion will still be too big to share on the forum, so you will still need to resize it. So crop then resize! This is actually an advantage of high megapixel cameras, you can use crop to really zoom in on the details and it will still fill the whole picture. For example, let's use the picture I posted earlier of my setup: Let's say that I only wanted to show you a part of the camera. Well I would use a photo program to crop out all the stuff I don't want.  which leaves us with the following result (after being resized to fit into this posting) 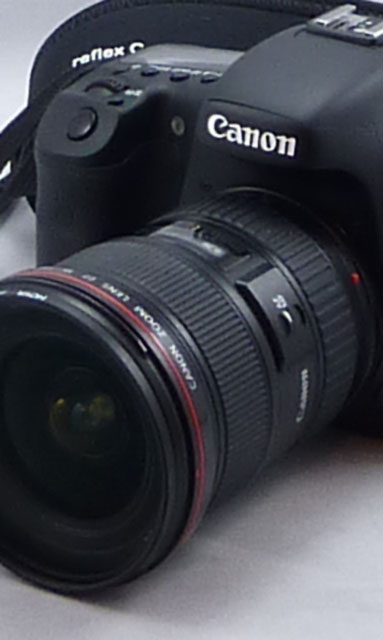 The Final Result So after all of this hard work, let's see the end result!!!! You can see the color looks nice because we set the white balance. I think it looks pretty nice considering I used my wife's cheapy point and shoot and a cardboard box with garbage bags!!!!!  Applying these principles The same principles of indirect lightening, white balance, and tripod can be applied for use without the lightbox (for example, taking pictures of rifles where fitting it into a lightbox is problematic). Here's my rifle photo setup, a cheap shop light pointed towards the ceiling. As you can see these halogen lights throw off a very yellow cast. So we'll need to do the custom white balance again. 1) Grab something white (white box of junk I had handy in the garage) 2) Choose "set custom white balance" on the camera, voila! box turns white! and here's a pic after WB has been set: using my "tape trick" to prop it up the pic: and finally after playing with cropping: 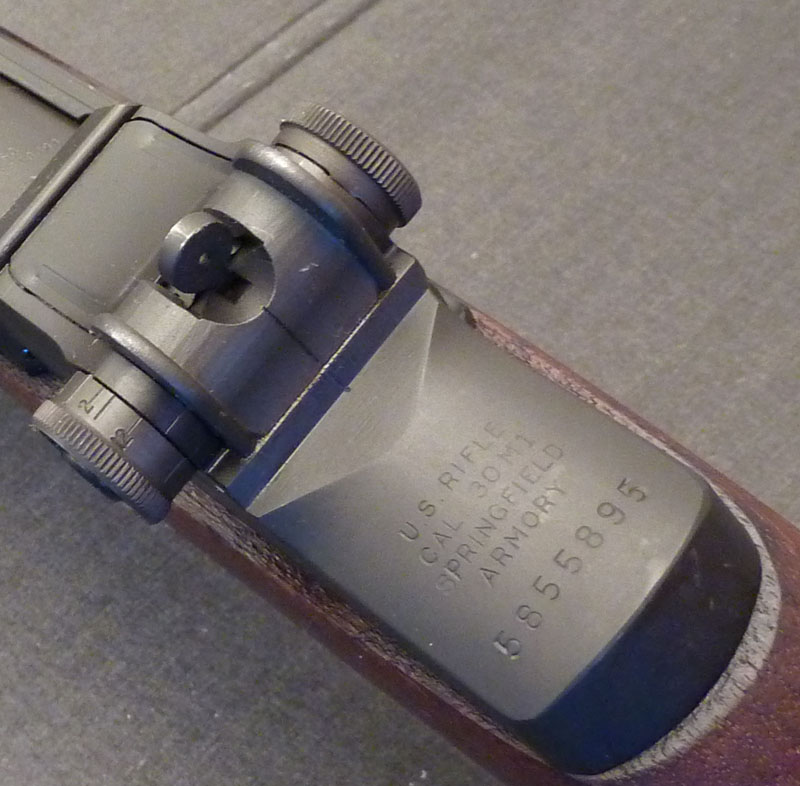 Where to go from here You can apply the techniques here for pretty much any kind of "product" photography. Anything that fits inside of the light box will photograph well be it guns or other stuff: Also, experiment with the background or add "color" to your pictures. I tried to go for a entire "look" with these pictures: 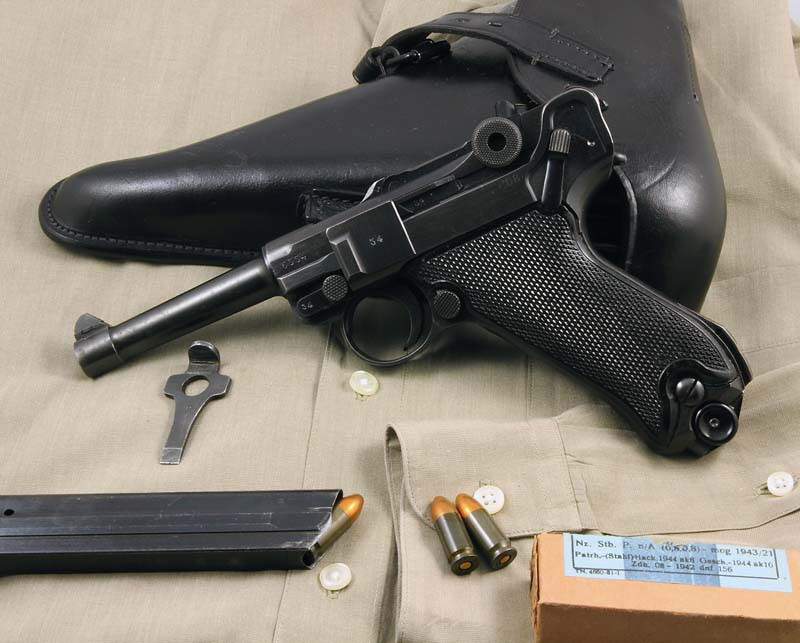 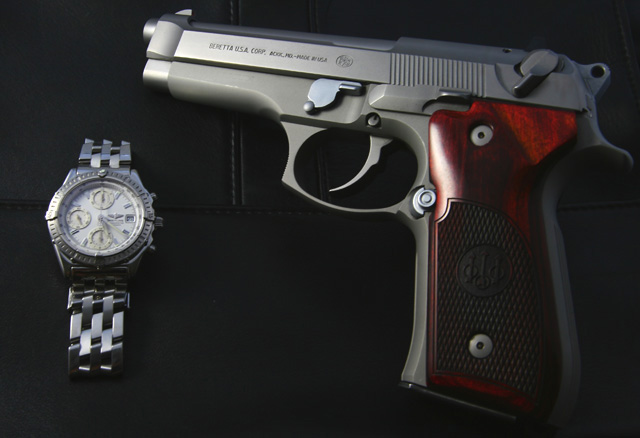 If you end up taking a lot of pictures, you might want to end up investing in a little better light box. I got one that folds up, it was around $59. That way I can set it up and break it down quickly. It comes with several different colored backdrops as well. Finally if you really get into this, then you might consider getting a digital SLR so that you have full control of the camera -- interchangeable lenses, shutter speed, aperature, etc. Well, I hope this helps! Feel free to ask any questions and I look forward to seeing your pictures. 
Last edited by beetledude; 05-05-2010 at 11:30 PM. |
|
|

|
|
|
#2 |
|
Patron
LugerForum Patron Join Date: Mar 2009
Location: Colorado
Posts: 978
Thanks: 68
Thanked 127 Times in 108 Posts
|
Thanks!
Fn |
|
|

|
|
|
#3 |
|
User
Join Date: Jul 2007
Location: US
Posts: 3,843
Thanks: 132
Thanked 729 Times in 438 Posts
|
Cool!!!
Thanks a lot! |
|
|

|
|
|
#4 |
|
User
Join Date: Jul 2007
Location: US
Posts: 3,843
Thanks: 132
Thanked 729 Times in 438 Posts
|
I just realized one fact -- In this era, 50% of selling an ordinary gun online is selling the pictures (another 50% is price/condition ratio). Picture like the following one is hard to sell, even if the item is perfectly fine and asking price is very modest. Especially when it came with "AS IS, NO RETURN" clause.
|
|
|

|
|
|
#5 |
|
User
Join Date: Oct 2005
Location: Upstate New York
Posts: 1,242
Thanks: 121
Thanked 714 Times in 371 Posts
|
Nice presentation Dude.
Yes Alvin I agree, I can't belive the pics peeps put up and expect to sell. I have asked for better pics from some auctions to no avail. There is always some kinda excuse so I move on. If you can't take the time neither can I.
__________________
 Laugh hard and often. Laugh hard and often.Gary |
|
|

|
|
|
#6 |
|
Super Moderator - Patron
LugerForum Life Patron Join Date: Dec 2009
Location: Eastern North Carolina, USA
Posts: 3,911
Thanks: 1,375
Thanked 3,111 Times in 1,511 Posts
|
This is a nicely done article! I've converted it to a .PDF file in case the site would like to post it in the general information section.
Please contact me and I'll forward it... Marc Marc |
|
|

|
|
|
#7 |
|
User
Join Date: Feb 2010
Posts: 20
Thanks: 1
Thanked 18 Times in 3 Posts
|
FYI I added a bit more content and fixed up a few small things. If this site wants it as a PDF please remake it from the new version posted above.
Thanks! |
|
|

|
| The following member says Thank You to beetledude for your post: |
|
|
#8 |
|
Super Moderator
Eternal Lifer LugerForum Patron Join Date: Jun 2002
Location: North of Spokane, WA
Posts: 15,947
Thanks: 2,048
Thanked 4,556 Times in 2,105 Posts
|
I have made this a sticky and moved it to new collectors (with redirect for 3 months)
Well done! Marc, redo, send to me via pdf and if not too big I will post it somewhere... ed |
|
|

|
|
|
#9 |
|
Lifer X5
Lifetime Forum Patron Join Date: Sep 2008
Location: texas
Posts: 708
Thanks: 87
Thanked 522 Times in 201 Posts
|
as i set up a similar system...thanks, tom
|
|
|

|
|
|
#10 |
|
User
Join Date: Aug 2009
Location: Franklin Tennessee
Posts: 119
Thanks: 22
Thanked 10 Times in 7 Posts
|
Beetledude, Great article and thank you for taking the time to explain it. Also where is this presentation going to be stored. Great reference material.
Newluger |
|
|

|
|
|
#11 |
|
Super Moderator - Patron
LugerForum Life Patron Join Date: Dec 2009
Location: Eastern North Carolina, USA
Posts: 3,911
Thanks: 1,375
Thanked 3,111 Times in 1,511 Posts
|
Email sent with revised PDF to Ed.
Marc |
|
|

|
| The following member says Thank You to mrerick for your post: |
|
|
#12 |
|
Super Moderator
Eternal Lifer LugerForum Patron Join Date: Jun 2002
Location: North of Spokane, WA
Posts: 15,947
Thanks: 2,048
Thanked 4,556 Times in 2,105 Posts
|
|
|
|

|
|
|
#13 |
|
User
Join Date: May 2008
Location: south central Kentucky--Tompkinsville
Posts: 33
Thanks: 22
Thanked 5 Times in 4 Posts
|
Beetledude,
Thanks for a wonderful presentation. I learned more about taking a picture and posting to forum from your post than anything else I have previously read. William |
|
|

|
|
|
#14 |
|
Super Moderator
Eternal Lifer LugerForum Patron Join Date: Jun 2002
Location: North of Spokane, WA
Posts: 15,947
Thanks: 2,048
Thanked 4,556 Times in 2,105 Posts
|
I realized I had not added the pdf into this sticky.
Sorry and thanks to Marc E Ed
__________________
Edward Tinker ************ Co-Author of Police Lugers - Co-Author of Simson Lugers Author of Veteran Bring Backs Vol I, Vol II, Vol III and Vol IV |
|
|

|
| The following member says Thank You to Edward Tinker for your post: |
|
|
#15 |
|
User
Join Date: Jun 2010
Location: Northern Kentucky
Posts: 62
Thanks: 1
Thanked 5 Times in 2 Posts
|
Nice thread, thank you.
Bill |
|
|

|
|
|
#16 |
|
Super Moderator - Patron
LugerForum Life Patron Join Date: Dec 2009
Location: Eastern North Carolina, USA
Posts: 3,911
Thanks: 1,375
Thanked 3,111 Times in 1,511 Posts
|
Glad to see the PDF posted. It's a great overview. Hope the PDF makes it easier to download and use...
Marc
__________________
 Igitur si vis pacem, para bellum - Igitur si vis pacem, para bellum -- Therefore if you want peace, prepare for war. |
|
|

|
|
|
#17 |
|
User
Join Date: Jun 2010
Location: Northern Kentucky
Posts: 62
Thanks: 1
Thanked 5 Times in 2 Posts
|
I've been thinking about this thread and just wanted to add a comment. It's been my finding that a good lense is more important than high mega pixles. You're right on regarding proper lighting and using light boxes. At least you've provided food for thought, thanks
Bill |
|
|

|
|
|
#18 |
|
User
Join Date: Mar 2003
Location: Leland NC 28451
Posts: 1,017
Thanks: 1
Thanked 13 Times in 12 Posts
|
"WOW" Thank You
|
|
|

|
|
|
#19 |
|
Super Moderator - Patron
LugerForum Life Patron Join Date: Dec 2009
Location: Eastern North Carolina, USA
Posts: 3,911
Thanks: 1,375
Thanked 3,111 Times in 1,511 Posts
|
Following up on Bills comment, it's much easier to take precision focused pictures using a Digital SLR camera than a point and shoot. With either type camera a tripod and good lighting is essential.
You can eventually get a good sharp well lit picture from a point and shoot camera, especially one that has a "close up" focus setting (it usually looks like a flower symbol on one of the camera controls or it's setup menu). With an SLR set for manual focus and aperture priority (meaning you set the exposure using the lens' "F-Stop" control by hand) , you can exactly see what you'll be getting. The "Megapixel camera wars" are basically "mine is bigger than yours" once your get over about a 4 Mpxl sensor. The sensor determines how large you can enlarge a photograph, or how tightly you can crop it in on detail. It's amazing how many excellent used digital SLR cameras with interchangeable lenses are available used in almost new condition. Local camera shops with a community history are excellent places to look for one. E-Bay can also be a good source, but buyer beware... A few years ago, I picked up an autofocus Macro lens for my Nikon. This is my preferred lens for closeup photography. It really has made a difference. Marc
__________________
 Igitur si vis pacem, para bellum - Igitur si vis pacem, para bellum -- Therefore if you want peace, prepare for war. |
|
|

|
|
|
#20 |
|
Always A
Lifetime Forum Patron Join Date: Jul 2009
Location: Colorado
Posts: 2,417
Thanks: 226
Thanked 2,606 Times in 933 Posts
|
I'd like to echo Marc's advice about using an SLR. I set my Nikon D80 on full manual. Manual focus allows me to get the area of interest in sharp focus, and manual exposure control ensures that blued steel is correctly rendered. I take a few test shots, fiddling with aperture and shutter speeds, until I get it right. Finally, I use a plain white sheet of paper as background, it's amazing the difference this makes. Regards, Norm
|
|
|

|
| The following member says Thank You to Norme for your post: |
 |
|
|