Mark Ds Rust Bluing Solution and Procedures
I am offering this information in the hopes that a few experimenters, like myself, will pick up where I am leaving off and improve both the processes and the rust blue solution recipe that I am presenting in this forum post. I have spent consider time researching and perfecting my process/rust bluing solution and feel that I have done all I can do in this area. I would like to ask that if you come up with any suggestions, ideas or modifications to the solution which improve the rust bluing finish, please post them here for all to read.
Like many collectors, lugers have always had a magical allure for me. I have been fortunate over the last 20 years to pick up a number of shooter grade lugers for my collection. About two years ago, I decided to refinish a couple of these lugers to bring them back to their original look. I began by reading every luger book I could get my hands on as well as browsing the web for information on metal working and rust bluing. I decided early on that metal refinishing is an art and, rather than try to completely restore my pieces, I would focus on refinishing them with very little to no metal reworking as possible. To me, the slight pitting and scratches show the history and character of that unique luger. That path has led me down a very long road of experimentation, frustration, and finally success. During the last couple of years, I had the pleasure of completely refinishing over ten lugers as well as numerous miscellaneous luger parts and trial metal pieces.
Chapter 1 The Solution
I read numerous posts on this very forum that discuss in detail the Bern Browning Solution , the Roy Dunlap Acid Blue solutions, as well as other old homemade solutions. I found all of these recipes to be frustrating in one regard obtaining the chemicals. Many of these chemicals, once common, are considered hazardous and therefore almost unobtainable. After reviewing all of these recipes and failing to locate many of the now hazardous ingredients, I decided to try a different approach. There are several commercially available rust blue solutions out there that give varying results. I found that Brownells Classic Blue Rust solution was very easy to work. I used this solution to rust blue several lugers early on, but found that the finish lacked the dark blue look of the original lugers. It was at this point that I decided to use Brownells Classic Rust Blue solution as my base and would add ingredients to it in order to obtain the elusive luger blue finish.
The first thing that needed to be done was to identify all of the ingredients of Brownells Classic Rust solution and get the percentages (volume or weight) of these chemicals. I contacted Brownells and requested a Material Data Safety Sheet (MSDS) for their Classic Rust Blue solution. The MSDS sheet told me the percentages, by volume, of all ingredients:
Hydrogen Chloride 10.0%
Nitric Acid 5.0%
Hydrogen Chloride 5.0%
Water 50.0%
Ferric Nitrate 20.0%
Ferric Chloride 10.0%
Next, I converted the percentages to weight (grams) so I can use my digital reloading scale to measure out the ingredients that I wanted to add.
A four ounce bottle of Brownells Classic Rust Blue solution contains 108 grams of solution. I then converted the volume percentages to weight (grams):
Hydrogen Chloride 10.8 grams
Nitric Acid 5.4 grams
Hydrogen Chloride 5.4 grams
Water 54.0 grams
Ferric Nitrate 21.6 grams
Ferric Chloride 10.8 grams
Total 108.0 grams
I spent considerable time culling through old rust blue recipes to find what ingredients I could add to make the final finish much bluer. This part of the experimentation spanned a very long time with much trial and error and mixed results. Rather than bore the reader with formulas that didnt work, I will review how I came upon my single ingredient, Sodium Nitrate, and the results it has.
In reviewing the recipes posted in this forum, I was struck by the statement made by
nukem556 on 08-05-2011 when he found that the addition of Sodium Nitrate to his solution made the finish bluer. So, I went on Ebay and purchased one pound of Sodium Nitrate (used for gold processing) for approximately $10.00. There was a hazmat fee, so the total close was close to $20.00.
After trying various amounts of Sodium Nitrate to the Brownells base solution, I found that the addition of approximately twenty percent of Sodium Nitrate gave the results I was looking for a nice dark blue appearance instead of the usually grey/black finish. My exact solution, by weight, is as follows:
- Weigh 45 grams Brownells Classic Rust Blue Solution in a container A (this is approximately ½ volume of the bottle).
- Weigh 33.25 grams of hot water and put into a small container B (used to dilute the Sodium Nitrate, which resembles sugar).
- Weigh 11.25 grams of Sodium Nitrate and add to hot water in container B.
- Lastly, add container B (Sodium Nitrate/Water solution) to container A (Brownells Classic Blue Rust). Seal and shake the solution. You now have 89.5 grams (almost two ounces) of my solution which is enough for one luger.
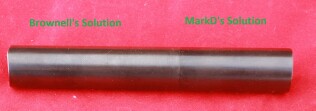
Here is a comparision between using Brownell's Classic Rust Bluing solution straight and my modified solution:
 Chapter 2 Metal Preparation
As mentioned earlier, I wished to refinish, not restore my lugers. So, the first step is to remove the bluing and/or rust. I begin by taking the luger completely apart I separate all coil and flat springs and place aside in a container. I do not remove the barrel from the slide. Since a luger has two large pieces (frame and barrel/slide), I usually do the frame first. When the frame is complete, I then do barrel/slide and the remaining pieces together in the same batch. I found that the luger upper (slide/barrel, toggle assembly, etc.) will all have the same finish if they are done together and in the same environmental conditions. One could argue that the frame should be done at the exact same time, however, that is a lot of work (as you will see). My results also show that there is no tonal difference between the frame and the upper being done separately. I will also note that I do the upper parts immediately after the frame is complete, so the conditions are very close to the same during the entire process.
To remove the bluing, all parts need to be free of dirt and residue. I cannot emphasize enough that once you start this process, you cannot touch the parts with your bare hands. Residual hand oils will stick to the part like glue and will completely ruin a rust blue solution application. Consider picking up at least three (3) pairs of leather gloves. Use one pair for buffing, one pair for solution application and other pair for carding.
I begin by soaking and cleaning all parts with Hoppes #9 gun cleaning solution. This cleans all powder residue as well as most dirt and oils. I then remove the parts from my Hoppes #9 bath and dry them with a paper towel. I then soak all the parts in acetone for a few minutes and then let them air dry. The acetone removes all residual oils and leaves the parts clean and ready to be stripped of bluing.
I have used two different solutions to remove the blue the first (and quickest) is Birchwood Caseys Blue and Rust Remover. I purchase the 3 ounce bottles in bulk (10 bottles at a time) direct from the Birchwood and they will give you a pretty good price on the larger order. The other product I use is listed on the web as Evapo-Rust, a water-based rust remover. I have seen this product for sale at AutoZone, but the price is twice what you can get it for on the web. I have had excellent results with both solutions, but the immersion times are completely different. If you want to tear right into it, use Birchwood Caseys solution, immerse the parts for 5 minutes, remove the parts, rinse them in water. Dry the parts with a paper towel (be careful not to touch the parts), then immerse all parts in acetone for 1 minute and let air dry over night. Note: I usually do this process in the evening after work and it only takes about ½ hour. If you use Evapo-Rust, the process is the same, but I allow the parts to remain the solution overnight it works slower, but the results are the same.
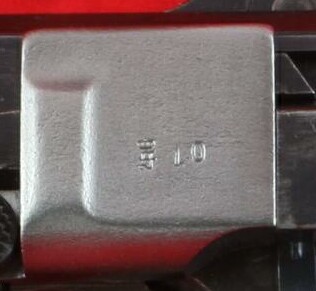
In the morning, you will notice that the parts will have a dull grey color to them. I then use a fine wire wheel for the large parts (frame, barrel/slide). You will find that the grey coating comes off very easily and you will be left with a bright shiny surface. I have not experienced any issues with stampings being removed or edges rounding as I am lightly applying the part to the wheel to remove the coating. For the small parts, I use a Dremel tool with various wire and nylon wheels and bushes to get the grey coating off. Pictured below is a trigger plate that has been stripped of bluing using the above process. Note that the stampings are clear.
 Chapter 3 Solution Application
A very important note there - Brownells states that their Classic Rust Blue solution should be applied within two hours of cleaning the parts otherwise oxidation will occur and cause issues with the first application of solution. I found this to be true (the hard way) and apply the solution to all cleaned parts immediately once they are cleaned.
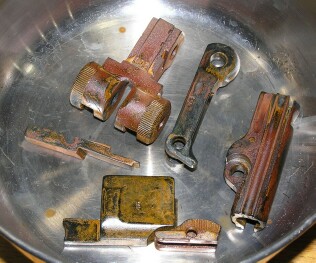
Once your parts have the grey coating removed, you can then apply the first coat of Mark Ds Rust Bluing Solution (for lack of a better term). I prefer to use a wool dauber (again, available from ebay) to apply the solution directly to the part. For the frame and barrel/slide, I like the ¾ dauber and for the small parts, the ½ daubers work great. Using small tweezers or dental pliers, hold the part securely and evenly apply the solution with the dauber. Once the part is coated, I hang it on a small hanger in my basement to dry. After 1 hour, give the part a second coat of the solution (this second coat only applies to this first application of solution). Place the part back on the hanger and let it dry for six (6) hours. In researching, I found that Mauser let their solution dry for six hours between applications, so if it worked for Mauser, it will work for me. Important point - I have let parts dry for longer than six hours (like overnight) and was not happy with the results. Sometimes the finish was too dull, other times it had small spots all over the piece. The only recourse was to start over by stripping off the bluing and reapplying a first coat. After the 6 hours, the parts will have a brown/black rust appearance (see below picture).
The next step is to boil the parts in hot water for 30 minutes to prepare them for carding. I use a camp stove (or turkey fryer burner) with a large stainless steel pot I picked up at a resale shop. I place the parts in the boiling water, cover the pot and let them boil vigorously for 30 minutes. After 30 minutes, remove the parts, remember they will be HOT, and place them on a clean stack of paper towls to dry. Remove any excess water in the by dabbing the parts with a clean rag or paper towel. You will notice that the parts will have a very heavy black oxide coating on them. This coating has to be removed by carding.
Chapter 4 Carding
I use 0000 steel wool for the carding process. The key point here is the steel wool must be cleaned before using in order to remove the oil that the manufacturer sprays on the steel wool to prevent it from rusting. I use a glass jar, fill it ½ way with acetone, drop in one or two steel wool pads, cover and shake. I then remove the pads and let them air dry for a few hours before use. When I do a luger frame, I use one pad for each carding session. When I do a luger upper (barrel/slide and small parts) I use two pads per carding session.
Once your boiled parts have cooled, rub them with the cleaned steel wool. Again, it is imperative that no hand oils get on the part, so I hold them using yet another leather glove dedicated for this part of the process. As you start rubbing with the steel wool, you will notice that the dark black coating will start to be removed and you will be left with a very nice blue color. It is important to clean all areas of the part, so you may need some small Dremel bits (nylon or steel) to get into these cracks and holes. I do not recommend that you use the Dremel tool itself as the high rpm may remove the coating and youll be left with the shiny metal you started with. Use the Dremel bits with your hand to manually remove the black coating. Its takes a while and a bit of practice, but once you get a system down, you can remove the oxide coating pretty fast. I also found that carding off the first application of the solution is the most labor intensive. Subsequent cardings on the parts go much quicker and easier.
Now that all the parts have the black coating removed, you will find that they have a very nice blue finish. Now, its time to repeat solution application process by recoating the parts with Mark Ds Rust Bluing Solution and letting them air dry for another six hours. After the six hours, boil the parts and card again. I apply of 5 coats of solution in order to obtain the finish you see the pictures. I have applied up to 8 coats, but saw no appreciable change in the finish to warrant the extra work. As you can tell, the process is takes some time. I usually figure 5 to 6 days to do a frame and then another 5 to 6 days to do the upper luger parts. If you skip a day or two between solution applications, that is not a problem. Just make sure that the black oxide coating is completely removed from the parts between applications.
When I am satisfied with the finish, I soak all parts in water displacing oil (available from Brownells). This very light oil does a molecule by molecule replacement of any residual water on the part and prevents your final finish to become rusty brown. Once the part is removed from the water displacing oil, I let drain for a few hours and then spray the parts with Remingtons Rem-Oil. I usually let the parts cure for 3 to 4 days before assembling.
Chapter 5 Straw Bluing
There is a great sticky on the Refinishing forum about strawing parts and I use that process. All parts are cleaned, stripped, and wire wheeled as mentioned above. I place a clean cookie sheet (I have one just for this) on the top rack of the kitchen stove and turn the temperature to 450 degrees. When the stove and cookie sheet are up to temperature, I carefully place the parts on the cookie sheet. Close the stove for 6 minutes. Remove the parts and cool them down with household oil. Thats all there is to it.
Chapter 6 Nitre Bluing
Nitre bluing is a hot blue (500-600 degrees F) process that I use to blue the grip screws and upper toggle pins. It is not required, but gives that nice transparent blue color to those parts. Nitre bluing is beyond the scope of this post as I mainly wanted to get the solution recipe and process out there.
Summary
I am sure there are a lot of comments that can be said about my process and hopefully you will add any ideas, suggestions and findings to this post. If you have any questions, please feel free to email me via a PM on the forum.
Thanks and good luck,
MarkD