I posted this picture earlier but I need to post it again as a reference for this post:
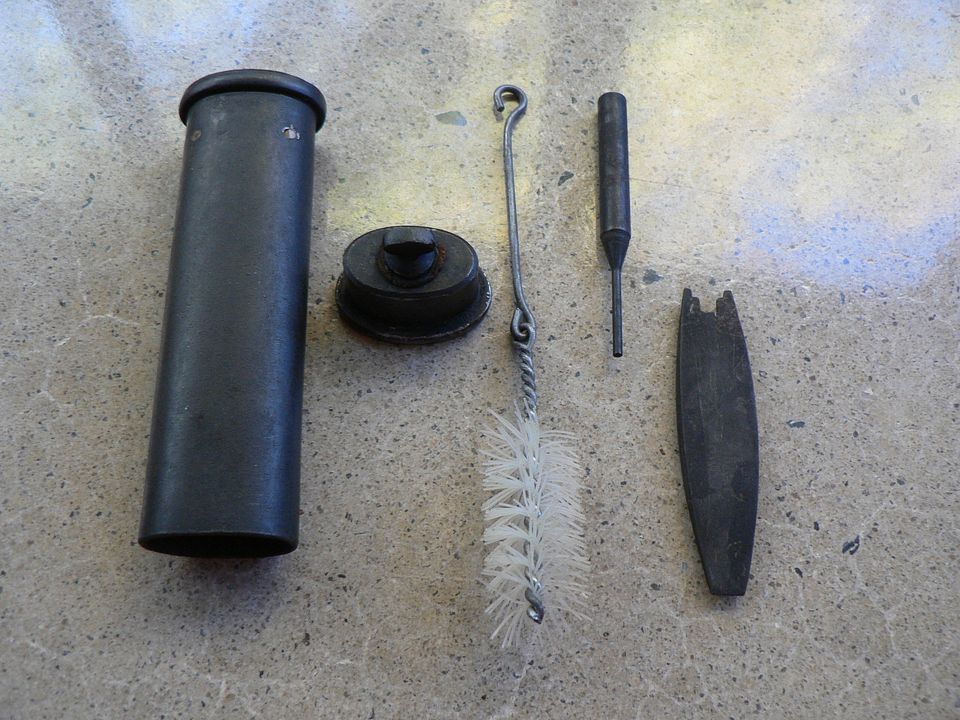
Above is the proper contents of the maintenance kit. We've already looked at the case and the oiler so now we need to look at the tools.
Of the five kits we're looking at in this article, one of them was missing the pin punch unfortunately:

They are just tiny little things, necessitated by the need to fit into the case. Measuring in at about 2 3/8", this tool is used to remove the various pins holding parts in place. Parts such as the extractor, loaded indicator, barrel link, the entire ignition system carried by the mechanism support, etc. Notice how each one is a little different.
A rear view showing clear proof of being turned on a lathe:

They were made for function, not for looks.
Next up are the screwdriver blades. Here's one side:

And the other side:

You'll notice the differing stamps on them. Whether these are final inspection marks, makers marks, or both, I don't know. Sometimes, they are marked on one side, sometimes both sides, and sometimes not at all.
The standard end is used to remove the grip screws. The specialized end is for removing the trigger axle (which also holds the disconnector and magazine safety levers in place) and disassembling the magazine catch. While the markings on the blades vary, the specialized end is finely machined and exactly the same on each blade for obvious reasons. Here's a closeup of the specialized end:

In case you're wondering, this also fits various screws and nuts on a MAS 36 rifle.
Here, we see it engaged with the trigger axle:

As expected, it is a very precise fit.
And here, with the magazine catch button:

Unlike a Model 1950 Pistol, these bits are not peened in place on the 1935S, so they should be somewhat easy to disassemble. But one wrong move ends up with a bunged up part so we aren't disassembling these bits. If you want to see what they look like disassembled, experiment on your own pistola!
The last tool in the kit is the articulated bore brush. I've laid all five out here:

The bristles on these range from very stiff to very compliant. And that's not the only difference. Even a cursory examination reveals that the wire is of differing thickness.
Additionally, the braid on different brushes is wrapped in different directions:

And the loop at the end of the handle differs from brush to brush:

The above pictures are ample proof that a number of companies were making these things. Also, they are so obscure that I'm confident that no one is faking them. If they were WWII German, yes. Post war French, not a chance. These things might be ridiculously rare but they are also almost completely unknown unless you are a total French nerdo such as myself.
The brush is just a tad longer than the barrel:

So, the way you use this thing is to insert the end of the handle into the chamber and slide it in until the bristles come up against the rear of the chamber:

Then, you use the tip of your index finger to push on the end of the bristle portion until it's even with the rear of the chamber:

At this point, the looped end of the handle is poking out of the muzzle:

Then, you simply grasp the loop and pull the brush through the barrel and out the muzzle end. Here, we see the bristle portion pulled part way out of the barrel showing the difference between the diameter of the bore and the diameter of the brush:

If you've followed the instructions in the manual, cleaned your barrel immediately after firing that old corrosive ammo and cleaned it well, you'll end up with a bright and shiny bore:


So that's it for the maintenance kit. In the next post, we'll look at some seldom encountered early holsters for the PA35. I hope you're enjoying this, and I also hope to see you then. Bye for now!