Great initiative paolo.orange! Thanks for posting that. Very interesting

I'm also into photography, but only on hobby basis. I find it just as cost draining as Luger collecting, with the endless amount of accessories available.. Since Iâ??m mostly into shooting nature scenery, so I wanted to use what I already have to make setup for this.
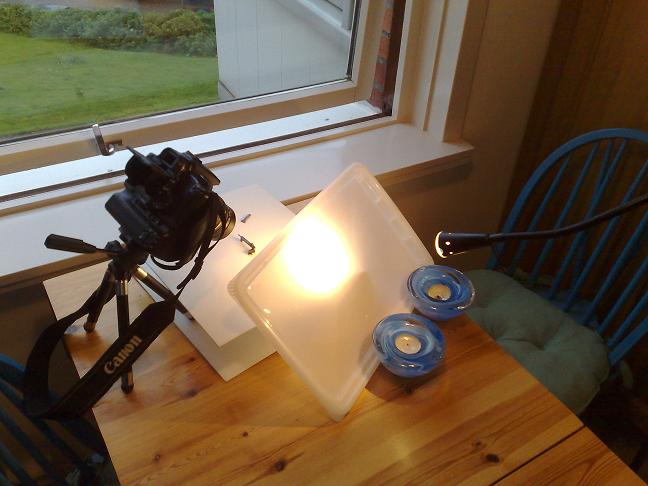
So here is my shot at a poor mans macro lens;
*Digital DSL camera (I prefer a DSL when shooting makro, not because of the quality/resolution, but for an easier access to manual adjustments, as depth, sharpness and shuttertime..
*â??wide angleâ?? lens, in my setup, I used the low cost Canon 17-55mm that came with my camera
*Canon 50mm f1.4 USM lens, this could be any lens. But I would look for a f1.4 to catch as much light as possible, preferable in the 50mm area. (Perhaps look for an a used one with the proper diameter, since it does not need to have auto focus)
*Macro coupler ring, there is no brand on mine. I bought it cheap from China trough Ebay. The ring is mounted outside the lens and allows you to screw on a second lens, in my case the 50mm, opposite way on the 17-55mm. Head to head. This ring came with a wide angle â??lensâ?? to screw on any lens with the proper diamenter. But the distortion was terrible, therefore I would recommend to find just the ring instead the â??wide angle kitâ??.
*Tripod, the small ones are often crappy (but cheap). I super glued mine so that it can only be adjusted up-down. It made it more stabile.
*2xteleconverter. Mine is not, but you can find these also cheap trough Ebay. Autofocus usually donâ??t work anyway.. This is a ring mounted between the camera and lens, witch makes a 17-55 into a 34-110mm
*light source. Strong lamp, external flash (if flash, set it low!), sunlight.. whatever you have. You will probably want to adjust the light angle, so make sure your setup is adjustable that way.
(*you could also add a close up filter, I donâ??t have any yet, so I donâ??t have much experience with them. Basically because I like to have the object further away from the lens, but for those of you who want to take picture of unit marks or a stamping, it would be a good alternative.
I have heard that if using several at the same time, the strongest shall be placed closest to the lens. But keep in mind that itâ??s best to have as little glass as possible, no matter how good the quality may be. Hama and Hoya have some of these)
The setup;
1.Install the tripod, screw on the teleconverter, then the zoom lens, macro coupler ring and then the 50mm lens 'wrong way' on.
2.Find a place with good lightning, close to a window and an adjustable light/flash on the other side can be sufficient. To to have an equal light on the object, you can send the light trough light fabric or like I did, a white plastic lid.
3.Then find the background you would like to have, gray can be nice. On the picture below, I used a paper cover because of the pattern found on it. Thought that would help the background look more diffuse. Place it in the right distance from lens, you can use books or whatever you like.
4.Look trough the viewfinder and adjust both distance, angle to object and light angle until you are happy with it. Look at the shadows, make them as good as possible. If trouble with reflection somehow, you can use a polar filter to eliminate it. (You will find it in your photobag, if not, you should find it in any shop that sells DLS's. Very neat thing to have.. )
Taking the picture;
1.Set the camera to Av (Aperture priority)
2.Use a high diaphragm, like F8
3.Zoom in on the object
4.If â??as close as possibleâ??, lock the focus to as close at it gets, then move the camera away from object until it gets clear and then starting to get unclear again. Then adjust the focus until it is perfectly clear. If not using a tripod, adjust only by moving the camera.
5.If you have a lot of light, set the ISO down towards 200.
6.Then start taking pictures with various shutter time. If you have a remote, ir or cord, thatâ??s a good thing to have. Since we now have digital cameras, you can take many pictures. Start with long or short shutter time and go step by step down or up. If you take it in a increasing/decreasing order like that, itâ??s much easier to find the best picture once you get it on your computer.
7.Then you can play a little with it in Photoshop, Pain Shop Pro or a similar program. I usually end up playing with all the effects until I realize that simple is often the best. Hue, saturation, brightness and contrast + cutting it to a proper size and resize it down reasonable size, without loosing too much quality.